|
Products
Database Search Solution (New Version) Search Control SEO Pager Highlighter Shortcut Controls Crypt Package Free ASP.NET Controls
Geotargeting Component ASP.NET Media Player Control Flash Video Player Control Services
ASP.NET Telecommute Jobs Free IP Location Lookup Test .Net Regular Expressions CSS/Table/DIV Page Layouts Custom Programming Article Sites Master List |
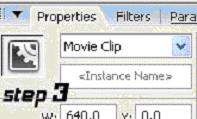
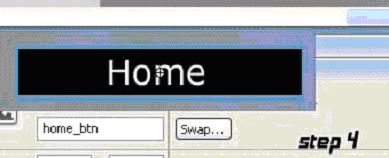
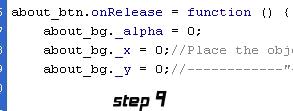
Animating background slides using ActionScript - Tween ClassThis tutorial will teach you how to change, via Action Script, the background of your website when entering a new section. It also contains an in-depth analysis of an extremely powerful tool that Flash has to offer, the Tween Class. Hello and welcome to my tutorial on using AS to dynamically animate the background of your site when entering a new section. I may be referring only to slides in this tutorial, but the lesson you will learn here will enable you to animate anything from buttons to menus. Without further ado, let us begin. Step 1 - Importing the background pictures that you will useYou first need to import the actual slides that you want to use. To do that you need to go File >> Import >> Import to library and navigate to your pictures. I have already redimensioned mine using Adobe Photoshop to 640x480 px. Step 2 - Creating Movie ClipsIn order to animate the pictures using AS they must be converted to movie clips. So, bring all the pictures out of the library (if, by default, your library isn't visible, hit CTRL + L) and onto the stage. Select them one at a time and hit F8. A dialogue box appears, asking you to name the new object and choose its type. We choose Movie Clip as the type. Be sure to registrate the movie clip by the upper left corner (see pic1 for details).  TIP: Always name your clips accordingly. I have named mine home_bg, about_bg, contact_bg and gallery_bg. Step 3 - Giving the movie clips instance namesAnother condition of animating through AS is, that all objects need to have an instance name, something by which they can be called upon in the code. To do this, click a movie clip and then look down, at the properties panel. Under the type of the object (in this case Movie Clip) you will find a text box that allows you to introduce an instance name(picture 2).  Give your movie clips the following instance names: home_bg (for the home bg slide), about_bg (for the about bg slide), contact_bg (you got the picture) and gallery_bg. Step 4 - Creating buttonsNext we need to create buttons to control the movement between different sections of the site. Create a new layer and four new buttons (if you want to be fancy, go right ahead, but simple white text on a black rectangle will suffice for the purpose of this tutorial || you can use the symbol button if you want... I am used to making all of my buttons in the form of movie clips), and then give them the following instance names: home_btn, about_btn, contact_btn and gallery_btn.  Step 5 - Last preparations before going into Action ScriptPlace all your background slides like this: the home slide... on the stage at x = y = 0 px. Put the other 3 slides around, anywhere off of the stage. Make sure all your objects (buttons and slides) have the appropriate instance names. We are ready to enter the realm of AS. Create a new layer and name it actions. Click the first frame and hit F9. This opens the actions panel. Step 6 - First step into ASFirst you need to import the Tween Class into Flash. To do that you need to type : "import mx.transitions.Tween". To use the Tween Class you also need the easing class, so you need to import that as well. So, on the next line, type "import mx.transitions.easing". This is a standard step to use the tween class so try to remember it as it is. Don't forget to end your statements by using the semicolon (";").  Step 7 - Variable initializingThe type of animation that we are after requires the tweening of two movie clips at once. A movie clip that fades in and another that fades out. For that to happen, we need to initialize a variable with the current page... the home_bg slide. This variable will be actualized every time we click a button. We will see that later. For now, let's create a new variable: currentPage. Make it a string and initialize it with "home_bg" (without commas).  Step 8 - Assigning code to buttonsOk, so it's time to code the buttons. Do not worry that you will have to write a lot of code. Writing it once and the copying and pasting it in place, with some minor adjustments, will be possible. So... when the a specific button is released, we want the current page to fade out and the section we wanted to go to, to fade in. For example... if we were on the home section and we clicked the button labeled "about" we want the home slide to fade out, and the about slide to fade in. "Well how do we do that?" you might ask. It's really quite simple once you get the hang of it. Let's get to it (I am going to work with the about section... and after that I will teach you how to create the code for the rest of the buttons): We want the animation to occur when we click a button so the first line is:  We will put all of our code inside the two curly brackets of this function. Step 9 - Positioning the slidesRemember that we put all of our slides on the "slides layer", outside of the stage? Now we need to transfer them onto the stage. That means we will have to alter the "_x" and the "_y" properties of the slide that is fading in. Also, for the animation to look smooth, we need to set the initial alpha of image that is going to fade in to 0.  Step 10 - Finally animatingOK... so you made it here. Animating isn't that hard; you just need to remember the exact order of the elements that you have to introduce. First we need to declare a new Tween for the current page, the one that is going to fade out:  We have declared our first Tween. Now, between those two parentheses we need to introduce 7 parameters. I am going to list them here, detail them and then we will particularize them for our transitions:
Now it's time to get back to our example. We said we would first fade out the current page:  The property that we want to tween is the '_alpha' property:  I am going to go for a strong easeIn as my easing method, so:  Beginning value: the picture starts at 100 alpha, so that is what I am going to introduce. The ending value is, of course, 0. I want it to take 15 frames so I'll go for 15 for the duration false for the last parameter.  There... you have completed your first dynamic tween. Now we will create another tween, for the section that fades in. The only things that will change are the name of the tween, the object id and the beginning and end values, which will switch places.  Step 11 - Last oneNow that we have completed our tweens, we need to update the currentPage variable, which will become about_bg. Tutorial toolbar: Tell A Friend | Add to favorites | Feedback |

