|
Products
Database Search Solution (New Version) Search Control SEO Pager Highlighter Shortcut Controls Crypt Package Free ASP.NET Controls
Geotargeting Component ASP.NET Media Player Control Flash Video Player Control Services
ASP.NET Telecommute Jobs Free IP Location Lookup Test .Net Regular Expressions CSS/Table/DIV Page Layouts Custom Programming Article Sites Master List |
How to Create and Work With Windows Services in C#What are Windows ServicesWindows services are executable applications that run in background. They are controlled by Service Control Manager(SCM). They can be started, paused, re-started manually. A service can run without any user being logged on to the computer. Typically, Windows services start when the Microsoft Windows operating system is booted and runs in the background as long as Windows is running. These features make services ideal for use whenever you need long-running functionality that does not interfere with other users who are working on the same computer. Basics of Windows ServicesTwo classes are required for implementing window services. 1. System.ServiceProcess.ServiceBase 2. System.Configuration.Install.Installer ServiceBase ClassThe ServiceBase Class provides following important methods: 1. OnStart: 2. OnStop: 3. OnPause: 4. OnContinue: 5. OnShutdown: The ServiceBase class has following properties: 1. AutoLog: 2. CanHandlePowerEvent: 3. CanHandleSessionChange: 4. CanPauseAndContinue: 5. CanShutdown: 6. CanStop: Installer ClassThe Installer Class provides the foundation for custom installations. This is the base class for all custom installers in .NET framework. It helps install applications on a computer. Example of Windows Service: Implementing File Watcher using Window Services in C#When this service is started, it monitors a Folder constantly whose path is specified in app.config file. This service writes an entry to a file whenever any file or folder is created, deleted or renamed. Creating and configuring your serviceTo create a new windows service project open Visual studio and Click File menu ->New -> Project and select Visual C#-> Windows -> Windows Service Project type. Name this project as FolderWatch 1. Click designer to select service1.cs. (press F4) Then in properties window change the ServiceName and Name property to FolderWatch. 2. Set AutoLog property to True. 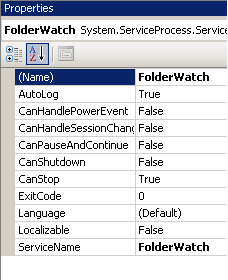 3. Open program.cs and edit the Main method to create an instance of FolderWatch. ///
<summary> 3. Open Service.cs to implement OnStart() and OnStop() methods. These methods are automatically overridden when you created the project. You can also override other methods like OnContinue(), OnPause() and OnShutdown(). public
partial class
FolderWatch :
ServiceBase 4. Open service1.cs in design mode and from Toolbox select FileSystemWatcher control and set its name property to FolderWatcherTest. 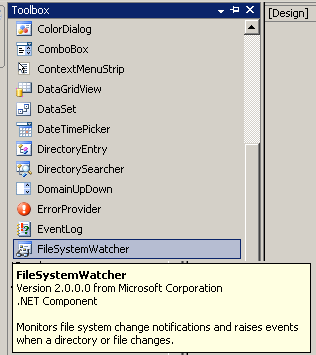 5. Go to FileSystemWatcher control's properties and give the path of folder which needs to be monitered. Or you can set this path in app.config file of your project and specify this app.config path in OnStart event of your service. 6. The FileSystemWatcher provides following events to be handled. 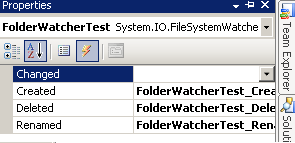 7. These events are implemented in service1.cs class as shown below. private
void FolderWatcherTest_Created(object
sender, System.IO.FileSystemEventArgs e) Here whenever any Folder/File is created, deleted or renamed it writes an entry in a file using a Textwriter object. 8. When installing windows service some custom actions need to be performed which can be done with help of Installer Class. Visual studio creates these installers for a window service and adds them to your project. Create Installers for your Service1. Go to Service1.cs in designer mode .Right click and click Add Installers to add Installer Class. 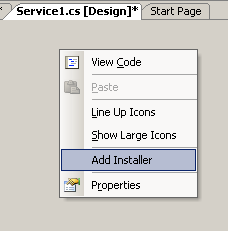 Or 1. Go to Properties of Service1.cs class. Click the Add Installer link. 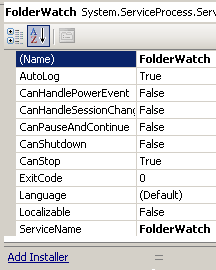 2. When you click Add Installer visual studio adds two components to your ProjectInstaller.cs class. serviceProcessInstaller1 serviceInstaller1 The most important property is Account within the ServiceProcessInstaller class. It specifies the Windows account under which the service runs (security context). The following options are available: LocalService: Service presents the computer's credentials to remote servers. LocalSystem: Service presents anonymous credentials to remote servers. NetworkService: Service has limited local privileges and presents the computer's credentials to remote servers. User: A local or network account is specified. You may specify the necessary username and password via properties, or you may type them during installation. The Service uses the security context of the specified user account. Following three options are provided to specify how your service is started. Manual :- The user starts the service. Automatic :- The service starts automatically when the system starts. Disabled :- The service is not available for use. 3. Go to Properties of serviceInstaller1 class and set ServiceName to FolderWatch and StartType to Automatic. 4. Go to Properties of serviceProcessInstaller1 and set Account property to LocalService. This causes the service to run on local service account. How to build your windows service project1. Right click your project in solution explorer and click properties. 2. From Startup object list select FolderWatch.Program 3. Build your service from Build Menu and select Build FolderWatchService. Or press Ctrl+Shift+B. How to install windows service1. Open Visual studio command prompt utility from Start->Programs. 2. Go to the Folder where your project’s executable (.exe) is present. (Generally present in your working folder’s bin/debug folder) 3. Run installutil command to install your service: Installutil MyService.exe 4. To Verify that your service is installed go to Run and type services.msc. press Enter. Find your service in services list. How to UnInstall Windows Service1. Go to command prompt and run Installutil /u MyService.exe Instead of manually installing your service you can create a set up and deployement project for your service and create a .MSI package and install your service by running your .msi file. This tutorial is written by DotNetFreaky. Tutorial toolbar: Tell A Friend | Add to favorites | Feedback | comments powered by Disqus |

