

Products
Database Search Solution (New Version) Search Control SEO Pager Highlighter Shortcut Controls Crypt Package Free ASP.NET Controls
Geotargeting Component ASP.NET Media Player Control Flash Video Player Control Services
ASP.NET Telecommute Jobs Free IP Location Lookup Test .Net Regular Expressions CSS/Table/DIV Page Layouts Custom Programming Article Sites Master List |
Adding Some Style To ASP.NET 2.0 PagesThese days layout is very important. ASP.NET supports CSS and adds its own Themes and Skins which provide control based style elements. Uniform layout on your whole site can be guaranteed by using Master Pages. Master PagesA professional Web site will have a standardized look across all pages. It can be difficult to maintain a standard look if you must always put the common pieces in place with every single web for you build. A Master Page defines the look and feel and standard behavior as a template for all the pages (or a group of pages) in your application. Your Web form only needs to define the unique content itself and this will plug into specified areas of the Master Page layout at runtime. To create a Master Page right click on your folder in the Solution Explorer > Add new Item > Master Page. On first sight you would say it's a normal Web form with the standard HTML generated. The differences between a normal Web form are the Master directive (<%@ Master ...>) and a ContentPlaceHolder where the content of your web form will be placed.  Around this ContentPlaceHolder you can create your template which will be used for all the pages you assign this master too. It is possible use more than one ContentPlaceHolder, but don't forget to use the different ID's in your Web form too. To use a Master page at the creation of a new Web form you'll have to select the checkbox 'Select Master Page' while creating the new Web form (Add new Item > Web Form). This web form will be created with a link to your Master Page in the Page directive and all basic HTML tags will be replaced with a Content control for each ContentPlaceHolder in your Master Page. 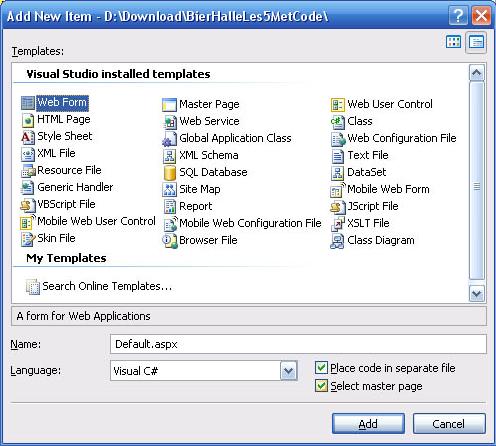 <%@
Master Language="C#"
AutoEventWireup="true"
CodeFile="MasterPage.master.cs"
Inherits="MasterPage"
%> Master Pages can be nested by adding a link to the other Master Page file in the first one's Master directive. If you want to use your Master Page for the whole site it can simply be done by adding <pages masterPageFile ="~/SiteTemplate.master" /> to your Web.config file. The title for your page can be set in your Page directive or be placed into the Master at runtime. Metadata can only be placed at runtime. The best place to do this is the Page_Load event. In case you have controls in your Master Page that has to be accessed by your Web form, you can do this with public properties and methods in your Master Page file. Now you'll be able to access the controls in your content page, but without IntelliSense. To enable IntelliSense for these controls you'll have to add the virtual path of your Master Page file to your Web form (.aspx file). protected
void Page_Load(object
sender, EventArgs e) Using CSS in ASP.NETTo add a CSS file to your website you can do this by Add New Item > CSS. Cascading Style Sheets work together with HTML tags, not with ASP.NET controls and are implemented by the browser. If you want the style elements to be applied on the ASP.NET web controls you'll have to use Themes/Skins. Themes and SkinsA Skin is a server side stylesheet, each stylesheet has the extension .skin. A Theme is a group of style-related files (css, skin, resources like images) and needs at least one skin file with the standard properties for your controls. It's possible to add several skins to one single control by changing the SkinID. Place the Themes in the App_Themes folder of your project. To add a new theme/skin, right click and Add New Item -> Skin File. This will create a skin file and if it's the first skin file also the theme folder in which it will be placed. To use the skin file on a certain page place the theme in the Theme property or add it in the Page directive. This might give conflicts with style you've assigned to certain controls. The conflicts are solved in this order: Theme goes first, then CSS style, then the control defined style. If you plan to use a certain Theme for several pages or even your whole site, consider placing a link to the Theme in your Web.config file. This can still be overloaded by using the Page directive in case you want a special Theme for one singular page. You can go even further by automatically assigning themes by using a DropDownList and sessions. This way the user can choose his own theme. protected
void Page_Load(object
sender, EventArgs e) Using DivsTo conclude this tutorial a small view on the eternal discussion between tables and divs. It's a fact that tables are around longer than CSS and it's rather easy to position your things. But tables were meant to output large sets of data in a nice way, not to design your site. In fact using loads of tables makes your page slower to render. Also all positions are relative to eachother when using tables, this might sound good, but can have downsides too. It's also easy to forget a tag, with all consequences added to it. Pages created with divs aren't only smaller (and render faster most of the times), there are a nice step forward to the future since divs stick closer to XHTML and XML. Whenever you feel like changing your layout, you only have to mess around with your css file and your whole site is restyled. Imagine changing the table layout on a 30ish pages, one by one. There is a small downside to divs too though. Some browsers have an own opinion about interpreting and implementing css files and refuse to follow the W3C standards. So use divs whenever you can and fall back on a table when it's really needed. There is Sample Adding Style Visual Studio Project, used in this tutorial. This tutorial is written by Assesino Tutorial toolbar: Tell A Friend | Add to favorites | Feedback | |