Products
Database Search Solution (New Version) Search Control SEO Pager Highlighter Shortcut Controls Crypt Package Free ASP.NET Controls
Geotargeting Component ASP.NET Media Player Control Flash Video Player Control Services
ASP.NET Telecommute Jobs Free IP Location Lookup Test .Net Regular Expressions CSS/Table/DIV Page Layouts Custom Programming Article Sites Master List |
Building a Simple CMS for your static website in ASP.NETProblem StatementIt is interesting to note that most of the websites over the internet are small websites with 10-100 pages of static html content. And, in most of the scenarios, its not easy to update those websites by their webmasters or owners. Converting a simple static website into a CMS is not a very good idea unless you want to spend a lot on your static website. Proposed SolutionA simple solution to this problem is to install a generic file manager script on your website so that a website owner could.
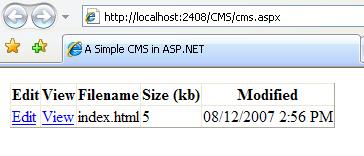
About this TutorialThis tutorial elaborates the technical aspects of implementing that CMS in ASP.NET using C#. The tutorial is for beginner-level ASP.NET developers to induce their problem-solving capabilities in ASP.NET. It can also act as a good case study for learning ASP.NET. Screenshots and code snippets are mentioned where-ever necessary. Moreover, you can also download the complete CMS VS 2005 Project Files. Let's start. Reading the list of files and folders on your web server.
It's very easy to read information on directories or files on a given directory on web sever.
The class used for this purpose are DirectoryInfo
and the methods are GetFiles and GetDirectories. DirectoryInfo
dirInfo = new DirectoryInfo(MyDir); Here, MyDir is a string variable that contains absolute path of the directory (whose files and folders we like to browse). Now the arrays of DirectoryInfo and FileInfo are populated with respective data. It can be iterated and used. Using DataTable in a GridViewWe can iterate the files array, can filter only html files, and we can also write this into a DataTable. First we've to add columns into our DataTable and then we've to add rows into it. See the following code for that. DataTable dt =
new DataTable(); Connecting our DataTable with a GridView is only two lines away.
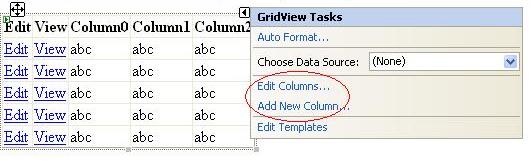
We just have to call GridView.Datasource with our DataTable and then we've to call GridView.Bind function. Customizing GridView to show correct links of view and edit
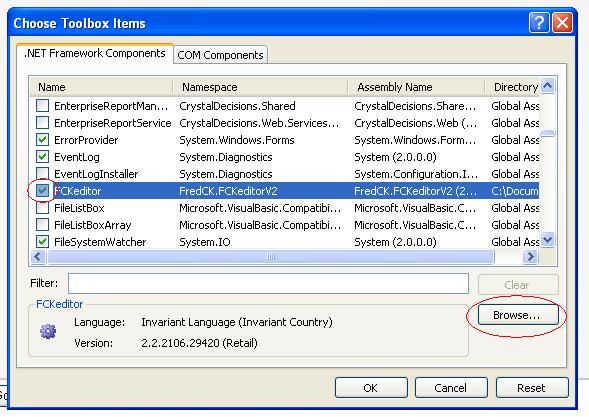
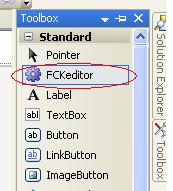
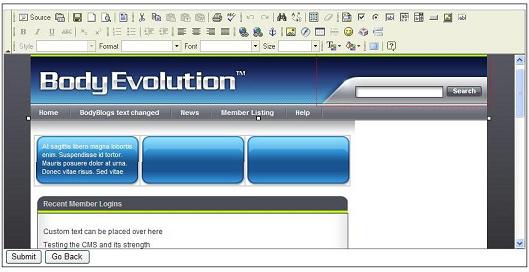
Using a 3rd-party control - The "FCKEditor" as our rich text editor.
FCKEditor is a very famous Rich Text Editor.
We will be using it for editing html files on the server.
First we've to make it available in our Visual Studio Project.
For this, we have to:
Please also note: Reading file contents and saving it backThe following code shows how to read a given file from the server and associate it with FCKEditor control for user-editing. Its done by simply using the StreamReader StreamReader sw =
new StreamReader(MyDir + FileName); We use the StreamWriter for writing the file back to the server StreamWriter sw =
new StreamWriter(MyDir + FileName);
To Do ListThe web-application works perfectly on any directory and allows you to edit files in rich text editing mode. However, there are many areas on which this application can be extended. This todo list can act as a homework which can help you a lot to increase your capabilities in ASP.NET.
Tutorial toolbar: Tell A Friend | Add to favorites | Feedback | |