

Products
Database Search Solution (New Version) Search Control SEO Pager Highlighter Shortcut Controls Crypt Package Free ASP.NET Controls
Geotargeting Component ASP.NET Media Player Control Flash Video Player Control Services
ASP.NET Telecommute Jobs Free IP Location Lookup Test .Net Regular Expressions CSS/Table/DIV Page Layouts Custom Programming Article Sites Master List |
Connecting ASP.NET to Access and SQL Server DatabaseThis tutorial talks about connecting to an Access or Sql server database using ASP.NET You might have noticed that the procedure to connect to a database is almost the same, but you should always take some ideas into consideration before you start implementing your projects. The tutorial will be seperated into two parts, the first one covers the connection using Sql Server, and the second one talks about connecting to MS Access database. Connecting To Sql ServerFirst of all, let's create a new database with Sql Server 2000. Open up your Sql Server, and create a new database and call it "Database1". Throughout the tutorial, we will be in need of only one table. Let's create a new table. Design your table to be similar to the following: 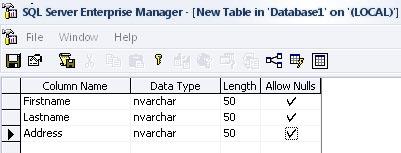 Call this table "Students". Open Visual Studio, and create a new project. Call it whatever you want. We will use the default page to insert new students into the database. The page will be look as the following image: 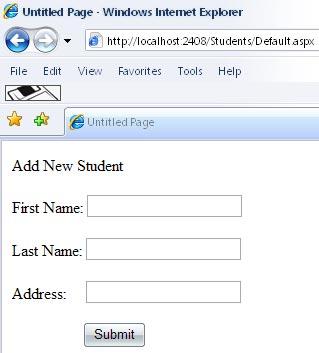 Note that the textboxes are called "txtFirstname", "txtLastname" and "txtLastname". The button's name is "btnSubmit". Double click on the submit button and place the following code.
Dim con As
New System.Data.SqlClient.SqlConnection Note that all we did is creating a connection and a command, using the System.Data.SqlClient namespace. Then we opened the database, executed the command and then closed the database again. Notice also that the commandtext was straight, we just inserted the values into the database, in the order we created previously. Now we will see how this differens in Access Database. If you have to make many ASP.NET forms like this, it is usually better to obtain ApexSQL Code to get standardized ASP.NET web forms and reduce development time. Connecting To MS AccessOpen Access 2003 and create a new database. Call it "Database1.mdb". Create a new table related to this database that has the same structure as the table we created in SQL. Also call it "Students" as well. 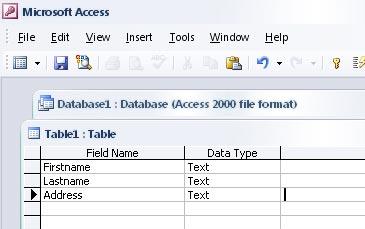 Now create a new page in the project. I called it "newInsert.aspx". Design the page to have the same design of the old page (Default.aspx). Now double click on the Submit button and place the following code:
Dim con As
New System.Data.OleDb.OleDbConnection The first thing you might notice, is the Mappath function. This function retrieves the path where the application is. And since in Access the Database is an mdb file, so we should specify it's location exactly. And since we're going to publish our website later on to the web, then we should place that mdb inside our website. That's why we used Mappath instead of using strict addressing such as "C:/Database1.mdb". The second thing that differs here, is the namespace for the connection and the command. System.data.OledbClient is the namespace used for access instead of System.data.SqlClient The most important thing to notice here, is the presence of the arguments in the CommandText: ' Insert into students(Firstname,Lastname,Address) values ...... This is very important, the connection to the access database will not work if you don't specify the arguments of the table. This becomes really annoying if we have a table that has many columns in it. Note that in Reading from the database, the only thing that differents is the namespace. Create a new page and call it "listAll.aspx". This page will list all the students in the database. Click the Source Tab, and insert this code within the form tag: <table
runat="server"
id="myTable"> We will fill this table at runtime. Double click on the middle of the new page to get the OnLoad event. Place the following code:
Dim con As
New System.Data.OleDb.OleDbConnection Here's how the page looks like at the end: 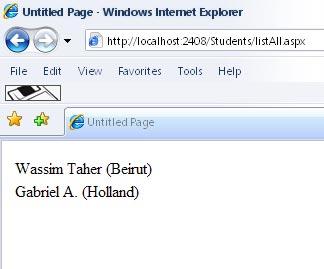 Nothing really complicated, we just selected all the users, and made a loop over everyone of them, and printed out their first name, last name and address each in a different row. We figured out the number of rows using the dt.rows.count, which counts how many rows we have in our table. Then we subtracted one because the first row starts at location zero. Note that the DataAdapter opens the database automatically, and then closes it by itself, so you don't worry about this issue. Then we filled the data into a datatable called dt. It is an instance of the System.Data.Datatable provided by Visual Studio. The DataTable is very important and easy to work with. Note that we used The DataAdapter only for getting informations from the database. To insert or update, use the Command, and open the connection manually then close it after executing the command. That's it, Hope you enjoyed learning. Happy Coding! Tutorial toolbar: Tell A Friend | Add to favorites | Feedback | |