

Products
Database Search Solution (New Version) Search Control SEO Pager Highlighter Shortcut Controls Crypt Package Free ASP.NET Controls
Geotargeting Component ASP.NET Media Player Control Flash Video Player Control Services
ASP.NET Telecommute Jobs Free IP Location Lookup Test .Net Regular Expressions CSS/Table/DIV Page Layouts Custom Programming Article Sites Master List |
Creating Nested Master PagesMaster pages are ASP.NET 2.0 offering at the altar of templates. Creating a master page can be very simple or very complex depending on the intentions of the web designer. In this tutorial we shall create a very simple master page and nest a number of other master pages into it. Open Visual studio 2005 and click on Create>> Web Site in the small window titled "Recent Projects" to the top left of the screen (see screenshot below) 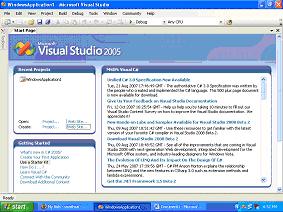 A dialog box opens asking the user to indicate the type of website he wants to create. Click on ASP.NET Web site. Ensure that the language is set to Visual C# and the folder in which you want to keep your web pages is correctly displayed and click OK. 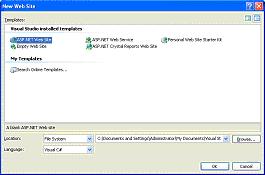 Visual Web developer will create a folder and a new page named Default.aspx for you as illustrated below. 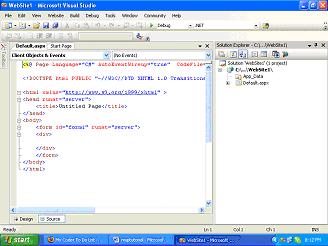 Now right click the folder name C:\...\Website1\ and click Add New Item. 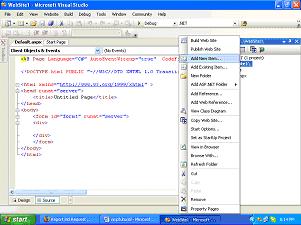 A dialog box asking you what kind of item you want to create opens. Select Master page and check that the language text box is set to Visual C# and press ok. 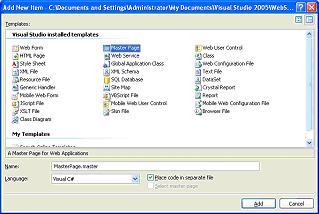 Now look at the contents of the Master page in Source view. The code that is generated is as under:
<%@
Master Language="C#"
AutoEventWireup="true"
CodeFile="MasterPage.master.cs"
Inherits="MasterPage"
%> Let us spend a few minutes analyzing this code. It will help you understand the process better. At the top of the page is <%@ Master %> delclaration. This declaration appears in place of the normal <%@page%> which normally appears in other pages. Also note that the body of the code contains a declaration for a content place holder <asp:contentplaceholder>. This is the control in which the master page merges and displays the content dynamically from different pages at run time. The master page can have more than one ContentPlaceHolder. Also note that the Page does not have a title. Let us call it "Top Level Master Page", since we are going to nest more master pages into this page. Let us begin designing the look and feel of the master page. Switch to Design view. 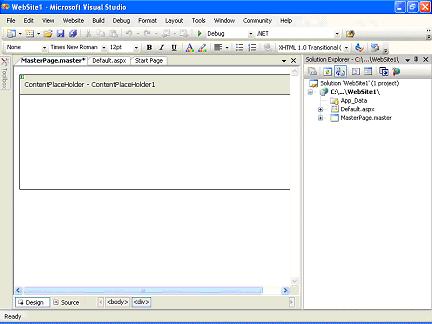 Open the properties window by navigating to View>>Properties Window 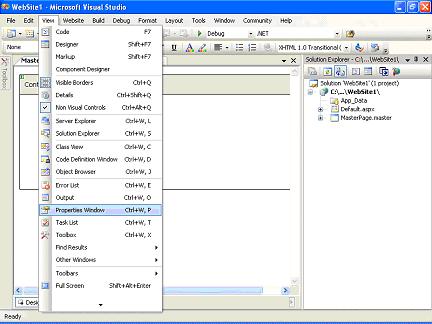 In the properties window Click DOCUMENT and set the background color to a distinct shade of your choice. This color will be different from the color you select for the nested master page to help you distinguish between the two.  Let us now define a table to hold the different elements of the Master Page. In the Layout menu click Insert Table. In the dialog box that opens, select Template and from the drop down box select Header, Footer and Side. Click OK. 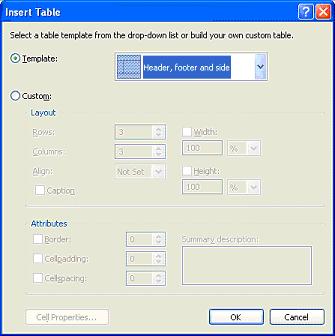 The Template defines the layout of the table. Set the width of the left column to 48 px and the height of the header and footer to 48 px. The width and height can be adjusted by dragging the borders of the cells. Now select a distinct color for each of the cells and set the Valign to TOP. Drag the content place holder and place it in the right column, middle row of the table. 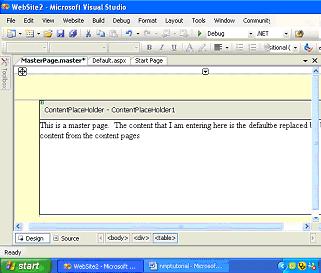 You can now enter copyright information or a text menu at the bottom bar and a logo and some text in the top cell of the table. The Left hand column of the middle row can be used to set up a menu or a logon box. In this tutorial we shall place a image control in the top row along with text. We shall populate the image control with the logo and enter the text ASP.NET Network as the name of the site. 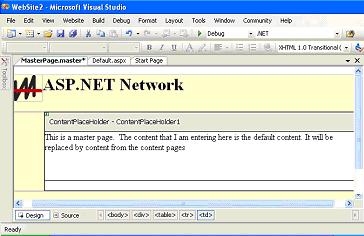 Now let us place a logon control in the left column so that it appears on all pages of the website. Add some default content to the content place holder in the right column. 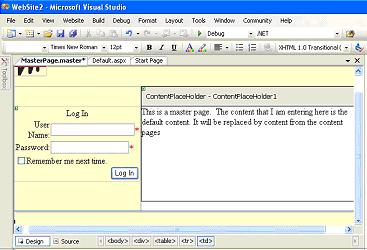 Let us place the copyright information at the bottom cell. 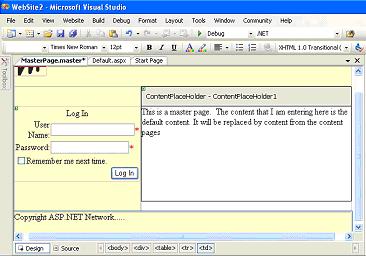 You have now created a basic layout for the master page. Creating the content page for the master pageThough we have entered default content, we would like the user to be able to see different content when he clicks on a menu item. So we create content pages separately and code it to display in the content place holder of the master page. The content we display can be text or other controls. In the Solution explorer right click the name of the web site and click Add New Item. In the dialog box that opens, select Web Form and name the page Aboutus.aspx. Check the "Select Master page" check box and Click Add. 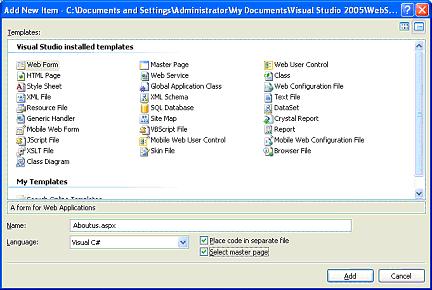 The select master page dialog box opens. Select Toplevel.master and click ok. 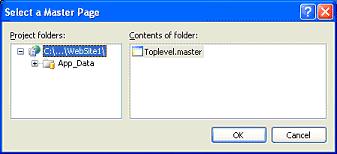 Note that content pages do not have the usual elements such as <html>, <body> etc. It has only the content which needs to be displayed in the ContentPlaceHolder of the master page. In the design view, the content alone will appear active while all other parts of the master page will appear dimmed. In the properties window, select document and set the Title to Aboutus page. This information gets stored in the @Page directive and will ensure that the title of the page is correctly displayed on the browser. Now right click on the Title bar of Content control and Click Create Custom Control. 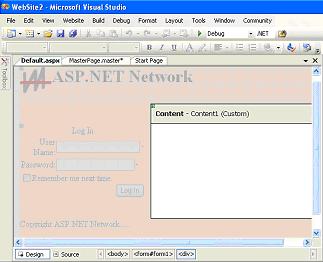 Now add the custom content to the content place holder. To test the pages, click on CTRL+F5. 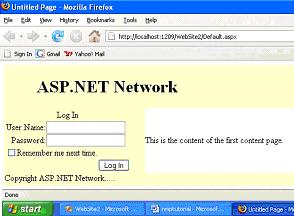 Your first master page and content page is ready. We shall now begin the process of nesting other master pages into this master page. Creating Nested Master PagesWhen one master page references another master page as its master, the master pages are said to be nested. You can have any number of nested master pages in a single master. This type of structuring enables the designers create a number of nested masters without compromising on the look and feel of the site. Child masters also have the .master extension appended to their name. They also have all the controls that are mapped to content place holders and have content place holders of their own too. Child masters cannot be created in design view! Now we shall set about creating a second master page which we shall call from the first master. Let us go through the steps of creating a second master and call that master secondlevel.master. Now open the code view page of the TopLevel.Master and enter the following code.
<script
runat="server"> Now open the secondLevel.Master at the source view and enter the following code just below the @master directive.
<%@
Master Language="C#"
MasterPageFile-"TopLevel.master"
Debug="True"
AutoEventWireup="true"
%> Save the file and now open the Aboutus.aspx in the source view and enter the following code.
<%@
Page
language="C#"
masterpagefile="SecondLevel.master"
%> Save the file and press control + F5 to run the application. You have now successfully created your first nested master page. You will notice that the Abotus.aspx content page has been loaded into the Secondlevel.master and the whole has been loaded into TopLevel.Master. Try creating more masters that can be nested into the main master’s content place holders. This tutorial is written by smnthsai. Tutorial toolbar: Tell A Friend | Add to favorites | Feedback | Google |