

Products
Database Search Solution (New Version) Search Control SEO Pager Highlighter Shortcut Controls Crypt Package Free ASP.NET Controls
Geotargeting Component ASP.NET Media Player Control Flash Video Player Control Services
ASP.NET Telecommute Jobs Free IP Location Lookup Test .Net Regular Expressions CSS/Table/DIV Page Layouts Custom Programming Article Sites Master List |
Data Normalization using ASP.NETProblem StatementIn any datasets each attribute has its own range. For instance an age attribute can have a maximum range up several hundred. On the contrary, monthly salary attribute will always have range in thousands. Abnormal minimum and maximum values (noise) can also lead to misinterpretation of data. Data Normalization uses different techniques to narrow down values to a certain range. Min-Max and z-Score are most common normalization techniques. In this tutorial we will use ASP.NET to solve the data normalization problem. A web-based application will a read dataset, normalize it, and store it in a Microsoft Access database. The normalized dataset will be displayed to the user in an ASP.NET data grid control. For the sake of convenience we will divide the problem solving process into these phases:
Reading datasetFirst of all start your Microsoft Visual Studio. To build an ASP.NET web application go to File menu and select New>Website (Note that you can skip this part and download complete project, used in this tutorial). In the new dialogue box specify path and select Visual C# as language. Now place the following controls from toolbar to your Default.aspx (while in the design view):
Place all controls inside a Panel control and name the controls for your convenience. Now your ASP.NET application should look something like this:  Now double click the Go button to start the coding. Here is the ASP.NET code for reading and parsing the input file:
// create an object of StreamReader and pass file path as parameter For file parsing in ASP.NET, we used StreamReader class object. To use the class you first have to include System.IO namespace at the top of Default.aspx.cs file. OrigMatrix is a 2-D matrix for storing the parsed data. Size of matrix will be specified by user in the rows and column text area. Convert.ToDouble() function is for string to double conversion. At the end of this function all our required data will be stored in OrigMatrix. After doing the calculation we want the ASP.NET application to save values to a MS Access database. First of we have to create an Access database having five attributes, namely Column_1, Column_2, Column_3, Column_4 and Type. Data type of the "Type" attribute is Text, whereas rest attributes are of type Double Number. Name the table NormalizedData (you can also give any other name). Save the database file in C:\Inetpub\wwwroot. If you have installed Windows on some other drive than change the path accordingly. In ASP.NET we use the connection object to connect to a database. You have to include the name space System.Data.OleDb for this purpose. The code for establishing connection is as follows:
OleDbConnection
conn = new
OleDbConnection(); // our connection object For executing a command in ASP.NET we need to declare an initialize a new object belonging to the OleDbConnection class. Here is the code for initializing the command object:
OleDbCommand
command = new
OleDbCommand(); You can also place the above code inside a function so that it can be reused when required.
public
void ExecuteCommand(string
MyCmd) For storing data to the database we will construct a query by executing a nested loop that traverses the whole matrix. Following code snippet accomplishes this task:
string
ValuesStr=""; Finding out the statisticsIn ASP.NET doing calculations is very easy. We will write a function to perform these calculations. Each column will have its own statistics. We will store each statistic in a separate 1-D array. Here is the C Sharp code that for performing the desired task:
for (j = 0; j < columns; j++) Min, Max, Sum and Avg are variables of double type and i and j are integer loop counters. MinArray, MaxArray[j], StdArray[j] are our arrays of double type for for saving minimum, maximum and standard deviation of each column. Normalize and store dataAfter doing the basic calculation we will proceed towards the normalization phase. Here is the ASP.NET code for finding and storing the z-Score and Min-Max:
double
MinMaxValue = 0; ReturnMinMax and ReturnZScore are our own function. They take value and column no as parameter and return the results. Display dataIn ASP.NET, easiest way to display contents of a database is by using a Data Grid. First we need to create a separate web form. Go to File menu and select New>File option. Specify name and language (Visual C#). Place a GridView control (present in the Data section) from the Toolbox. In our previous form we will place some useful values in the Session object. Place a DropDownList in the default form. While in the aspx file, select the DropDownList. A small arrow will apperar at its top right corner. Clicking the arrow reveals a menu for DropDownList Tasks. 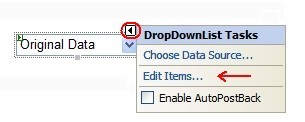 Select the link named "Edit Items...". Add items to the DropDownList by clicking the Add button and specifying Text and Value attributes for each item. 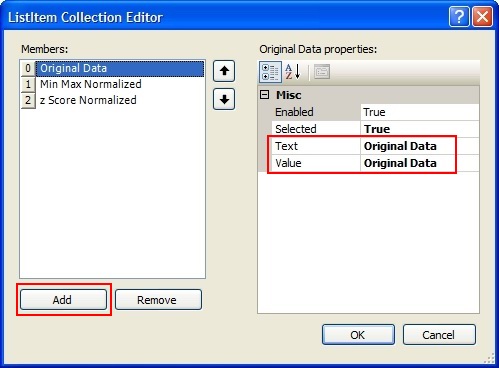 Now place a button for viewing data. Write the following code in its click handler:
int
option = ViewDataDropDownList.SelectedIndex; In the newly created ASP .NET web form's C Sharp file (Dataview.asp.cs) retrieve values from the session object and display them on the data grid. In the Page_Load event just write the following code:
//get type from session. original,min-max or z-score Above code can be used for all three type of data namely original, min-max and z-score. Depending upon the "type" stored in the session. Don't forget to include t System.Data.OleDb namespace at top of the file. In ASP.NET data adapter object "da" acts like a bridge. It establishes connection between our DataSet object "ds" and the MS Access database "temp.mdb". Data adapter can not only read records from a database, but it can also delete records, edit records and store new records. ASP .NET DataSet object "ds" is a disconnected array. It acts like a cache. When you fill dataset using the data adapter object, values are stored to the data set object. Later on these values can be retrieved without connecting to database again. Here is a screenshot of the application showing normalized data: 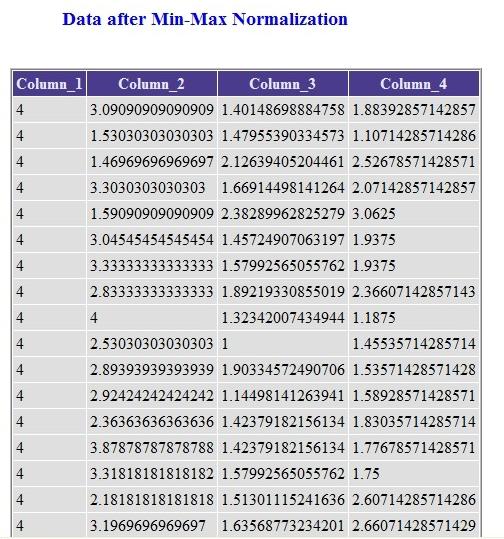 We can also use a Table control to show the statistics in Default.aspx file. For this purpose we will have to use objects of TableRow and TableCell classes. Here is an example.
int
numrows = 5; // no of rows in the table Here is the final screen shot of application containg the newly created table. 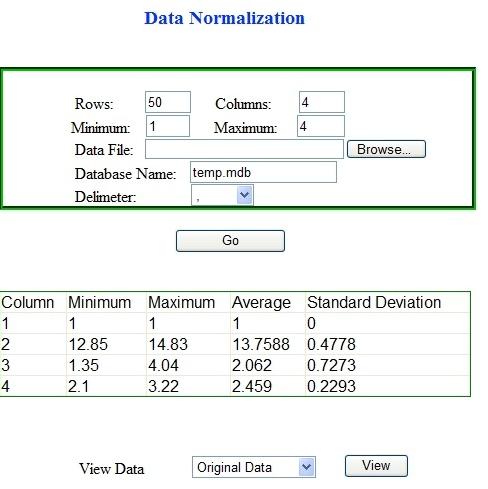 In your ASP.NET application you can also use CSS. This will make the application more user friendly. All you have to do is to write CSS code in the source view of your .aspx file. Alternatively you can also use the attribute "CssClass" available in properties of each ASP .NET control. Tutorial toolbar: Tell A Friend | Add to favorites | Feedback | |