Home
    Shop
    Advertise
    Write For Us
    Affiliate
    Newsletter
    Contact

Developing a Shopping Cart in ASP.NET

Introduction

In this tutorial we are going to develop a simple shopping cart consisting of two pages, an order page, where your user will be able to check the available merchandise and order the same and the second is a cart page, where the selected items will be shown in the cart. This apparently simple application explains few basic design concepts.


You will clearly find three layers in this application: a back end database describing your products, couple of classes, implementing your business logic and thirdly of course the front end web pages. The middle layer business classes not only give shapes of your business logic but also acts as a vehicle to bring data from the database to the web page. With these much background information let us start with the development.

Step by step development of the Shopping Cart

The Order Page

The order page accepts an order entry for any items in the online store. The user selects the product from the drop-down list, enters a quantity required in the text and clicks on the 'Add to Cart' button. The selected product is added to the shopping cart along with the quantity and the cart page is displayed.

The product information is retrieved from the products table of the database. An AccessDataSource control is bound to the drop-down list. The AutoPostBack property of the drop down list is set to true so that the page is posted when the user selects a product and the information for this product is displayed.

We have used a SortedList to store the shopping cart information and saved this data in session state for retrieving and updating the cart each time a product is selected.

When a user selects a product from the drop down list some label controls displays the name and description of the product and an image control displays the image of the product. We have not stored the image directly in the database but stored the name and position of the image file and the code retrieves the image from the respective file.

We have also implemented validation controls to ensure that the user enters a positive number in the range of 1 to 100 for the quantity. A RequiredFeildValidator ensures that the user enters some value in the text box for quantity and a RangeValidator control ensures that the value is within desired range. Both these controls' ControlToValidate property is set to the name of the quantity text box.

The order page code is as follows:

<%@ Page Language="VB" AutoEventWireup="false" CodeFile="Order.aspx.vb" Inherits="Order" %>
 <!DOCTYPE html PUBLIC "-//W3C//DTD XHTML 1.0 Transitional//EN" "http://www.w3.org/TR/xhtml1/DTD/xhtml1-transitional.dtd">
 <html xmlns="http://www.w3.org/1999/xhtml" >
<head runat="server">
    <title>My Shopping Cart</title>
</head>
<body>
    <form id="form1" runat="server">
    <div>
        <div style="font-size: xx-large; vertical-align: baseline; width: 614px; color: #ffffff;
            direction: ltr; height: 112px; background-color: #660000; text-align: left; font-variant: normal">
            &nbsp;
            <br />
            &nbsp; &nbsp; &nbsp; &nbsp; &nbsp; &nbsp; &nbsp; &nbsp; &nbsp; &nbsp; &nbsp; &nbsp;
            &nbsp; &nbsp;&nbsp; My Web Shop</div>
        <br /><br />
        <asp:Label ID="Label1" runat="server"
            Text="Please select a product:"></asp:Label>
        <asp:DropDownList ID="ddlProducts" runat="server" Width = "150px"
            DataSourceID="AccessDataSource1" DataTextField="Name"
            DataValueField="ProductID" AutoPostBack="True">
        </asp:DropDownList>
        <asp:AccessDataSource ID="AccessDataSource1" runat="server"
            DataFile="~/App_Data/my_products.mdb"
            SelectCommand="SELECT [ProductID], [Name], [ShortDescription],
                [LongDescription], [ImageFile], [UnitPrice]
                FROM [Products] ORDER BY [Name]">
        </asp:AccessDataSource>
        <br />
        <table>
            <tr >
                <td style="width: 250px; height: 22px">
                    <asp:Label ID="lblName" runat="server"
                        Font-Bold="False" Font-Size="Larger">
                    </asp:Label>
                </td>
                <td style="width: 20px" rowspan="4">
                </td>
                <td rowspan="4" valign="top">
                    <asp:Image ID="imgProduct" runat="server" Height="200" />
                </td>
            </tr>
            <tr>
                <td style="width: 250px">
                    <asp:Label ID="lblShortDescription" runat="server">
                    </asp:Label>
                </td>
            </tr>
            <tr>
                <td style="width: 250px">
                    <asp:Label ID="lblLongDescription" runat="server">
                    </asp:Label>
                </td>
            </tr>
            <tr>
                <td style="width: 250px">
                    <asp:Label ID="lblUnitPrice" runat="server"
                        Font-Bold="True" Font-Size="Larger">
                    </asp:Label>
                    <asp:Label ID="Label2" runat="server" Text="each"
                        Font-Bold="True" Font-Size="Larger">
                    </asp:Label>
                </td>
            </tr>
        </table>
        <br />
        <asp:Label ID="Label3" runat="server" Text="Quantity:"
            Width="80px" BorderWidth = "0px"></asp:Label>
        <asp:TextBox ID="txtQuantity" runat="server" Width="80px"></asp:TextBox>
        <asp:RequiredFieldValidator ID="RequiredFieldValidator1" runat="server"
            ControlToValidate="txtQuantity" Display="Dynamic"
            ErrorMessage="Quantity is a required field.">
        </asp:RequiredFieldValidator>
        <asp:RangeValidator ID="RangeValidator1" runat="server"
            ControlToValidate="txtQuantity" Display="Dynamic"
            ErrorMessage="Quantity must range from 1 to 500."
            MaximumValue="500" MinimumValue="1" Type="Integer">
        </asp:RangeValidator><br /><br />
        <asp:Button ID="btnAdd" runat="server" Text="Add to Cart" />&nbsp;
        <asp:Button ID="btnCart" runat="server" CausesValidation="False"
            PostBackUrl="~/Cart.aspx" Text="Go to Cart" />
    </div>
    </form>
</body>

</html>


The design view of the page should look like:

Order page of shopping cart
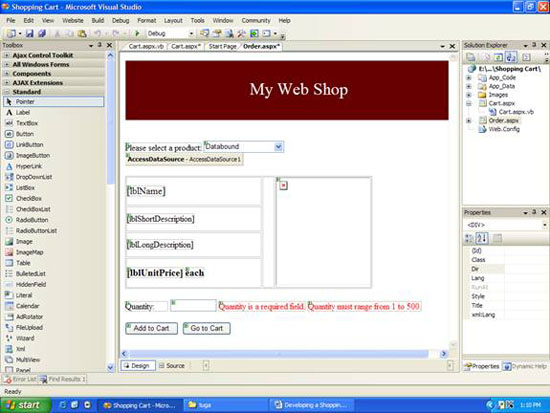
Image 1. Order page in design view


The Cart Page

The cart page displays the selected items list and is implemented by a list box control. The shopping cart information is saved in session state by the order page. The user can select any item in the list and remove it from the list or empty the cart or continue shopping by returning to the order page.

The check out button ideally should take the user to payments mode but it is beyond the scope of present tutorial.

The code for the Cart Page is as follows:

<%@ Page Language="VB" AutoEventWireup="false" CodeFile="Cart.aspx.vb"
Inherits="Cart" %>
 
<!DOCTYPE html PUBLIC "-//W3C//DTD XHTML 1.0 Transitional//EN" "http://www.w3.org/TR/xhtml1/DTD/xhtml1-transitional.dtd">
 
<html xmlns="http://www.w3.org/1999/xhtml" >
<head runat="server">
    <title>Shopping Cart</title>
</head>
<body>
    <form id="form1" runat="server">
    <div>
        <div>
        <div style="font-size: xx-large; vertical-align: baseline; width: 614px; color: #ffffff;
            direction: ltr; height: 112px; background-color: #660000; text-align: left; font-variant: normal">
            &nbsp;
            <br />
            &nbsp; &nbsp; &nbsp; &nbsp; &nbsp; &nbsp; &nbsp; &nbsp; &nbsp; &nbsp; &nbsp; &nbsp;
            &nbsp; &nbsp;&nbsp; My Web Shop</div><br /><br />
        Your shopping cart:<br />
        <table style="width: 500px" cellspacing="0"
                cellpadding="0" border="0">
            <tr>
                <td style="width: 286px; height: 153px">
                    <asp:ListBox ID="lstCart" runat="server"
                        Width="267px" Height="135px">
                    </asp:ListBox>
                </td>
                <td style="height: 153px">
                    <asp:Button ID="btnRemove" runat="server"
                        Width="100px" Text="Remove Item" /><br /><br />
                    <asp:Button ID="btnEmpty" runat="server"
                        Width="100px" Text="Empty Cart" />
                </td>
            </tr>
        </table>
        <br />
        <asp:Button ID="btnContinue" runat="server"
            PostBackUrl="~/Order.aspx" Text="Continue Shopping" />&nbsp;
        <asp:Button ID="btnCheckOut" runat="server" Text="Check Out" /><br />
        <br />
        <asp:Label ID="lblMessage" runat="server"></asp:Label>
    </div>
    </form>
</body>
</html>

The design view of the cart page should look like this:

Shopping cart page
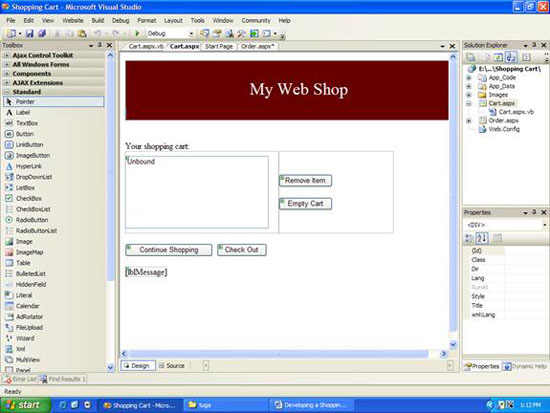
Image 2. Cart page design


The business classes needed for shopping cart

This simple shopping cart application requires two business classes Product and CartItem. The Product class has properties similar to the fields in the Product table of your database as this class will be the vehicle to carry your product information from database to the application logic. The CartItem class will have just two properties product and quantity and a method for displaying the product name and quantity selected.

The product class

 
Public Class Product
    Public ProductID As String
    Public Name As String
    Public ShortDescription As String
    Public LongDescription As String
    Public UnitPrice As Decimal
    Public ImageFile As String
End Class
 
The CartItem class
 
Public Class CartItem
    Public Product As Product
    Public Quantity As Integer
 
    Public Function Display() As String
        Return Product.Name + " (" + Quantity.ToString() _
            + " at " + FormatCurrency(Product.UnitPrice) + " each)"
 
    End Function
End Class

To retrieve data from the database an AccessDataSource control has been used. The Select method of the AccessDataSource class return a DataView object which contains the rows retrieved from the Access database. the return type of Select method is IEnumerable, so we need to convert the returned object to a DataView object. The RowFilter property of the DataView class allow you to filter rows based on some criteria. The indexer of the DataView class is used to get a specific row as a DataRowView object. The indexer of the DataRowView object in turn allows to get a specific column from the row. The following code explains this.

Dim dvProduct As DataView = CType(AccessDataSource1.Select(DataSourceSelectArguments.Empty), DataView)
dvProduct.RowFilter = "ProductID = '" & ddlProducts.SelectedValue & "'"
Dim Product As New Product
Product.ProductID = dvProduct(0)("ProductID").ToString
Product.Name = dvProduct(0)("Name").ToString
Product.ShortDescription = dvProduct(0)("ShortDescription").ToString
Product.LongDescription = dvProduct(0)("LongDescription").ToString
Product.UnitPrice = CDec(dvProduct(0)("UnitPrice"))
Product.ImageFile = dvProduct(0)("ImageFile").ToString

Use of Session State to Store the Cart Information

Asp.Net uses session state to track the state of each user of an application by creating a session state object. This session state object includes a session ID which is sent back to the browser as a cookie. The browser automatically returns this cookie with each request and this way the server associates the browser with an existing session state object. This session state object can be used to store and retrieve items across executions of an application.

The following table shows the commonly used properties and methods of the HttpSessionState class

Properties Description
SessionID The unique ID of the session
Item(name) The value of the session state item with the specified name
Count The number of items in the session state collection
Methods Description
Add(name, value) Adds an item to the session state collection
Clear Removes all items from the session state collection
Remove(name) Removes the specified item from the collection

We have used the session state object to store the list of the selected items in the shopping cart. The following code snippet shows that:

Private Function GetCart() As SortedList
        If Session("Cart") Is Nothing Then
            Session.Add("Cart", New SortedList)
        End If
        Return CType(Session("Cart"), SortedList)
    End Function

The complete application should look like:

Shopping cart sample
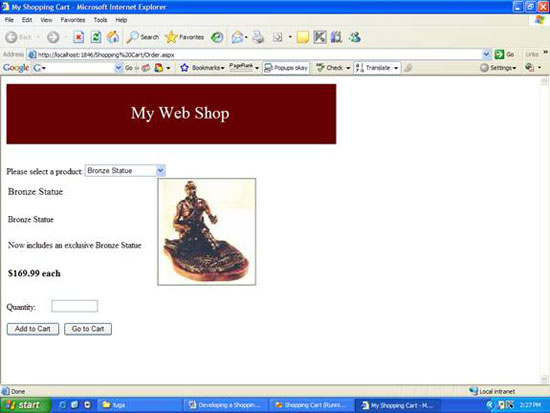
Image 3. Shopping cart at run time

Conclusion

This simple shopping cart application explains how to handle a simple problem using Asp.Net. Though we have used the barest minimum functionalities, you will find lots of shopping carts with much more complex finery, we just hop this tutorial helps you to understand the basic workings of Asp.Net. You can download the Shopping Cart Visual Studio project, used in this tutorial.

Happy Programming!


Tutorial toolbar:  Tell A Friend  |  Add to favorites  |  Feedback  |