Products
Database Search Solution (New Version) Search Control SEO Pager Highlighter Shortcut Controls Crypt Package Free ASP.NET Controls
Geotargeting Component ASP.NET Media Player Control Flash Video Player Control Services
ASP.NET Telecommute Jobs Free IP Location Lookup Test .Net Regular Expressions CSS/Table/DIV Page Layouts Custom Programming Article Sites Master List |
How to Get Started With ASP.NETWhat you should knowBefore you continue with this tutorial about ASP.NET you should have a basic understanding of the following:
What is ASP.NET?ASP.NET is a server side scripting technology developed by Microsoft as a part of the Microsoft's .NET Framework. This framework is built on the common language runtime, which can be used on a server to build powerful Web applications. Although ASP.NET is developed by Microsoft for Windows platforms only, open source projects like Mono are available to run .NET applications on Linux, Solaris, Mac OS X and Unix. Why use ASP.NET?Most people start their web developing with a creating a static HTML Web page. Nothing wrong with a static Web page, but you won't use it as a professional site since it lacks functionality and the "professional look". Client-side scripts like JavaScript might help a bit to add this functionality, but it still has limits. And the worst thing is that you have to create and maintain everything yourself. Certainly when your site starts counting quite a few pages it becomes painful to update them all one by one when something changes. ASP.NET supplies a very powerful and flexible environment to create Web pages. Thanks to the server-side scripts you can generate dynamic contents and/or layout. The Web Server executes the server-side scripts and generates HTML and client-side scripts. This way the strengths of both client and server-side scripts are brought together to deliver you a professional site. ASP.NET ComponentsAlmost all HTML elements on a page can be defined as ASP.NET control objects that can be controlled by scripts. ASP.NET also contains a whole set of object oriented input controls, validation controls and even a data grid control. Adding these controls and implementing the code behind them can easily be done by using Microsoft Visual Studio, Microsoft's .NET IDE. We all know that looks are important these days. With Master Pages you have the ability to define common structure and interface elements for you site, available for an entire Web site and all gathered in one single place. First Web applicationWe're finally ready to set our first steps into the world of ASP.NET and create our first Web page by using Microsoft Visual Studio. The first Web page will be a simple game called Snake Eyes. In this game you have to roll two dices but you aren't allowed to get a double 1. We'll be using C# for the code behind the controls. Step 1: Create the Web site in which our pages will be placed: File > New > Web Site.
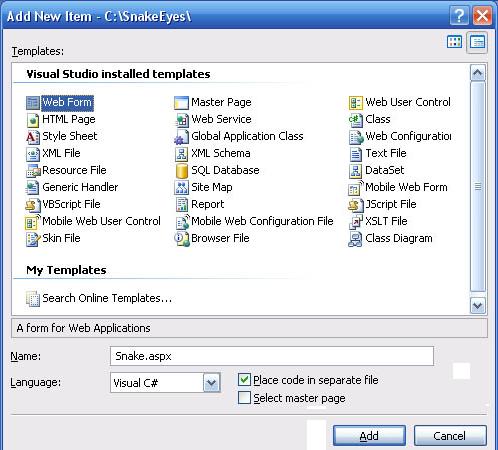
Visual Studio creates a Web site on the location you specified. In the Solution Explorer you see a subfolder App_Data (for data files) and one page (Default.aspx). Other ASP.NET-specific folders can be added when you right-click in the Solution Explorer, more about this will be explained in other tutorials. At the moment we only need the .aspx-file which implements the actual Web page. Every ASP.net page (also called Web Form) exists out of two parts: the user interface (.aspx) and the code behind (.aspx.cs). You can open the .aspx-file in both Design and Source view. When you look to the source you can see the link to the code file (.aspx.cs) and the class which it inherits in the Page directive. If you choose to rename page then you'll have to rename this link in the interface file and the name of the class in both the interface and the code file yourself! It might be easier to delete the Web Form and add a new one with the correct name right away. This is done by right clicking the folder in the solution explorer and Add new item.
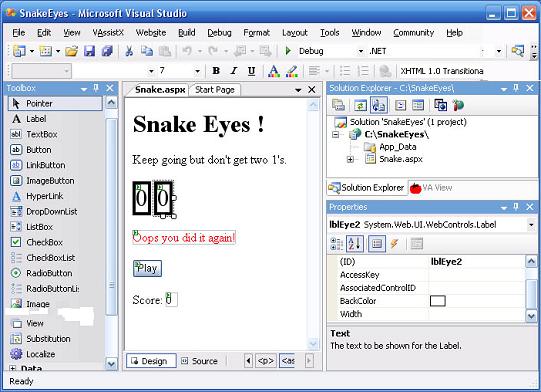
Now you can add some text to the page in Design or Source mode. For the dices you can pick two Labels from the Toolbox by dragging them to your page or by double clicking. It's a good habit to change the ID of both labels right away. Label1 might seem a good name to you, but when you have a lot of controls on your page it's hard to know which one does what if they don't have a name that fits their function. Changing the ID can be done in the Properties window (F4) or in the source view. Under the labels for the dices you can put another label with a message in case somebody rolls a double one. This shouldn't be visible in other circumstances so you put the Visible-property on False. An extra label for the score would be nice and ofcourse you'll need a Button to roll the dices.
A glimp on the source shows you how the controls are written in ASP.NET. Every control starts with an "<asp:" tag and has a property runat="server". This way the Web Server knows he has to convert this code to proper HTML. Further you can see the type of the control (e.g. Label) and his ID. Know that you can type this code yourself with the help of IntelliSense (auto completion). <%@
Page Language="C#"
AutoEventWireup="true"
CodeFile="Snake.aspx.cs"
Inherits="Snake"
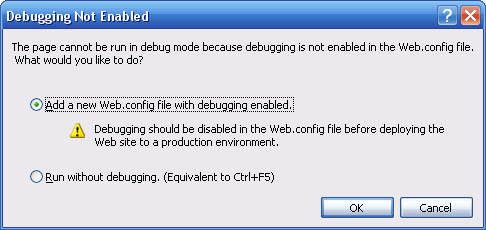
%> Of course you want to see what you have made now. With Debug > Start Debugging (or F5) Visual Studio starts a Web Server and opens the page in your browser. Notice that the first time you do this, you'll get a warning asking you if you want to enable debugging. If you consult the source, you'll notice that all ASP.NET controls have been converted to standard HTML. There is only 1 problem: nothing happens when you hit play!
So far this could all have been done with static HTML, now it's time to add some extra functionality. Stop debugging the application so further changes to the source can be made. If you want that something happens when you click on the Play-button, then there has to be code behind the button. Double click on the button in design view, this will bring you to the code behind (.aspx.cs) and will generate the some code for the event that happens most for that control (for a button it's the click event). When you click play you want two random dices. If you roll a double 1 then you want to see your hidden message and the score has to be reset to 0. In every other case you can simply add the result to the score.
protected void
btnPlay_Click(object sender,
EventArgs e) If you didn't make any errors while entering the code, you should be able to run this application and have a working Snake Eyes game. To finish this tutorial here's a small explanation what happens when you click on the Play-button: It's possible to disable the ViewState for each control in their properties. This way the server will not be able to 'remember' the value of the control.You can download sample project, used in this tutorial. Tutorial toolbar: Tell A Friend | Add to favorites | Feedback | |