|
Products
Database Search Solution (New Version) Search Control SEO Pager Highlighter Shortcut Controls Crypt Package Free ASP.NET Controls
Geotargeting Component ASP.NET Media Player Control Flash Video Player Control Services
ASP.NET Telecommute Jobs Free IP Location Lookup Test .Net Regular Expressions CSS/Table/DIV Page Layouts Custom Programming Article Sites Master List |
Globalization and LocalizationApplications must be designed to accommodate users from various cultures. Users in different parts of the world use different languages and different formatting standards for numbers, currency, and dates. International applications should be customizable according to the preferences of users belonging to different nations, cultures, or regions. An application uses the locale to identify the preference of a user. The local is the combination of a language and a country. For example, the locale of a user speaking English and belonging to the United States is "en-US". The locale includes information about the formats used for representing time and date, symbols and conventions used for representing currency, and the character encoding scheme being used. The structure of an internationalized application is divided into two blocks:
The process of making an application ready for customers is called internationalization. It includes three phases:
When designing an international application, you should ensure the following factors:
The different aspects of an application that should be taken into account while incorporating localization are:
Implementing GlobalizationThe System.Globalization namespace provides different classes that enable you to determine locale-specific information, such as te language and country of an application at run time. The System.Globalization namespace includes classes that enable you to localize your application. For example, the Calendar class contains different calendars, such as JulianCalendar and GrgorianCalendar. Using the CultureInfo ClassEvery locale is identified by a culture. The general format of the culture is as follows: <Language code>-<Country/Region code>
Cultures are of two types:
The following table describes some of the commonly used properties of the CultureInfo class:
The following table describes some of the commonly used methods of the CultureInfo class:
The following code snippet shows how to use the CultureInfo class: CultureInfo my_CI = new CultureInfo ("ru-RU"); In the preceding code snippet, a new CultureInfo class instance by the name, my_CI, is created that sets the culture of the instance to "ru-RU".
Working with ResourcesA resource is any non-executable data that is logically deployed with an application. A resource might be displayed in an application as an error message or as a part of the UI. Examples of resources include the strings displayed in the UI based on the culture settings of the system or a set of images. A separate resource file should be created for each culture for which the application is to be customized. Information is stored in a resource file in the key/value format. For example, to store the welcome message you must assign a the message to a key. Like this: WelcomeText = "Welcome to my homepage"; In the preceding code snippet, WelcomeText is the key and "Welcome to my homepage" is the value. There are specific naming conventions to follow when naming resource files. The resource file for default culture should be Strings.txt or Strings.ResX, and for any other culture Strings.culture-name.ResX. Where Strings represents the name of the file. For e.g., Strings.fr-CA.resx. After resource files are created in the text form, they need to be converted into a binary format recognized by the .NET Framework. Generating Resource FileYou can use the Resource File Generator (ResGen.exe) command prompt utility to convert a resource file in the text format into the binary format. The syntax is as follows: resgen [/compile] [inputfilename.extension] [outputfilename.extension] The extension of the input filename will be .resource. Creating Resource-Only AssembliesTo create a resource-only assembly, perform the following steps:
The output will be a DLL file, which will contain all the resource files you added. Creating Satellite AssembliesSatellite assemblies are resource-only assemblies that contain only culture-specific resources. The name of the resources included in a satellite assembly should follow this naming convention: Filename.culture-subculture.resource The name of a resource file included within a satellite assembly should reflect the culture to which it belongs. All applications will contain one culture-neutral main assembly, which will be loaded by default when a request is sent to the application. The relationship between the main assembly and the satellite assembly under the Windows platform follows a hub-and-spoke model. When a Web application is deployed, the main assembly is always copied in the bin folder in the application root. Satellite assemblies are copied into the subfolders beneath the bin folder in the application root. Satellite assemblies are copied into the subfolders beneath the bin folder based on their culture. For example, the satellite assembly for the culture, fr, will be copied into the bin\fr folder and that for the culture, fr-CA, will be copied into the bin\fr\CA folder. Perform the following steps to create a satellite assembly:
The difference between resource-only and satellite assemblies is that resource-only assemblies can contain any resource, such as images and text. Satellite assemblies contain only culture-specific resources. You can also use the AL.exe utility to link resource files to your application. The AL (Assembly Linker) is a command prompt utility shipped with the standard version of Visual Studio .NET. Retrieving Resources at Run TimeThe System.Resources namespace provides different classes, which enable you to retrieve values from resource files. This namespace contains the ResourceManager class which manages all the resources associated with an application. ResourceManager Class It can be used to retrieve resources from an assembly. Each instance of the ResourceManager class is associated with an assembly that contains the resources. This class provides different constructors that can be used according to the need. For example, when you need to retrieve resources from an assembly, use the ResourceManager constructor, which has the following syntax: ResourceManager ( "BaseName" , "Assembly Name", Type) In the preceding syntax:
If the resources are stored in a folder instead of an assembly, you can use the FileBasedResourceManager function of the ResourceManager class. This function takes the following three parameters:
The other important classes in the System.Resources namespace are:
Configuring a Web application for GlobalizationIn ASP.NET, you can use the Web.config file to configure an application for globalization. The <globalization> tag enables you to configure locale-specific information, such as culture and encoding. The <globalization> tag has the following attributes:
The following code snippet shows an example of how to use the <globalization> tag to configure a Web application: <globalization
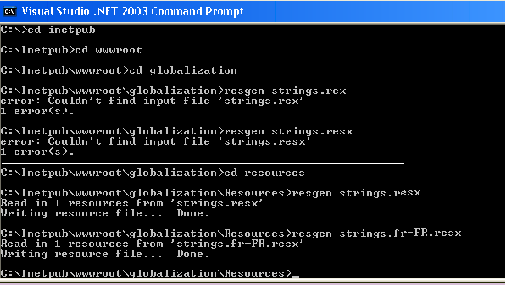
Practical DemonstrationHere we will be creating an ASP.NET application that is locale-aware. For simplicity sake we our only creating it for 2 cultures, although its just the repetition of steps that would be required if you wish to implement using more cultures. Our application will have an user interface with a drop down list from where the user can select the culture of his choice and then the Text values of the controls would be as per the selected culture. Solution:Perform the following steps for the same:
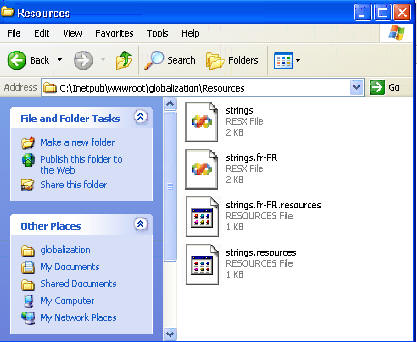
 You can see these files in your Resources folder of your application as shown in the figure.  The main code performing this functionality is given below. You can download example Visual Studio project from this link. private
void Page_Load(object
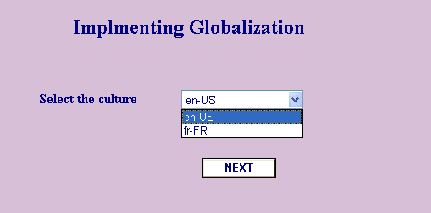
sender, System.EventArgs e) Here Session["lang"] is assigned the value of the selected item form the drop down list, that contains the available cultures for the site. The first output screen looks like this:  When you select any culture, the message is displayed in that particular culture as provided by you in the .resx files (remember the name/value pairs!)  Tutorial toolbar: Tell A Friend | Add to favorites | Feedback | |

