|
Products
Database Search Solution (New Version) Search Control SEO Pager Highlighter Shortcut Controls Crypt Package Free ASP.NET Controls
Geotargeting Component ASP.NET Media Player Control Flash Video Player Control Services
ASP.NET Telecommute Jobs Free IP Location Lookup Test .Net Regular Expressions CSS/Table/DIV Page Layouts Custom Programming Article Sites Master List |
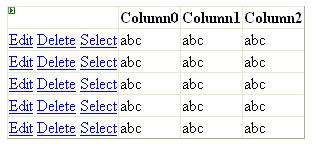
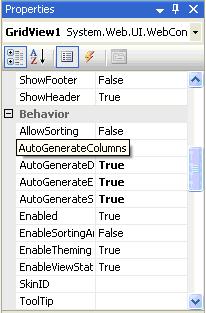
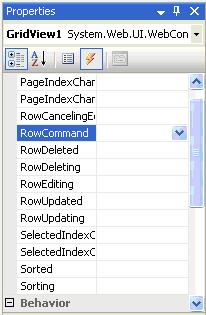
How To Add CheckBox And Image Button Columns In GridViewThe GridView is a powerful tool commonly used in web applications. It has features that allow to manipulate data in a lot of ways but sometimes we just need to extend that functionality to go from a GridView that looks like this:  To a GridView that looks like this:  Of course these changes are not just about look, they allow the user to perform certain operations that the control itself does not support so we need to play with the code a little bit to add them. Image Button Columns in GridViewGridViews have properties to generate link columns to perform select, delete and edit operations like in the first picture of this tutorial but to give a more professional look to the control we might need to use self-designed icons like the ones used in the second picture. There are no simple properties to add columns with image buttons in them but when going to the markup language we can use other type of columns to achieve this, the "buttonfield" columns. Take a look at the following code: <asp:GridView ID="GridView1" unat="server" AutoGenerateColumns="False" OnRowCommand="GridView1_RowCommand"> Two things you have to notice on the first code line are the properties "AutoGenerateColumns" and "OnRowCommand".  "OnRowCommand" property will contain the name of the procedure that is going to handle the event thrown by the click of the image buttons. This can be set by double clicking the event in the events section at the properties tab in the design panel.  Lines number 3 and 4 define the columns with the image buttons. The "ImageUrl" property will contain the path to the image icon we will use in the column. The "commandname" property will contain the name of the event that will help us differentiate between the click of one image button and another. For this example we have defined "ibtnEdit" as the name of the event that will be thrown when clicking an edit image button and "ibtnShow" as the name of the event for a show image button click. In the code behind we use a simple switch case statement like the following: protected void GridView1_RowCommand(object sender, GridViewCommandEventArgs e) The "CommandName" property of the "GridViewCommandEventArgs" object (line 1) contains the name of the event that has been triggered. The "CommandArgument" property contains the index of the row where the image button was clicked (starting from 0 for the first row). GridView Checkbox columnsCheckbox columns are a very professional way to eliminate the use of the select link column. They also allow users to perform an operation in multiple rows at the same time. The following code shows how to create a checkbox column: <asp:GridView ID="GridView1" runat="server" AutoGenerateColumns="False">
Note that in the first line we set the "AutoGenerateColumns" property to false again. CheckBox cbCelda = new CheckBox();
In line number 1 a CheckBox object has to be declared. A cycle to go through all the GridView rows has to be set so the checkbox of every row is verified. The last thing we have to take care of when using checkbox columns is the "Select All/ Unselect All" option. When defining the TemplateField to create the checkbox column, a checkbox also appears in the header row. If no code is implemented to use this header checkbox it will do nothing when clicking it. Using this feature can be a little tricky since we have to write acutal javascript inside our ASP.NET page so the feature can be used without having to do a postback.  Since ASP.NET does not support writing javascript in server controls on design time, we need to write the code in execution time. The following code has to be written RIGHT AFTER the databind method of the GridView control is called: GridView1.DataBind();
An ArrayList object will be used to save the ID of each checkbox generated by the GridView. In line number 6 the checkbox of the header row is obtained using the FindControl method and its ID is the first value to be added to the ArrayList object. Note that every ID is added with Apostrophes. <asp:Label ID="CheckBoxIDsArray" runat="server" Text=""></asp:Label> Now all that is left to do is to define the javascript methods that will implement the Check/Uncheck operations in the Checkbox column. function ChangeCheckBoxState(id, checkstate) The method "ChangeCheckBoxState" will simply change the state of a Checkbox control to the value specified in the parameter checkstate. function ChangeAllCheckBoxStates(checkstate) The method "ChangeAllCheckBoxStates" will set all checkboxes in the CheckBoxIDs arrayd variable to the value specified in the checkstate parameter. function ChangeHeaderState()
The method "ChangeHeaderState" will basically verify if all checkboxes are checked. If that's the case it will check the header's checkbox. That is verified when the method reaches the line number 14 which will mean that no checkbox was unchecked making the method to enter the if statement that unchecks the header's checkbox and finishes the method. Check / Uncheck operations can be easily implemented using server side code but we would have the expense of a postback that would end up annoying our customer for sure. Here is the sample code for this tutorial to appreciate the added functionalities. Enjoy the code! This tutorial is written by Almaxsoft Tutorial toolbar: Tell A Friend | Add to favorites | Feedback | Google |

