Products
Database Search Solution (New Version) Search Control SEO Pager Highlighter Shortcut Controls Crypt Package Free ASP.NET Controls
Geotargeting Component ASP.NET Media Player Control Flash Video Player Control Services
ASP.NET Telecommute Jobs Free IP Location Lookup Test .Net Regular Expressions CSS/Table/DIV Page Layouts Custom Programming Article Sites Master List |
How to use ImageMap ControlImageMap control is another new server control released in ASP.NET 2.0. It enables you to turn an image into a navigation menu. In the past, developers would break an image into multiple pieces and put it together again in a table, reassembling the pieces into one image. When the end user clicked a particular piece of the overall image, the application picked out which piece of image was chosen and based actions upon that particular selection. With the new ImageMap control, you can define images with distinct regions called hot spots which are identified using coordinates. Each hotspot is independent element which can respond to user actions like postback. Hot spots features
Different types of hot spotsThere are three different types of hot spots offered by ImageMap control. They are:
CircleHotspot: CircleHotspot defines circle shaped hot spot region in an ImageMap control. To define the region for a circle hot spot, we should define X and Y coordinates for circle as well as radius property which usually is the distance from the center of circle to the edge. RectangleHotspot: RectangleHotspot defines rectangle shaped hot spot region in an ImageMap control. To define the region for a Rectangle hot spot, we define Top, Bottom, Left and Right coordinates. Similar is the case for the Polygon hot spot. Overlapping hotspots are treated with extra attribute called z-index value. The hotspot with higher z-index value will be treated as selected hotspot. With the new ImageMap control, you can take a single image and specify particular hotspots on the image using coordinates. An example is shown below. You can download a sample ImageMap Control Visual Studio .NET project, used in this tutorial.
<asp:ImageMap
ID="ImageMap1"
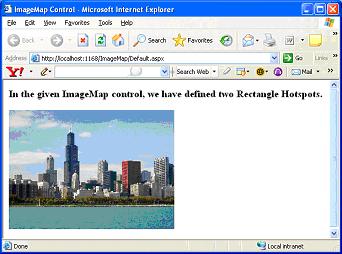
ImageUrl="~/ChicagoSkyline1.jpg"
Width="300"
HotSpotMode="PostBack"
runat="server">
Protected
Sub ImageMap1_Click(ByVal
sender As Object,
ByVal e As
System.Web.UI.WebControls.ImageMapEventArgs) Handles
ImageMap1.Click
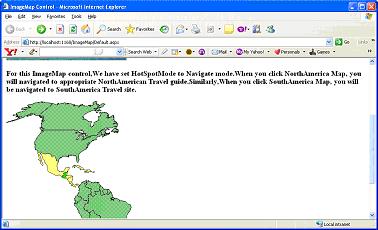
Below output brings up the image of Chicago city. If you click the left side of the image you see below message.  Similarly, if you click the right side of the image you see below output message. 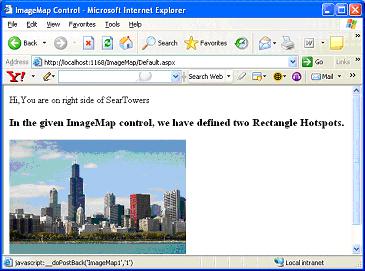 We define ImageMap control in two steps. First, define ImageMap by assigning image to control using ImageUrl property. Next, configure the hotspots for the control by setting HotspotMode property. The ImageMap control enables you to specify hotspots in a couple of different ways. From the example in above listing, you can see that hotspots are placed in a rectangular fashion using the <asp:RectangleHotSpot> element. The control takes the Top, Bottom, Left and Right coordinates of the rectangle that is to be the hotspot. Besides, the <asp:RectangleHotSpot> control, you can also use the <asp:CircleHotSpot> and the <asp:PolygonHotSpot> controls. Each control takes coordinates appropriate to its shape. After you define the hotspots on the image, you can respond to the end-user click of the hotspot in several ways. You first specify how to deal with the hotspot clicks in the root <asp:ImageMap> element with the use of the HotSpotMode attribute. The HotspotMode attribute can take the values PostBack, Navigate, or Inactive. In the previous example, the HotSpotMode value is set to PostBack - meaning that after the end user clicks the hotspot, you want to postback to the server and deal with the click at that point. Because the HotSpotMode is set to PostBack and you have created several hotspots, you must determine which hotspot is selected. You make this determination by giving each hotspot a postback value with the PostBackValue attribute. The example uses chicagoleft as the value of first hotspot, and chicagoright as the value for the second. The PostBackValue attribute is also the helper text that appears in the browser as tooltip directly below the mouse cursor when the end user hovers the mouse over the hotspot. After the user clicks one of the hotspots, the event procedure displays the value that was selected in a Response.Write statement. Instead of posting back to the server, you can also navigate to an entirely different URL when a particular hotspot is selected. To accomplish this, change the HotSpotMode attribute in the main <asp:ImageMap> element to the value Navigate. Then, within the <asp:RectangleHotSpot> elements, simply use the NavigateUrl attribute and assign the location to which the end user should be directed if that particular hotspot is clicked. You can see in below listing, we have defined two rectangular hotspots one covering North America and another South America. When you click any of rectangular hotspot, you will be navigated to appropriate site as shown below.
<asp:ImageMap
ID="ImageMap2"
ImageUrl="~/map.gif"
HotSpotMode="Navigate"
runat="server">
Hence, the ImageMap control can be used for hotspots on an image. No more worries of splitting images and learning the coordinate system to create clickable sub images. Tutorial toolbar: Tell A Friend | Add to favorites | Feedback | |