Products
Database Search Solution (New Version) Search Control SEO Pager Highlighter Shortcut Controls Crypt Package Free ASP.NET Controls
Geotargeting Component ASP.NET Media Player Control Flash Video Player Control Services
ASP.NET Telecommute Jobs Free IP Location Lookup Test .Net Regular Expressions CSS/Table/DIV Page Layouts Custom Programming Article Sites Master List |
Storing Images to Database and Retrieving to GridViewIntroductionOver the internet, one can easily find a lot of references for uploading images to a database. The major problem arises when one has to retrieve these images and display them in some server control, like the GridView control. In this article we will tackle exactly that. So let's begin... shall we? PrerequisitesThis tutorial assumes that you own a copy of Visual Studio 2005 or Visual Web Developer Express. It also assumes that you are familiar with ASP.Net 2.0 basics and have worked with SQL Express before. Creating the File Upload page:We will start with the default page, from where we will provide the user the functionality to upload the images. Open Default.aspx and switch to design-view. Drag-n-drop controls from the toolbox onto the page to create a similar form: 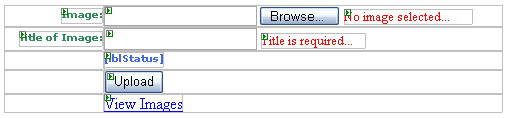 The Text-Box followed by the Browse button is the HTML File Input control. After adding this control onto the form switch to Source-View and add modify the control's source to include runat="server". This will allow us to use the control as a server control. In the above page, the controls are as follows:
Let us suppose that the Database File already exists. If not then add one now by right-clicking the Project and clicking on Add Item. Select Database and name it imgDB.mdf. The database will contain one table which is as follows: 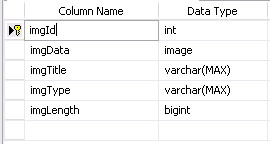 Switch to the code-behind class of Default.aspx and add a button click event handler for btnUpload. Protected Sub btnUpload_Click(..., ...) Handles btnUpload.Click Dim intLength As Integer Dim arrContent As Byte()
If fileUpload.PostedFile Is Nothing Then lblStatus.Text = "No file specified." Exit Sub Else Dim fileName As String = fileUpload.PostedFile.FileName Dim ext As String = fileName.Substring(fileName.LastIndexOf(".")) ext = ext.ToLower
Dim imgType = fileUpload.PostedFile.ContentType If ext = ".jpg" Then ElseIf ext = ".bmp" Then ElseIf ext = ".gif" Then ElseIf ext = "jpg" Then ElseIf ext = "bmp" Then ElseIf ext = "gif" Then Else lblStatus.Text = "Only gif, bmp, or jpg format files supported." Exit Sub End If
intLength = Convert.ToInt32(fileUpload.PostedFile.InputStream.Length) ReDim arrContent(intLength)
fileUpload.PostedFile.InputStream.Read(arrContent, 0, intLength)
If Doc2SQLServer(txtTitle.Text.Trim, arrContent, intLength, imgType) = True Then lblStatus.Text = "Image uploaded successfully." Else lblStatus.Text = "An error occured while uploading Image... Please try again." End If End If End Sub What this function does is that it grabs the file selected in the File Input control and gets its extension. If the file is of type jpg, bmp, or gif, then it proceeds otherwise it throws an error. This terminates upload if the selected file is not an image of supported format. After checking the file format, we get the length of the file and create a Byte Array of that same length. This Byte Array will store our file/image for us. Using the InputStream.Read method of fileUpload control, we load the image into the Byte Array. After having saved the file into the byte array, we call our function Doc2SQLServer to store the file. We pass in the title that was supplied by the user, the byte array (which is our image), the total length, and the type of image. In the Doc2SQLServer method, we create a connection to our SQL Express database and create an insertion command. After connecting to the database, we execute the query and store our image and its information to the database. Below is the Doc2SQLServer method. Protected Function Doc2SQLServer(ByVal title As String, ByVal Content As Byte(), ByVal Length As Integer, ByVal strType As String) As Boolean Try Dim cnn As Data.SqlClient.SqlConnection Dim cmd As Data.SqlClient.SqlCommand Dim param As Data.SqlClient.SqlParameter Dim strSQL As String
strSQL = "Insert Into tblImage(imgData,imgTitle,imgType,imgLength) Values(@content,@title,@type,@length)"
Dim connString As String = "Data Source=.\SQLEXPRESS;AttachDbFilename=""|DataDirectory|\imgDB.mdf"";Integrated Security=True;User Instance=True" cnn = New Data.SqlClient.SqlConnection(connString)
cmd = New Data.SqlClient.SqlCommand(strSQL, cnn)
param = New Data.SqlClient.SqlParameter("@content", Data.SqlDbType.Image)
param.Value = Content cmd.Parameters.Add(param)
param = New Data.SqlClient.SqlParameter("@title", Data.SqlDbType.VarChar) param.Value = title cmd.Parameters.Add(param)
param = New Data.SqlClient.SqlParameter("@type", Data.SqlDbType.VarChar) param.Value = strType cmd.Parameters.Add(param)
param = New Data.SqlClient.SqlParameter("@length", Data.SqlDbType.BigInt) param.Value = Length cmd.Parameters.Add(param)
cnn.Open() cmd.ExecuteNonQuery() cnn.Close() Return True Catch ex As Exception Return False End Try End Function The Image GrabberNext we create a web-page that will grab the image whose id is passed to it as a query string. Right-click the project in solution explorer and add a web-page imgGrab.aspx. Define the page_load method as follows: Protected Sub Page_Load(...,...) Handles Me.Load Try Dim ds As New DataSet Dim da As SqlClient.SqlDataAdapter Dim arrContent As Byte() Dim dr As DataRow Dim strSql As String
strSql = "Select * from tblImage Where imgId=" & Request.QueryString("ID")
Dim connString As String = "Data Source=.\SQLEXPRESS;AttachDbFilename=""|DataDirectory|\imgDB.mdf"";Integrated Security=True;User Instance=True" da = New SqlClient.SqlDataAdapter(strSql, connString) da.Fill(ds) dr = ds.Tables(0).Rows(0) arrContent = CType(dr.Item("imgData"), Byte()) Dim conType As String = dr.Item("imgType").ToString() Response.ContentType = conType Response.OutputStream.Write(arrContent, 0, dr.Item("imgLength")) Response.End() Catch ex As Exception
End Try End Sub What this does is quite simple. It gets the image data whose id is passed in and writes it to the web-page. Response.ContentType sets the web-page as an image content holder and when we write the complete byte array to the response stream, we actually get the image. Loading Images into the GridView ControlA major problem faced by developers is when loading images back into the datagrid or the new gridview control. I myself faced long hours trying to come up with a solution for this, which in the end was a simple procedure. Create a new-page, Viewer.aspx and add a GridView onto it. (This page is linked from the Default.aspx page via lnkView). Name the GridView imgGrid and click on the small box located at the upper-right corner of the control. 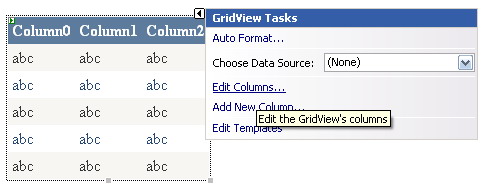 Click on Edit Columns to open the Fields Dialog as shown below. 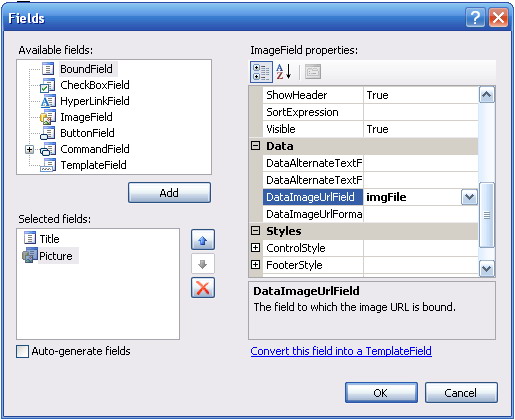 In this dialog, uncheck "Auto-generate fields" and add two fields; a bound field and an image field. For the bound field set the column header text to Title and the DataField property to imgTitle (This will bind this column to the imgTitle column in the dataset to which we will load our table data). As for the image field, set the caption to Picture and the DataImageUrlField to imgFile. You might think where this imgFile comes from, especially since the database does not contain a column with such a name. Switch to the code-behind class and create the page_load event as follows: Protected Sub Page_Load(ByVal sender As Object, ByVal e As System.EventArgs) Handles Me.Load Dim ds As New DataSet Dim da As SqlClient.SqlDataAdapter Dim strSQL As String
strSQL = "Select imgId,imgTitle from tblImage" Dim connString As String = "Data Source=.\SQLEXPRESS;AttachDbFilename=""|DataDirectory|\imgDB.mdf"";Integrated Security=True;User Instance=True" da = New SqlClient.SqlDataAdapter(strSQL, connString) da.Fill(ds)
ds.Tables(0).Columns.Add("imgFile")
For Each tempRow As DataRow In ds.Tables(0).Rows tempRow.Item("imgFile") = ("imgGrab.aspx?id=" & tempRow.Item("imgID")) Next
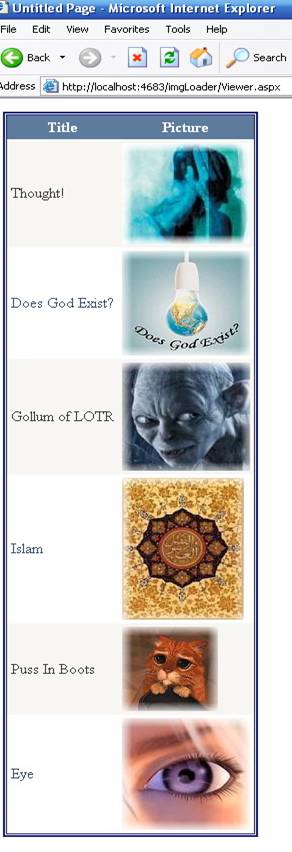
imgGrid.DataSource = ds imgGrid.DataBind() End Sub What this function does is the simple task of grabbing data from the database. It grabs two columns, imgId and imgTitle. What it does afterwards is the key concept... and the few-lines of code that marks the solution to a big problem. After filling in the dataset, we know that it contains one table, at index 0 of course. We add a custom column "imgFile" to it. After that, we traverse through each dataRow in the table. And for each row, we make a call to our imgGrab.aspx page with the id from that row. We set this equal to the record for imgFile for that row. Thus on display of the GridView, for each row being displayed, the imgGrab.aspx web-page is called and the image is displayed in return. A screen-shot of the resulting grid:
Tutorial toolbar: Tell A Friend | Add to favorites | Feedback | |