Products
Database Search Solution (New Version) Search Control SEO Pager Highlighter Shortcut Controls Crypt Package Free ASP.NET Controls
Geotargeting Component ASP.NET Media Player Control Flash Video Player Control Services
ASP.NET Telecommute Jobs Free IP Location Lookup Test .Net Regular Expressions CSS/Table/DIV Page Layouts Custom Programming Article Sites Master List |
Client Side in ASP.NET: Common Javascript FunctionsWhy?An over all look at all or most of the currently employed web development areas will rival an interesting fact: You can utilize and make benefit of many of these areas without full or deep knowledge of their underlying technologies! This fact is simply the motivation of writing such a tutorial. If it is possible to gain all these benefits without digging deep into the technology itself, then why not to do so? Why wait to have a complete mastering of a given technology and then start utilizing it? In this tutorial we are going to present you a set of famous and frequently used client side scripts. You can simply copy any of these scripts into your web application without giving any attention to their underlying technologies. If, in any case, further customization or configuration is essential to utilize any of these scripts then we will include this information as well. All these scripts are client side scripts and if you are not familiar with client side scripts or need to contrast it with the more famous server side scripts you can review Wikipedia in this regard. All you need to know here is that the client side scripts are just a part of your HTML file. We will dig deep and come up with things that are commonly used and useful ..... Let's start then! Get input / Use inputTo get an input from your user and then to use this input elsewhere (Example: to display that input somewhere on your page) use the following script:
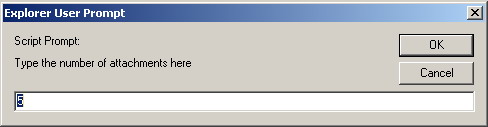
Line 5 displays an input box to the user to enter his input. The input is then stored in the variable input . In line 5 you can specify the message to be displayed to the user to help him figure what input is required. You can also set a default value to be displayed to the user (5 in our example). Line 5 will cause the following input box to appear to the end user:
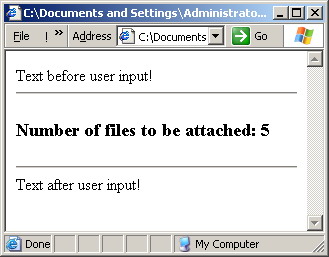
Line 6 writes some text to our HTML file. Specifically it writes some formatting tags (<H3>, and </H3>) and most importantly it reused our input variable so that it's value is written to the HTML file. After the user enters his input and clicks OK, the final output page will be as follows:
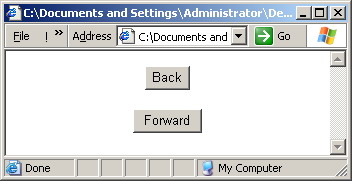
Back and forward navigationMost if not all web browsers have Back and Forward buttons. The best describing use case of these buttons is when you have a single page with many links. You click one of these links and then click the Back button to return to the main index page and click another link and so on. To implement the same behavior using a similar two buttons but inside your web page, you can use the following script:
In the above script, you can change the text on the two buttons by changing the words "Back" and "Forward". Although a somewhat similar behavior can be implemented using the standard non-scripting HTML anchor <a> tag, the fact of that not file names exist at all in the above script makes it a much more efficient alternative. When you run the above script you will see the following page:
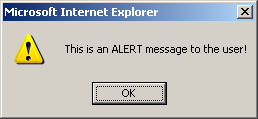
Display Message boxes and alertsTo display an alert to your user, use the alert JavaScript function call. For example:
When the browser executes the above script your end user will see the following alert:
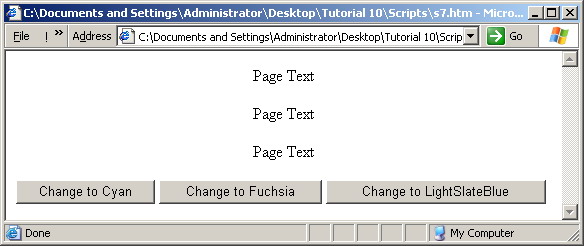
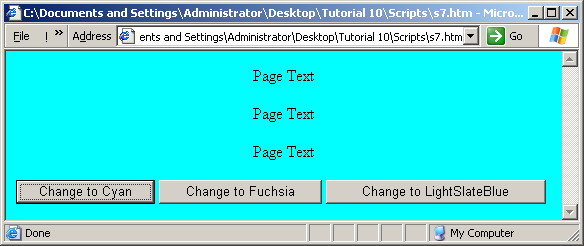
Visual feed back (Background color)It's sometimes desirable to give you user a proper feedback after an action he takes (after a button click for example). On of the most notable feedbacks is the change of the entire page background. For example, you can change your entire page background to red when your user clicks a critical button that performs a critical function. You can get a list of the supported colors from the references section at the end of the tutorial. The script we are going to present now is a function that changes the background of the page and a set of buttons that call that same function but with a different color parameter every time. Here's the script:
And when you run the script you will get the following 3 buttons:
Clicking any of them will change the color of the background to the corresponding color, let's examine the 'Change to Cyan' button for example:
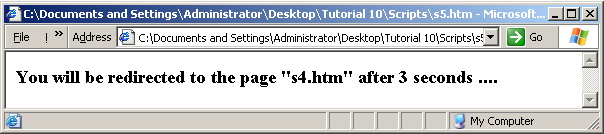
Automatic page redirectionSeveral times you visit a website and you see a message saying that this page has been moved and after few seconds you are automatically redirected to the new and correct location of the page. Another variation is to have a slideshow in which a set of pages are being displayed successively one after one with a duration of few seconds within every page. Several other scenarios can be implemented, so the actual applications are open to your imagination. The script itself is as simple as the following:
The above script display a message to the user that he or she will be redirected within 3 seconds (line 2). The new page to which the user is to be redirected is indicated in the statement in line 9. The duration after which the user is redirected is indicated in line 12 in unites of milliseconds. When this script runs, it displays the following page:
... and after 3 seconds the page "s4.htm" will be automatically displayed. For further information
Tutorial toolbar: Tell A Friend | Add to favorites | Feedback | |