

Products
Database Search Solution (New Version) Search Control SEO Pager Highlighter Shortcut Controls Crypt Package Free ASP.NET Controls
Geotargeting Component ASP.NET Media Player Control Flash Video Player Control Services
ASP.NET Telecommute Jobs Free IP Location Lookup Test .Net Regular Expressions CSS/Table/DIV Page Layouts Custom Programming Article Sites Master List |
LINQ To SQL With LinqDataSource ControlLINQ to SQL is an extension of LINQ that allows developers to write "queries" in your ASP.NET web application to retrieve and manipulate data from a SQL Server database. This gives the ability to access relational database objects as normal .Net objects. LINQ to SQL integrates SQL based schema definitions to the common language runtime (CLR) type system. This provides strong typing, syntax checking, intellisense over SQL objects, while retaining the expressive power of the relational model and the performance of query evaluation directly in the underlying database. Basically LINQ to SQL is an Object relational mapping implementation that allows developers to model a relational database using .NET classes. We can then query the database using LINQ, as well as update/insert/delete data from it. It fully supports transactions, views, and stored procedures. The Basic steps in implementing Linq to SQL are: Modeling Databases Using LINQ to SQLWe need to create a Model for our database by adding a Linq to SQL Class as follow. 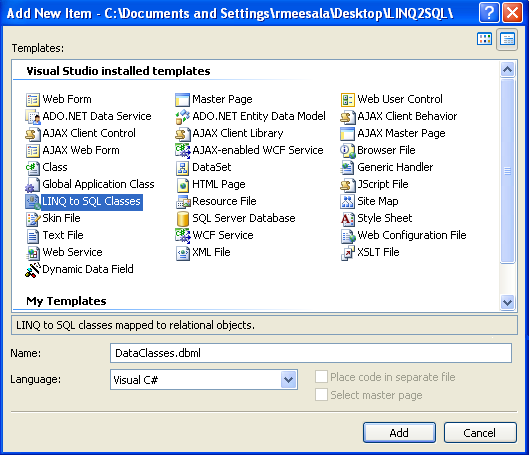 This creates a .dbml (Database mark up language) file which contains the metadata for the database that will be used to create the common language runtime types for the database objects. This file is used for creating datacontext class which contains tables as properties and stored procedures as methods. We need to drag the necessary tables from Database Explorer to the left pane and Stored Procedures to the right pane as shown below. 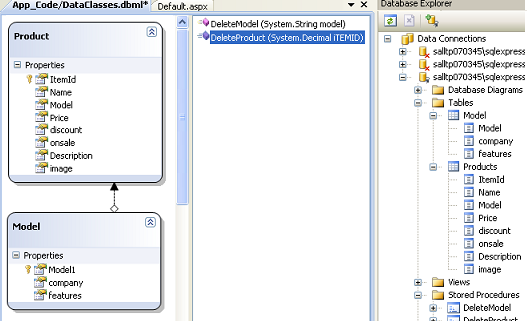 There are two tables (Products, Model) that are dragged from the database explorer to the left pane. This pane represents the properties of DataContext. The dotted arrow between two tables indicates the foreign key relationship between the tables. Also the two stored procedures DeleteModel, DeleteProduct are dragged from database explorer to the right pane. This pane contains the methods that are part of the DataContext class. Now we can use the above DataContext class to access the database. The DataContext class is a partial class so we can customize the class by adding our own methods and events to it for data validation as well as business logic rules integration. We can use the DataContext class to retrieve the product list like below. DataClassesDataContext
db=new DataClassesDataContext(); In the above code we are instantiating the DataClassesDataContext class which represents our data model to access the database tables and stored procedures. We are performing an inner join over the Product, Model tables to retrieve the columns of both tables. We are creating a new anonymous type in the select statement above. The result gives an IEnumerable<anonymous type> which points to the newly generated class of objects. The ArrayList object list will contain the data that is retrieved from the above query and used as the data source for the GridView Control. We are generating the column headers dynamically by setting AutogenerateColumns property of GridView to true. We can also execute the stored procedures using the DataContext like below. db.DeleteModel("SD1000"); We can also use LINQDataSource control to execute LINQ statements to retrieve database data as well as for data manipulation. We can use a LinqDataSource with a GridView as follows. Click the Configure DataSource Link Button on the GridView Tasks list. It opens DataSource Configuration Wizard like this. 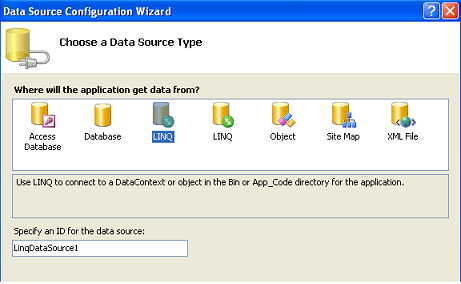 Select LINQ option and give an ID for the Datasource. By default it will take LinqDataSource1 as the ID for the LinqDataSource we are creating. Configure the DataSource by selecting the DataContext class we want to use for this GridView. The combo box shows the available DataContext classes and select an appropriate DataContext class from the list. 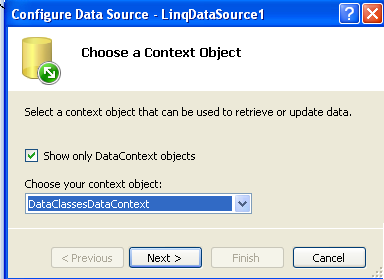 In this page we need to select the table that we want to associate with this GridView. Also we need to select the columns (individually or * to select all) that needs to be displayed on the GridView. If we want to perform the Insert, Update, Delete operations click on the Advanced button that will pop up Advanced Options dialog box where you can enable Automatic Insert, Update, Delete operations by checking the respective check boxes.  Finally enable Paging, Sorting, Selection functionality of the GridView by checking the appropriate check boxes. 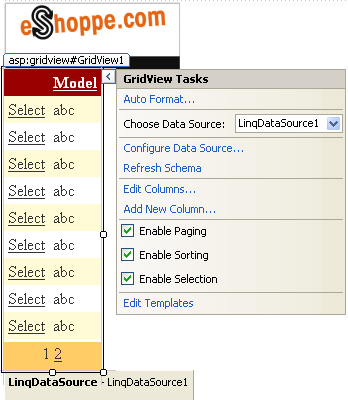 Now the GridView is ready to retrieve the data from the database using the LINQDataSource control. We can use the GridView operations like insert, update, delete to perform the respective operations against the database with out writing a single line of code. LINQDataSource control will fire the respective queries against the DataContext automatically. You can download example LINQ to SQL Visual Studio project, used in this tutorial. This tutorial is written by RELIANCE CONSULTING. Tutorial toolbar: Tell A Friend | Add to favorites | Feedback | |