

Products
Database Search Solution (New Version) Search Control SEO Pager Highlighter Shortcut Controls Crypt Package Free ASP.NET Controls
Geotargeting Component ASP.NET Media Player Control Flash Video Player Control Services
ASP.NET Telecommute Jobs Free IP Location Lookup Test .Net Regular Expressions CSS/Table/DIV Page Layouts Custom Programming Article Sites Master List |
A Simple Month Calendar Control for ASP.NETIntroductionVery often web reports needs input parameters. For example, this can be period of report (i.e. start date and end date). Hopefully we all have built-in calendars for this. But what to do when we need to select just month and year for our report? The simplest way is to use date select calendar and let user select any day in desired month and then throw day he selected, leaving only month and year. But, is this solution user-friendly; do you like it? I don't consider it to be user-friendly and don't like it as well. Starting with user controlsSo we decided to write our own control for selecting month/year pair. Then we will use it on our page. Let's start by creating new web-site in Visual Studio 2005 and adding new Web user control to it. You can download sample Month Calendar Visual Studio .NET project here. 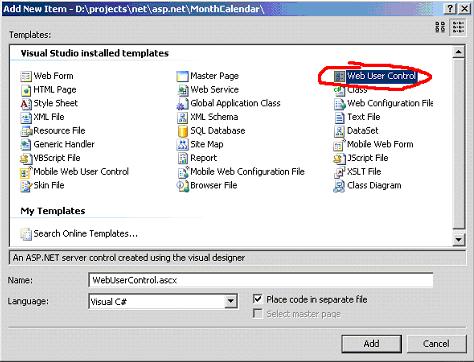 Web user control consists of two parts: .ascx file, which is face of our control and contains HTML and ASP.NET 2.0 tags and code-behind partial class. Now let's create a simple design for our control in .ascx file. Let's start by creating div, and placing a table inside of it. We will have 4 rows and 3 columns in our table (for 12 month).
<div
style="border: 1px solid
black; width: 100px; text-align: center;"> It's pretty simple now and by the way, where is the year? Let's make a field for year input and place it on top of our table in separate div.
<div
style="background-color:
rgb(255,238,187); padding-top: 2px;"> It's better now. But a simple navigation for year can be helpful. Let's create a simple JavaScript function to skip to next or previous year. One thing to remember there – is that user is not forced to enter only number in our year text box. So if we just take its value and increase (decrease) it can result in errors if user mistyped year and add some invalid characters to the field. Doing magic with JavaScriptTo validate date we will use regular expressions in JavaScript. It's really ease to use regular expressions - you just need to provide a patter and tell RegExp class to test your input value against pattern. Here is JavaScript function which will do all this for us:
<script> As you can its fair simple, but contains some interesting moments which I want you to take a closer look at. First of all it's getElementById which is standard JavaScript function. But if you look at its body you will notice the use of ASP.NET script as the parameter to getElementById function. ASP.NET renders its controls in respective HTML tags (and even several HTML tags) and gives them unique IDs. To ensure uniqueness ASP.NET may modify string provided in ID attribute of each ASP.NET control, adding this control id or page id. So our month calendar's text box on different pages can have different ids. That's why we use txtYear.ClientID, which returns the actual id of rendered input field. Next thing worth to have a look at, is a RegExp. RegExp stands for Regular Expression and allows performing several operations (replace, split, test, etc) on input strings using patterns. Pattern defines the format of the string. In our case \d ("\\d" in JavaScript, because "\" is escape sequence) is built-in class, which denotes numbers. Number 4 in {4} means that \d class should appear in text exactly 4 times. This expression can be rewritten to several other forms (for example [0-9][0-9][0-9][0-9] or \d\d\d\d or [0-9]{4} etc). If year in the input is correct, we then increase or decrease it by 1. But if test was not passed we simply get the current year (newDate.getFullYear()). Next step is binding script we wrote to some simple control. I choose to use simple left-right-arrow images. Now let's modify our header div (where the year text box is) to make it look like:
<div
style="background-color: rgb(255,238,187); padding-top: 2px;"> Now our text box is bound to our script by means of small arrows which allow user to go back and forth in year selection. Making months workNow we approach to core functionality of our control. Now we should make months which are just static text for now to be ASP.NET link button control. Replace month's table with the following one:
<table
width=100%
align=center> As you can see I wrapped month names in Link button and added event handler to all links. Now our work with .ascx file is done it's time to switch to code-behind class. In code behind we should first of all set the initial date of calendar and provide a value field so that pages and other controls can retrieve value from month calendar. Let's create a field and a property to hold value:
private
DateTime _Value =
DateTime.Now; Next step is to create even handler to our source. Paste next fragment in code-behind class.
public
void lnkMonthClick(object
sender, EventArgs e) public event EventHandler DateChanged; This code snippet is rather simple and somewhat stupid done. But its aim is just to demonstrate the way how it can be done and this way is easy to understand. First of all we try to determine what link was clicked this can be done in numerous ways, you can check sender it, text or any other value. In this case I check Text property of the control (the bad with this, if you change month name in .ascx file you should check to change it in code-behind). Once we're ready with month we can try to parse the year. If year was in incorrect format - then we just take the current one. And the final step is invoking method DateChanged so that other controls and pages can be notified when the date changes. Using Month select controlNow let's add control to our Default.aspx page. Just drag-n-drop your month select control file from right panel to Default.aspx content pane. You should see something like this: 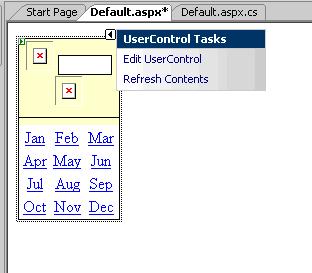 Now we should register event for month change. To do this, simply add this line to Page_Load: MonthSelect1.DateChanged += new EventHandler(MonthSelect1_DateChanged); And then add event handler code. For example:
void
MonthSelect1_DateChanged(object sender,
EventArgs e) ConclusionIt was an example of creating simple web user control using ASP.NET 2.0. Certainly there are a lot of variants how similar controls can be designed, but my aim was to provide just a basic tutorial on writing and using web controls. Tutorial toolbar: Tell A Friend | Add to favorites | Feedback | |