

Products
Database Search Solution (New Version) Search Control SEO Pager Highlighter Shortcut Controls Crypt Package Free ASP.NET Controls
Geotargeting Component ASP.NET Media Player Control Flash Video Player Control Services
ASP.NET Telecommute Jobs Free IP Location Lookup Test .Net Regular Expressions CSS/Table/DIV Page Layouts Custom Programming Article Sites Master List |
Nested Master PagesTo give a same look to the overall site Master Pages are used since long. They give you the power to customize your web pages but keeping the same overall look of the website as well. To add to this, one of the cool advanced features of the new Master Pages feature in ASP.NET 2.0 is the ability to nest them. This tutorial will cover the details regarding how master pages can be nested within one main master page. This will be done by first covering what is a Nested Master Page, its advantages & limitations and then a practical example will be given to show how the Nested Master Pages are made in ASP.NET. When one master page references another as its master, it is said to be a nested master page. A number of nested masters can be componentized into a single master. There is no architectural limitation to the number of child masters that can be created. This nested model is pretty cool and powerful, and allows arbitrary levels of nesting. The depth of nesting also does not impact on performance significantly. The advantage of this kind of structuring is that a number of child masters can be created to be subordinated to the overall look and feel of the site defined by the Parent master, while the child master give the child pages some uniqueness. While a parent master defines the overall layout of the pages—header, body and footer, the child master expands the body for a group of pages. Just like the parent master page child masters have the extension .master too. It contains all the controls that are mapped to content place holders on the parent master page. The layout is similar to that of a content page in this respect. However, child masters also have content place holders of their own to display content of its child pages. For example, you could define a top-level master-page called "MainMaster.master" that defines a common logo header and footer, and defines a content-placeholder for the page called "content". You could then define two sub-masters beneath it - one that provides a two-column layout model for the content ("TwoColumnMaster.master"), and one that provides a three-column layout model ("ThreeColumnMaster.master"). These two nested-master pages could then use the MainMaster.master file as the root master, and only adjust the layout within its content section (each would fill in the "content" placeholder and in turn add their own content-placeholders for sub-pages within it). The benefit of this approach is that if you ever want to change the logo or top-level design of the site, you only have to update one file (MainMaster.master) and then have every page on the site automatically pick it up regardless of what master file they were based on. Note that different "contentplaceholders" on the main master can be used to load groups of content files loaded into the child masters which are in turn loaded into the main master. This implies that multiple child masters can load multiple content files into different "contentplaceholders" on the main master file. ASP.NET 2.0 is not the first in support of "templating". However, the functionality provided by it goes beyond the frontiers of "templating" to make master pages components that can be reused. The mechanism is not based on class inheritance. The binding of the master and the content pages is defined statically and cannot be changed or set programmatically. Below are a couple of sample codes which will help you in better understanding of the concept of Nested Master Pages and how to implement it? Nested Master Pages - Example 1.1. We have 2 master pages, "MainMaster.master" and "SubMasterPage.master". 2. "SubmasterPage.Master" is a child of "MainMaster.Master". 3. All .ASPX pages are inherited from "SubmasterPage.master". As shown below: 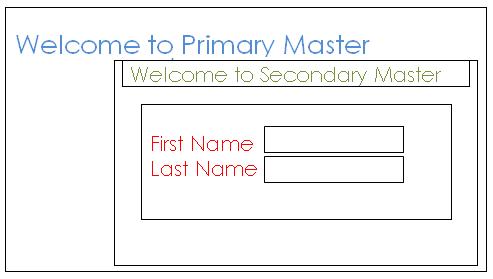 Implementation Steps: 1. Below is the code for our MainMaster.master:
<%@
Master Language="C#"
AutoEventWireup="true"
CodeFile="MainMaster.master.cs"
Inherits="MainMaster"
%> 2. Add another Master page i.e. "SubmasterPage.master" from "Add New Item..." 3. Open the HTML view of "SubmasterPage.master" and add MasterPageFile="~/MainMaster.master" in the "Master" directive. 4. In "SubmasterPage.master" add a <asp:Content> control. That in turns contains two <asp:contentplaceholder> controls. It is important to note that "ContentPlaceHolderID" property of a <asp:Content> should point to the Contentplaceholder control of <MainMaster.master>. Our <asp:Content> control looks like:
<asp:Content
ID="SubContent1"
ContentPlaceHolderID="MasterContentPlaceHolder1"
runat="server"> 5. Add Content page by right clicking the "SubMasterPage.Master" in solution explorer. Now compile your application and view the result. Nested Master Pages - Example 2Another sample code is given below: Parent Master Page:
<%@
Master Language="C#"
AutoEventWireup="true"
CodeFile="ParentMasterPage.master.cs"
Inherits="ParentMasterPage"
%> Child Master Page:
<%@
Master Language="C#"
AutoEventWireup="true"
MasterPageFile="~/ParentMasterPage.master"
%> Page:
<%@
Page Language="C#"
AutoEventWireup="true"
CodeFile="Default.aspx.cs"
Inherits="_Default"
Title="Untitled Page"
RunTimeMasterPageFile="~/ChildMasterPage.master"
MasterPageFile=""
CodeFileBaseClass="BasePage"%> The only limitation is that Visual Studio 2005 only supports nested master page editing in source-view, and doesn't support it in the designer, though obviously it does support editing them when the master pages are not nested. There is a cool tip, though, that will allow you to load a design-surface for a page that uses nested master-pages. This will allow you to use all of the control-designers and smart tasks in design-view for the page (for example: to perform data-binding, auto-format things, and use any of the control wizards), and not have to change any-code to test it at runtime. The tip works by adding in the "App_Code" folder of the website project, a base-page class that defines a new property called "RuntimeMasterPageFile" of type string. The base-class then overrides the page's "OnPreInit" method and uses this property to set the Page object's MasterPageFile at runtime:
public
class BasePage :
System.Web.UI.Page { Once a code-behind class derives from this base class, it becomes possible for a developer to set this "RuntimeMasterPageFile" property in the .aspx file's <%@ Page %> directive (note: the CodeFileBaseClass also needs to be set to the base class to enable this):
<%@
Page Language="C#"
You'll notice that the above page now has two master-page file directives - the usual "MasterPageFile" directive that Visual Studio will use at design-time, and then the custom RuntimeMasterPageFile directive that will override this at runtime. What this allows you to do is point the page at a "ParentMasterPage.master" file at design-time that is a single-nested page with contentplaceholder controls that match the names in your nested master. You can then switch to design-view and edit the content and all controls on your page. When you run the page, though, it will use the nested "ChildMasterPage.master" (or any other master page you specify) to run. Tutorial toolbar: Tell A Friend | Add to favorites | Feedback | Google |