Products
Database Search Solution (New Version) Search Control SEO Pager Highlighter Shortcut Controls Crypt Package Free ASP.NET Controls
Geotargeting Component ASP.NET Media Player Control Flash Video Player Control Services
ASP.NET Telecommute Jobs Free IP Location Lookup Test .Net Regular Expressions CSS/Table/DIV Page Layouts Custom Programming Article Sites Master List |
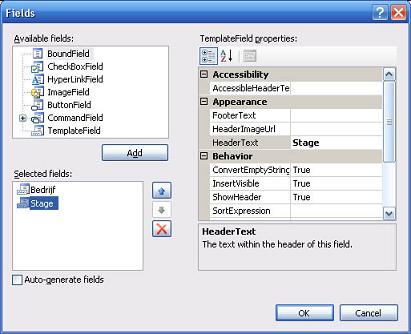
Working With ObjectDataSource And GridViewIntroductionA GridView supplies data in table form with the possibility to sort, edit, select an item and even split the data over several pages. Data binding with the GridView can be done by the principals of the 3 tier design model. For more info about this model and the implementation, see the tutorials of Using ADO.NET to Develop Data Access Logic (DAL) and ADO.NET - Working with Disconnected Data. ASP.NET supplies a data control structure called ObjectDataSource which supplies the possibility to use the 3 tier design model and has the advantage that less code has to be written. It supports all sql commands from the middle tier and handles sorting, paging and caching operations. You only have to supply the underlying object and map the methods from the Business Layer to the different sql commands. There are a few constraints for the middle tier to be able to use an ObjectDataSource. The middle tier has to be stateless, supply a default constructor (without parameters) in case of instance methods (not needed for static methods) and all logics have to be implemented in one single class. The positive side for using an ObjectDataSource is that the result of a query can be any possible collection (dataset, datatable), array or list of objects. Every record can be a custom object that makes his data accessible with public properties. ObjectDataSourceTo add an ObjectDataSource, drop it from the Toolbox on the Web page. Click the Smart Tag > Configure Data Source and a wizard will help you to choose a business object and define the data methods. It might be needed to check out 'Show only data components' if you have written some code for the business layer yourself. 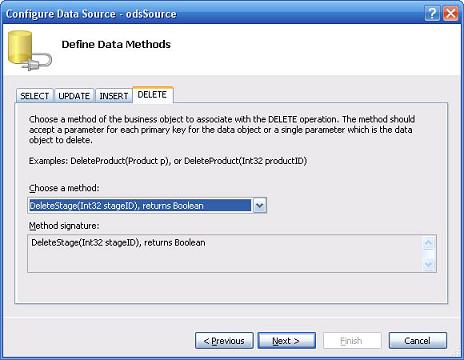 The TypeName property defines the type of object which will be instantiated. The DataObjectTypeName property refers to the class that implements the sql methods. Every operation has to be linked with a method of the class defined in the TypeName property. Every time a method is called, an object of the class defined in the TypeName property is created by using the default constructor and destroyed afterwards. It's possible to use extra parameters in your sql statements. These have to be inserted in the <SelectParameter> collection. Parameters can have different types, but their names have to be the same as their name in the select method in the facade class. Possible parameter sources are control, query, session or form values. 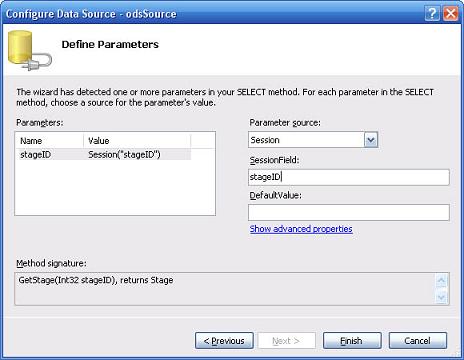 If you use the DataSourceID to link the ObjectDataSource with a control, then you don't have to call the DataBind method, this goes automatically. This binding happens just before the PreRender event of the control or the page. If you want to bind it right away, you can force it with calling the DataBind method. This can be useful in cases you need the data before showing the control (e.g. counting the number of rows to see if you need paging). GridViewThe GridView is some sort of a table to display your data in, but then with useful extra functions. As with any other control you can change the layout by changing the correct properties. Or you can use the Smart Tag > Auto Format to choose from several templates. Different parts (Header, Footer, Row, ...) each have their own set of properties to add style too, or you can make use of a CSS-class or a theme/skin and link it to the correct part. If you want to select, edit or delete rows of a GridView, you'll have to use keys to keep track of which row has been selected. This key exists out of two parts: the DataKeyNames is an array of strings filled with field names and DataKeys is an array with the correct value for each DataKeyName. There are different types of columns for a GridView:
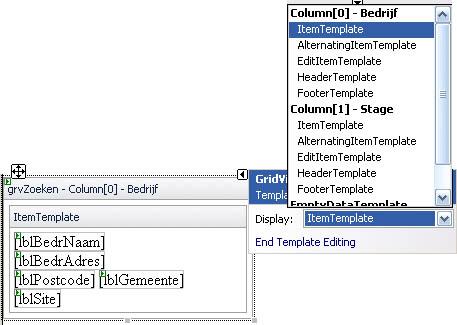 To place several fields in one column, you have to bind them one by one to their control. This is done by <%# Eval("fieldname")%> or by <%# Bind("fieldname")%>. Eval offers field formatting but only supports one way binding (read-only). Bind supplies a bi-directional binding which enables the fields to be updated and restored into the database. <ItemTemplate> A common used method to delete several rows at once is to use a checkbox to assign which rows have to be deleted. Do NOT use a CheckBoxField for this, but create a TemplateField and add a checkbox control towards it. You could also add a button control in the footer which enables selecting all rows at once. It might be very useful to use the CommandName for this control. Clicking this control will then trigger a RowCommand event in which you can check on e.CommandName to check which button you clicked. When editing is allowed (BoundField's property ReadOnly on false) then the text in a BoundField will change to a TextField
so you can edit it. For a TemplateField the layout will change to whatever your specified in the EditItemTemplate.
The Edit button from the CommandField will change to an Update and Cancel button. CachingQuite often you'll be using large data sets to populate your GridView. It would be a disaster for your performance if you have to reload all the data from the database every single time, certainly if the data is static. ASP.NET provides one cache object on the Web server for each web application. You don't have to be afraid to run out of memory when dumping all your tables in the cache, the Automatic Cache Resource Management will dump items out of the cache when memory resources get low. It's a nice habit to let the classes handle the caching. Note that standard GridView control have many possible limits in real world scenarios. You can make almost everything, but every that thing require your effort and your valuable time. If you need to implement support for context menus, Ajax, search engine optimization, load large tables and speed up data, full support for Firefox and Opera browsers, scrollbars, client side caching etc., it is better to get some more professional solution like APNSoft Datagrid which will do all this job for you and reduce your development time. This tutorial is written by Assessino. Tutorial toolbar: Tell A Friend | Add to favorites | Feedback | |