

Products
Database Search Solution (New Version) Search Control SEO Pager Highlighter Shortcut Controls Crypt Package Free ASP.NET Controls
Geotargeting Component ASP.NET Media Player Control Flash Video Player Control Services
ASP.NET Telecommute Jobs Free IP Location Lookup Test .Net Regular Expressions CSS/Table/DIV Page Layouts Custom Programming Article Sites Master List |
How To Change Page Title And Meta Tags At Run TimeOne of the things that I really like about ASP.Net, is that you can make everything accessible at runtime. You can make everything dynamic, including set the Title and the Meta Tags of your page at runtime. The good thing about ASP.Net actually, is that you always have the ability to add the attribute: Runat="server" . Using this attribute, you will be able to access your controls at runtime, even for the tags that are in the <head></head> portion of your page (which include of course the meta and title tags, as well as others such as the stylesheets, etc...). So anyway, let's get started. Open up Visual Studio 2005, and create a new website. Give your project any name. In my case it's "Title_And_Meta_Tags" (also, you can download sample Title And Meta Tags Project, used in this tutorial, if you don't want to build it from the beginning). Go to your HTML code page, and modify the title tag to look like: <title id="title" runat="server">Initial Title Here</title> Then add the following two meta tags to your code under the title tag: <meta name="description" content="description" id="description" runat="server"
/> Nothing hard till now. We just set for every tag an ID, and added the runat="server" attribute. This way we can access these controls from the code behind page. Now modify your page in the design view to look like the following image: 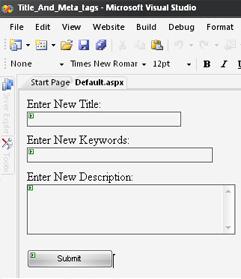 Controls IDs: txtTitle, txtKeywords, txtDescription, btnSubmit. Just before the declaration of your class, in the page behind code, import the HTMLControls class: Double click on the page to go to the "OnLoad" event. Place there the following: ' Code Starts Here title.InnerText = "Initial Title Here" ' Code Ends here At this stage, save your changes, and load the page in the browser. You should see the title "Initial Title Here". But to make sure everything is working correctly, right click on your page, and click "View Source". You will see the meta tags having the texts we added at the OnLoad Event. You should see something similar like this: <title
id="title"
runat="server">Initial
Title Here</title> This will prove that everything is working fine :) Now there's still a little bit of code to add, to handle the changes at runtime. To do so. go back to your design page, double click on the Submit button to handle the onClick Event. Once your there, add the following code: 'Code Starts Here title.Text = txtTitle.Text 'Code Ends Here That's it. The new attributes will inherit the text you enter in the text fields. Note that you need to be careful when changing page title and meta tags Keywords and Description, because search engines like Google or Yahoo use them in their search results. Use short title, few keywords separated by comma and short description. All three parameters must suite to the content of page. Hope this tutorial was helpful to you. This tutorial is written by Tea Maker. Tutorial toolbar: Tell A Friend | Add to favorites | Feedback | |