Products
Database Search Solution (New Version) Search Control SEO Pager Highlighter Shortcut Controls Crypt Package Free ASP.NET Controls
Geotargeting Component ASP.NET Media Player Control Flash Video Player Control Services
ASP.NET Telecommute Jobs Free IP Location Lookup Test .Net Regular Expressions CSS/Table/DIV Page Layouts Custom Programming Article Sites Master List |
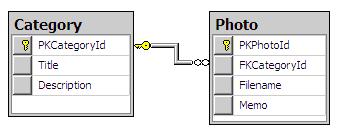
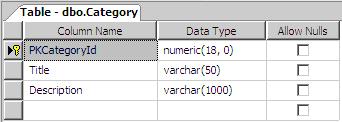
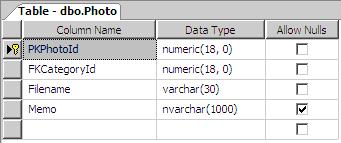
Developing a picture album in ASP.NETIntroductionA Photo album is a popular approach to share pictures among friends, members or even the whole world. In this tutorial, we will be looking at how to implement a photo album in ASP.NET 2.0 and MS SQL 2005. Picture album functionalitiesThe following functionalities will be implemented and put together so that at the end, we can get a complete photo album management system:
You can download sample Picture Album Visual Studio .NET project used in this tutorial. Database Design
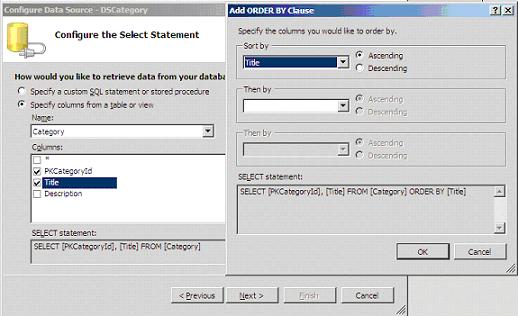
The Master PageWe will make use of the Master Page to bring uniformity to the website being developed. It will contain the menu for displaying the categories and also the links to add new photo or photo category. First, 2 hyperlinks are dropped on the form "Create New Category" and "Upload Photo" and their "Navigate URL" linked to the appropriate pages. Also, it is very important to set their "Causes Validation" property to False. 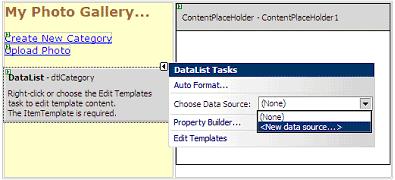 Then, a data source needs to be bound to it so that all the categories are displayed. 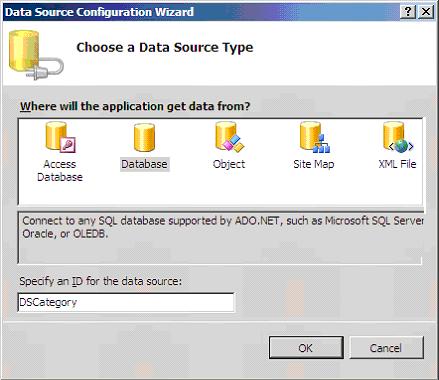 Chose the database and save the connection string in the Web.config file. Next, choose all the fields that are found in the table "Category", which we will use later. We can also choose to sort the list by Title, which makes sense in a way. 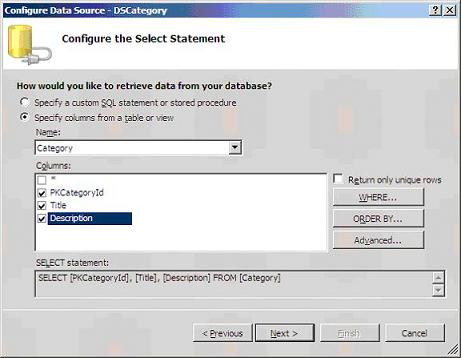 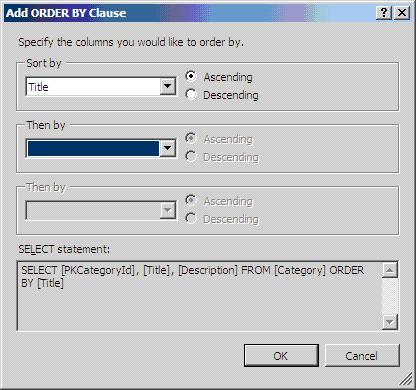 Click on "Next" and "Test Query" just to make sure the proper dataset is retrieved. The Item Template of the Datalist can be altered to get better menu displayed. First of all, the labels in the list need to be replaced by hyperlinks so the user can be redirected to the proper gallery when he/she clicks on a particular category. We can also choose to apply a ToolTip text so the description of the category is displayed whenever the mouse is hovered over the link. The text of the hyperlink is bound to the Title field of the dataset being returned by query. 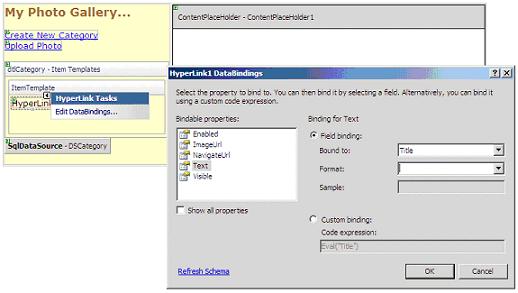 The page where the user should be directed is "Main.aspx". Also, to display the pictures in that particular category, a query string which makes use of the field "PKCategoryId" is used. 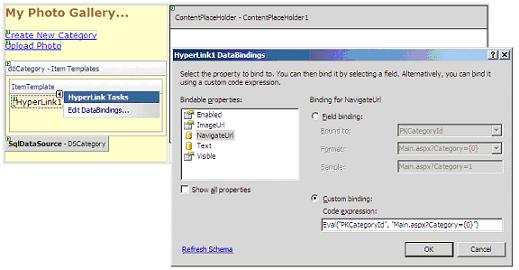 To display the ToolTip text on that URL, the following code needs to be added in the .aspx file: ToolTip='<%# Eval("Description") %>' One last thing that is really important is to get all the changes reflected in the master page (like when adding a new category). The DataList has to be simply refreshed with the datasource. And that is done in the Page_Load event of the Master Page.
' Refresh the datalist Adding New CategoriesThe screen below will be used to input new photo categories. 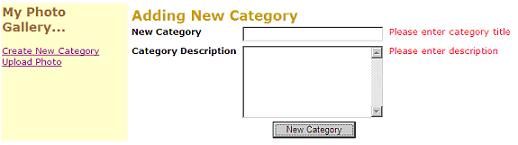 2 textboxes will be used for providing information about the category. Required Fields validators are also used to ensure that the information is supplied for both the Category Title and description. So, on the Click_Event of the button to add a new category, the following function will be used. Note that System.Data and System.Data.SqlClient need to be imported.
Private
Sub addNewCategory(ByVal
strTitle As String,
ByVal strDescription As
String) The parameters strTitle and strDescription are the values obtained from the 2 textboxes. The snapshot below shows the scenario where a new category (Christmas) was added. 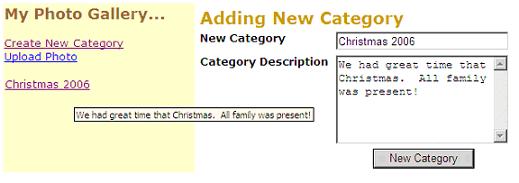 Uploading a picture in a CategoryThe screen below will be used to upload a photo to a particular category. The flow for uploading a photo:
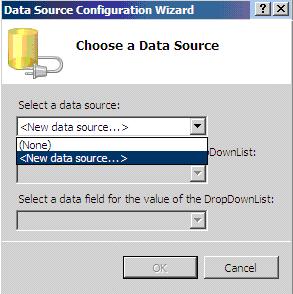
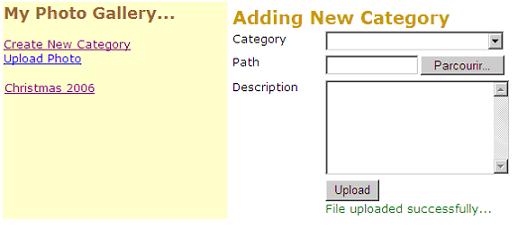 To populate the combo list "Category" is quite simple, as shown in the screenshots below.
Then select the value and the corresponding text to display in the combo list as follows.  That should be enough in populating the combo list with the categories available. The "FileUpload" object provided in ASP.NET 2.0 is really useful as it decreases a lot of work as compared to version 1.1. It provides a method called "FileExist" that helps in determining whether the file being browsed really exist on the machine; thus avoiding all sorts of errors. Also, it is important to give each picture being uploaded a unique name such that if 2 picture of the same name would exist in the uploaded folder, some unexpected behaviour may occur. For that, we will make use of the time stamp, i.e. the time at which the picture is uploaded. In this tutorial, we will call it the GUID – General Unique Identifier.
' Function to generate a GUID using current date and time We need a place to keep the picture. So, we will create a folder in the solution called "Gallery".
Before uploading a file, we need to check the extension of the file. In our concern, we will only process images (jpg, jpeg and gif). You are free to extend the list! The following code snippet checks for the extensions.
' Returns true if file name has the extension .jpg, .gif, .jpeg To save the picture physically in the "Gallery" folder, the following function is used.
' Adds picture to specified folder The function takes in 3 parameters:
Also, we need a function to store that file name in the database. The following code snippet takes category value from the combo list, the filename and the memo and adds a corresponding record in the database.
Private
Sub UpdateGallery(ByVal
strCategoryValue As
String, ByVal strFileName
As String,
ByVal strMemo As
String) So, on the click event of the "Upload" button, the above functions will be used to add the picture to the "Gallery" folder and insert record in database.
Protected
Sub btnAddToCategory_Click(ByVal
sender As Object,
ByVal e As
System.EventArgs) Handles btnAddToCategory.Click The screenshot below illustrates a scenario of uploading the picture. 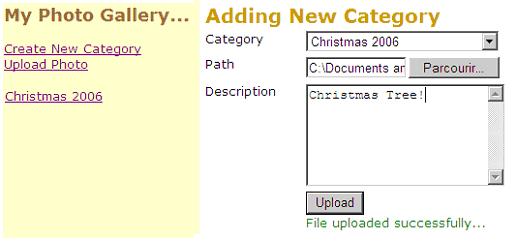 Displaying the picturesIt is easy job to display the photos. We will use a DataList control for that. The same principle is used to display category list in the left menu. A new Data List is added in the main page and data source is connected to it. 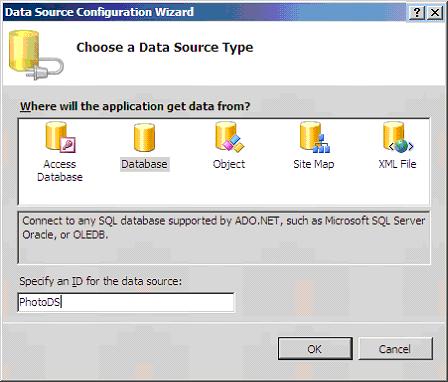 After choosing the connection string, choose the "Photo" table and check all the fields. 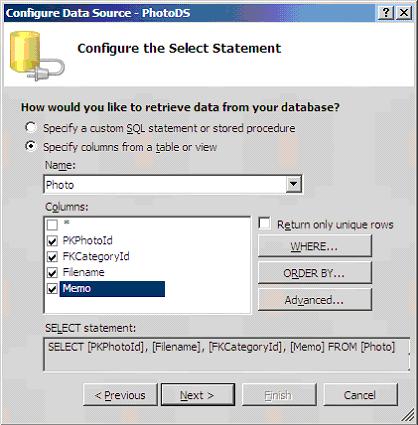 After that, click on the "WHERE" button to display the picture as per category. This is obtained from the query string, as shown below. 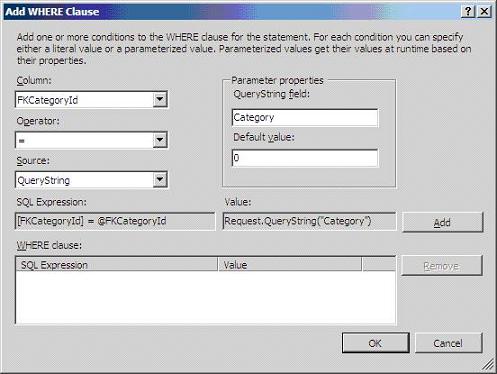 The Query field is "Category". Click on the "Add" button. Make sure that the Default Value is "0" in case there is no category added yet. Click on "OK" Test the SQL command generated by putting the query string as "1". Then, click on the "Finish" button. 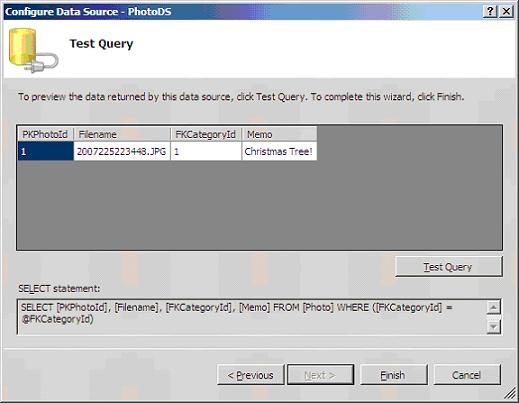 Back to the Data List, only the record information is displayed. But, we need to display the picture. So, edit the "Item Template" and put in an Image object. The picture's attribute is then linked with the data retrieved from the data source. The snapshot below shows how this is done. 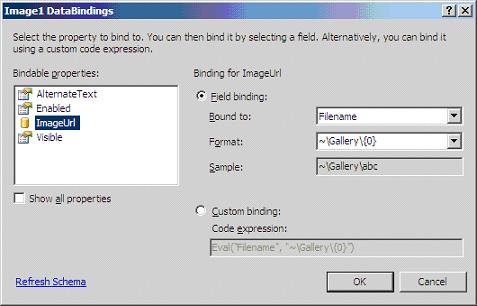 The expression Eval("Filename", "~\Gallery\{0}") makes sure to link the path of the images, concatenated with the Filename field. Also, the size of the pictures is set to 100px to 100px. The "RepeatColumns" property of the Data List is modified to 5 and the "Repeat Direction" to Horizontal We are only seeing the thumbnails, as illustrated in the figure below. 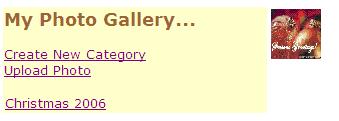 To allow a larger view of the picture to be displayed, some HTML works need to be done. The <asp: Image> tag is put in a <a> tag, to make it a kind of hyperlink. Target="_blank" means to open the image in a new window. The toolTip for each photo holding the memo is also added.
<a
href='<%#
Eval("Filename", "./Gallery/{0}") %>'
target="_blank"> Et voila! This tutorial summarizes one way how a picture gallery is normally done. Sure, it can also be extended as you wish and a lot more functionalities included (e.g. protection of SQL injection). Don't forget to download sample Picture Album Visual Studio .NET project, used in this tutorial. Tutorial toolbar: Tell A Friend | Add to favorites | Feedback | |