

Products
Database Search Solution (New Version) Search Control SEO Pager Highlighter Shortcut Controls Crypt Package Free ASP.NET Controls
Geotargeting Component ASP.NET Media Player Control Flash Video Player Control Services
ASP.NET Telecommute Jobs Free IP Location Lookup Test .Net Regular Expressions CSS/Table/DIV Page Layouts Custom Programming Article Sites Master List |
E-Mail in ASP.NETIntroductionIn this article we will explore three different and important e-mailing techniques; to send a simple text e-mail, to send HTML content via e-mail, and to send attachments. Let's dive right in. Before We StartMake that the SMTP server is running and that it can relay mail. From the IIS MMC window, with "local computer" selected on the left, you should see the "Default SMTP Virtual Server", if not you need to install it. After installation, Right-click it, go into "Properties", the "Access" tab, and click the "Relay" button. With the "only the list below" radio button selected, you should see the local IP address: 127.0.0.1, if it's not there, you need to add it. Otherwise, the code will not work. Also, when using the code, locate the line where I am setting the SmtpServer. I'll be setting it to "localhost", but you'll need to replace it with the name or IP address of your SMTP server. If you are using a Windows Desktop Computer, then there is no need to change it. Send simple e-mailThe code to send a simple e-mail is pretty simple and very small. There isn't much to explain either.
Dim
msg As New
Net.Mail.MailMessage( _ 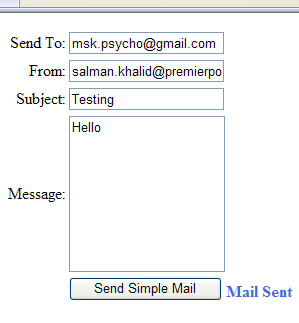 That is all there is to sending a simple text e-mail using ASP.Net 2.0. Sending E-mail AttachmentLet us now look at how to include attachments to our e-mail. Open the web-page in design mode and add an HTML file upload control to the form. Set it to run at Server, and switch to code-behind to make changes in our previous method.
Dim
msg As New
Net.Mail.MailMessage( _ All you need to do is check if the user posted a file or not, and if he did, then you need to create a new Net.Mail.Attachment object and add that to the MailMessage Object's Attachments collection. The line of code doing that could be broken down into the following, for simplicity;
Dim
strName As String
= fileUpload.PostedFile.FileName Moving forward, let us now look at how to send an HTML e-mail. Send HTML E-MailSending an HTML e-mail is pretty simple. All you need to do is set the IsHTML property of the MailMessage object to true, and the mail will be sent as HTML. The major part is in choosing the editor to create HTML Messages. Free TextBox (http://freetextbox.com/) is one of the best free ASP.Net editor control out there, and that is what I'll be using in my sample. Before you proceed, please download the latest version of the text-Box from the site. The best thing about this Free TextBox is that there are no external Scripts to worry about. All JavaScripts are internally stored in the assembly. Add the assembly to your ToolBox, and replace the simple textbox with this editor. You'll access the editor the same way you accessed a simple text-box. (By using the Text Property) You'll just have to add one line of code, and that to set the MailMessage's IsHTMLBody property to true. Otherwise, it will not identify the text as Html. Run the application, and quickly write down some text into the editor. 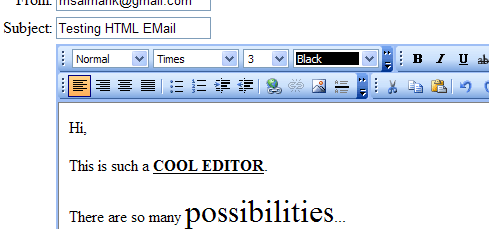 Quickly switch to the HTML view of the editor, and add in an image tag, linking to an image that you want to display. 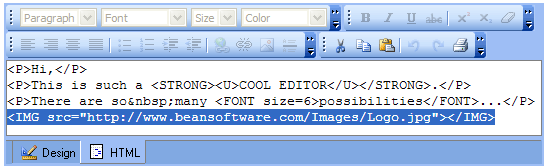 Switch back to design-view, and you should have the following;  Cool! Isn't it? Now press Send to send the e-mail. Potentially Dangerous Request Error when sending e-mailIf you do not receive an error stating; "potentially dangerous Request.Form value was detected from the client..." upon clicking Send, then you can skip this portion, but if you did, here is what you need to know. The .NET framework is throwing up an error because it detected something in the entered text which looks like an HTML statement. The text doesn't need to contain valid HTML, just anything with opening and closing angled brackets ("<...>"). The reason behind the error is as a security precaution. Developers need to be aware that users might try to inject HTML (or even a script) into a text box which may affect how the form is rendered. For further details see http://www.asp.net/faq/RequestValidation.aspx. This checking was not performed in the .NET 1.0 framework and was introduced with the .NET 1.1 framework. To disable request validation on a page add the following directive to the existing "page" directive in the file - you will need to switch to the HTML view for this: ValidateRequest="false" For example if you already have: <%@ Page Language="vb" AutoEventWireup="false" Codebehind="MyForm.aspx.vb" Inherits="Proj.MyForm"%> Then this should become: <%@ Page Language="vb" AutoEventWireup="false" Codebehind="MyForm.aspx.vb" Inherits="Proj.MyForm" validateRequest="false"%> Alternately, you can globally turn request validation off. To do so, add the following to your web.config file: <pages validateRequest="false" /> This should go within the <system.web> section, resulting in turning of Request Validation for every page in the web application. End ResultIf everything goes well, this is what you'll have in your inbox: 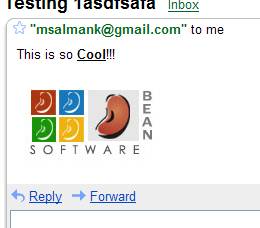 Of course, this is just basic functionality. There is a lot of other features you can add to make this code better. If you often need to create e-mail forms you can try Auto Email which creates advanced e-mail forms without programming required. This control will do all hard work for you and dramatically reduce your working time. Be sure to look its video demo to get closer picture how this control works. I hope you found this article informative and helpful. Sample Visual Studio .NET project for this tutorial you can download here Happy Coding! Tutorial toolbar: Tell A Friend | Add to favorites | Feedback | Google |