

Products
Database Search Solution (New Version) Search Control SEO Pager Highlighter Shortcut Controls Crypt Package Free ASP.NET Controls
Geotargeting Component ASP.NET Media Player Control Flash Video Player Control Services
ASP.NET Telecommute Jobs Free IP Location Lookup Test .Net Regular Expressions CSS/Table/DIV Page Layouts Custom Programming Article Sites Master List |
How to set up an ASP.NET web site with IISObjectiveThe objective of this tutorial is to show the steps that have to be followed in order to set up an already created ASP.NET web site with IIS 5.0/6.0 web server. Pre-requirementsIn order to follow this tutorial, you have to meet the below conditions: Please make sure that .NET 2.0 framework is installed after the IIS web server is. If you first installed the framework, please use the below command line: C:\[WinDir]\Microsoft.NET\Framework\[Version]\aspnet_regiis.exe -i IntroductionIn order to proceed forward it is important to understand how ASP.NET applications work with IIS. First of all IIS is a web server, a software that accepts and responds to requests using HTTP (Hypertext Transport Protocol) protocol. The result of the respond is an ordinary HTML page, so we can say that the purpose of the web server (IIS) is to provide HTML pages. When a user wants to see such a HTML page, he sends a request to the web server. The web server receives the requests and related to this it reads a file from its hard drive and sends the result content to the browser. From this point of view you can say that the web servers have the same functionality as the file servers have, waiting for network requests and sending to the browser the appropriate HTML pages. Because ASP.NET applications suppose dynamic content, the request-response process is a more complex one. ASP.NET applications are made of ASP.NET tags and C# or VB.NET code. When the web server receives a request for an ASP.NET web page it doesn't know how to process the data from that web page. This is why it has a list with all the responsible engines for the related web pages. So, the next pass would be to pass the request to the appropriate engine in order to process it. Figure 1 presents this process for ASP.NET and ASP web pages. When IIS receives a request for an ASP.NET web page it passes this request to the ASP.NET engine. This engine processes the appropriate web page and returns the HTML content to IIS. In the final step, the IIS has the honor to return the HTML document to the client. 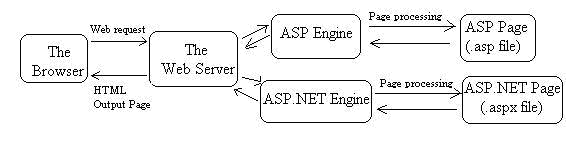 Figure 1. Request-Response process for an ASP/ASP.NET web page Set up a ASP.NET web site with IISAll you need to do is follow the bellow simple steps: As a note: Because web applications are usually hosted on Windows Server 2003, in the next steps I will use the IIS 6.0 to show you this process. How to create the virtual directory on the web server1. To start IIS Manager, select Settings -> Control Panel -> Administrative Tools Internet Services Manager from the Start menu. 2. The next step would be to create a virtual directory for an existing physical directory. For this please expand the Web Sites item in the IIS tree, right-click the Default WebSite item and choose New -> Virtual Directory from the menu (see Figure 2). 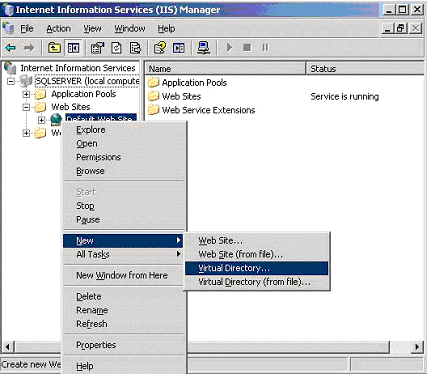 Figure 2. Creating a Virtual Directory 3. The first step in the wizard responsible with the virtual directory creation is to choose an alias (see Figure 3). The alias is the name a user will use in his URL to access the files in this virtual directory. For example, if your alias is MyApp and your computer is MyServer, you can request pages using URLs such as http://MyServer/MyApp/MyPage.aspx. 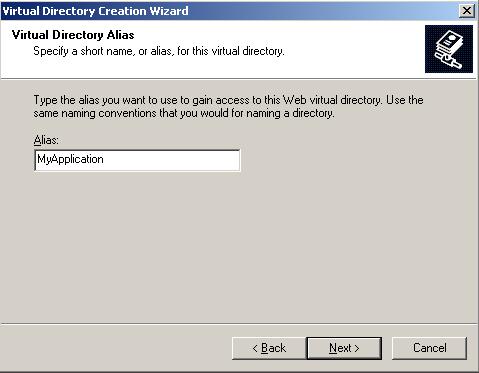 Figure 3. Choosing an alias. 4. Click Next 5. The next step in this wizard is to provide an existing physical directory to which the virtual directory will point to (see Figure 4). So, this physical directory will be exposed as a virtual directory through its alias. For example, c:\Webs\WebApplication1 is the physical directory that is used by this virtual directory with the MyApplication alias. 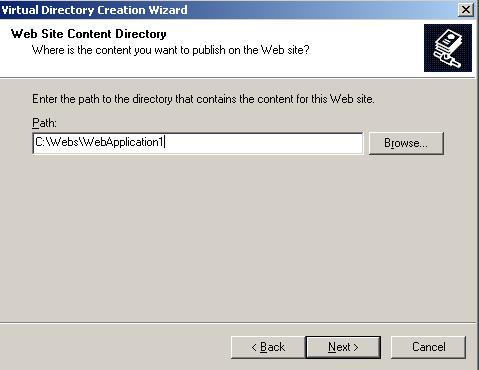 Figure 4. Choosing a physical directory 6. The final step in this wizard is to choose your permissions for the virtual directory (see Figure 5). Usually, to host an ASP.NET application, read and execute permissions are enough (the first two check boxes). Of course, in order to fulfill your needs you can choose other permissions too. 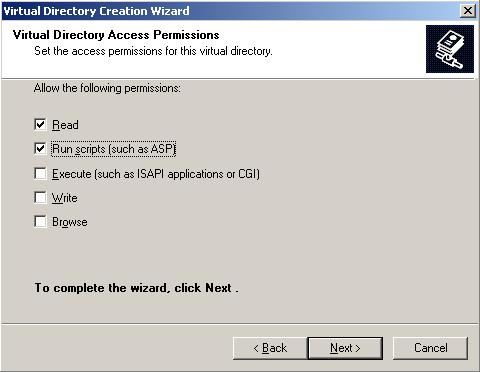 Figure 5.Setting permissions 7. Click Next and then Finish to create the virtual directory. When you finish these steps, you'll see your new virtual directory appear in the list in IIS Manager. Copy the entire site (including subdirectories) to the virtual directoryThe deployment of the ASP.NET application on the production machine can be done in many ways depending on the Internet hosting services. You can use FTP to deploy the application, or if the development computer and the web server are on the same internal network, you can use Windows explorer. Please also consider the tools that Visual Studio includes to make deployment easier. Configuring an Existing Virtual DirectoryIIS provides plenty of features you can use to configure the virtual directory that you have just created. In order to do that, simply right click the virtual directory in the list, and choose Properties item from the context menu. The Properties window will appear, with its information divided into several tabs. The following topic briefly explains the most important tabs you’ll want to configure for ASP.NET applications. Directory tab The Virtual Directory tab provides basic information about your virtual directory. At the top of the tab you can find information about the physical path for this virtual directory. So, the local path of the physical directory can be read-only if you are looking at a subdirectory inside a virtual directory, or you can set the local path to point to a different physical directory by clicking Browse button. (see Figure 6) 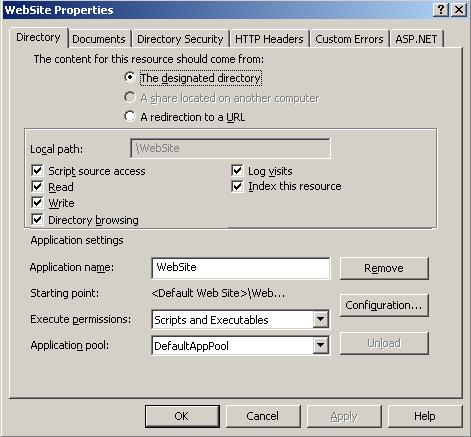 Figure 6. Directory tab Authentication and access control in Directory Security tab Here you can specify how IIS authentication is made. I will also explain how impersonation is made. So, here you can see which is the account IIS uses for anonymous access and also which are the authenticated access modes. When IIS is configured for anonymous access, ASP.NET makes requests for system resources using IUSR_MachineName account (in out case, IUSR_SQLServer). When a user authenticates directly to IIS using a Windows logon, ASP.NET impersonates that user account. (see Figure 7) 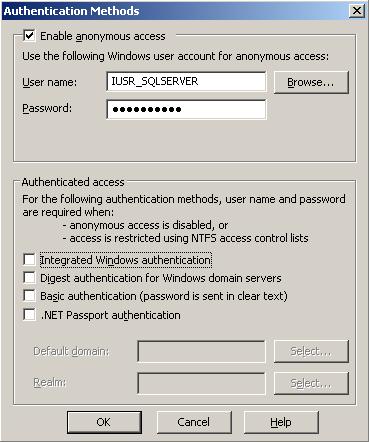 Figure 7. Authentication methods ASP.NET tab As the name suggests, the ASP.NET tab provides useful features only for ASP.NET applications: - It provides information about the current version of ASP.NET you’re using for this application (you can host on the same machine applications that require different version of ASP.NET) - You to choose any version of ASP.NET that’s installed on the computer just by selecting it from a drop-down list. - In provides information about the physical path and about the web.config file. - It provides you a more user friendly way to configure the setting in web.config file. In order to do this, just press Edit Configuration button (see Figure 8) 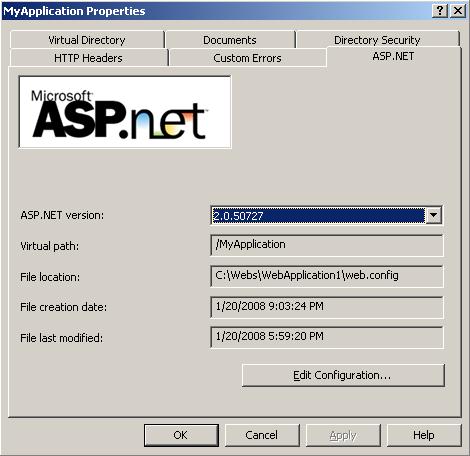 Figure 8. ASP.NET tab Windows permissionsKeep in mind the ASP.NET engine runs under ASPNET account in Windows XP or under Network Service account under Windows 2003 Server. In order you to access an ASP.NET web site, these accounts must have windows permission on the virtual directory. Right click on the virtual directory you have just created and choose Permissions option like below. Now, give the appropriate windows permissions to ASPNET or Network Service. (see Figure 9) 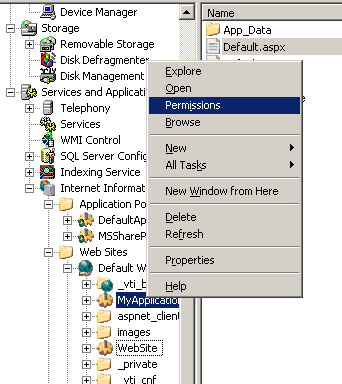 Figure 9. Give windows permissions Test the web siteLet's suppose that your web site has a Default.aspx web page. In order to test the web site, open your favorite browser and try to access the bellow link: http://localhost/MyApplication/Default.aspx If the Default.aspx web page appears correctly that means that everything went OK. If you receive the below result, that mean that ASPNET or Network Service account doesn't have appropriate windows permissions on that virtual directory. 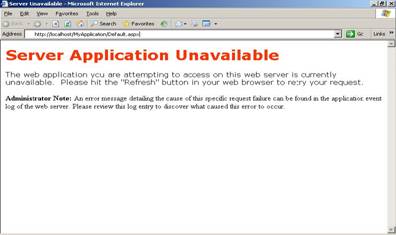 Figure 10. Server application Unavailable If you receive the below result, that means that IUSR_MachineName account or the windows account under which you are authenticated doesn't have appropriate windows rights on the virtual directory. This depends on the IIS authentication mode you have chosen to use.  Figure 11. Access denied by ACL This tutorial is written by Adrian Tarjoianu. Tutorial toolbar: Tell A Friend | Add to favorites | Feedback | |