|
Products
Database Search Solution (New Version) Search Control SEO Pager Highlighter Shortcut Controls Crypt Package Free ASP.NET Controls
Geotargeting Component ASP.NET Media Player Control Flash Video Player Control Services
ASP.NET Telecommute Jobs Free IP Location Lookup Test .Net Regular Expressions CSS/Table/DIV Page Layouts Custom Programming Article Sites Master List |
Site Maps In ASP.NETCreating high quality content for web site requires hard work. Because of that, webmasters usually want to be sure that all produced content is visible to web spiders so it can be indexed and possibly attract visits from popular search engines, like Google, Live or Yahoo. Webmasters often solved this problem by adding one more page, named site map page. That was common HTML page which contains hyperlinks to all other pages on web site, so visitor or web spider could find all content if classic navigation through menus didn't work properly. Google recognized this problem and introduced site maps formatted as XML files. Site maps are accepted later by Microsoft and Yahoo. ASP.NET 2.0 goes one step beyond and provides new .sitemap XML files that work with Menu, TreeView and SiteMapPath controls to enable easier navigation. Although Google site map and ASP.NET .sitemap are both XML files, they don't use same schema. Web.sitemap file in ASP.NETWeb.sitemap file must be placed in a root of web application. It is an XML file that describes hierarchical web site structure. You can make new Web.sitemap file in Visual Studio if you go on menu File --> New File... and select Site Map from Visual Studio Templates in "Add New Item" dialog. Click OK and you'll get new xml file with this content: <?xml
version="1.0"
encoding="utf-8"
?> As you can see, it is an XML file. There is interesting element siteMapNode which we can use to describe the structure of our web site. Here is an example of typical Web.sitemap file for small web site. <?xml
version="1.0"
encoding="utf-8"
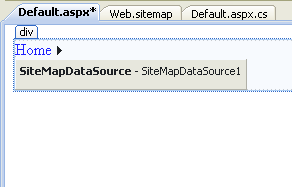
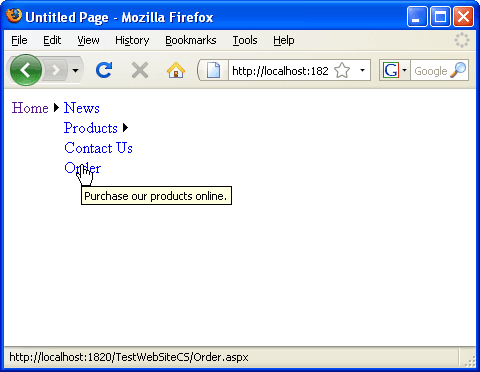
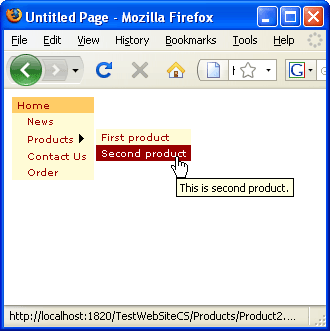
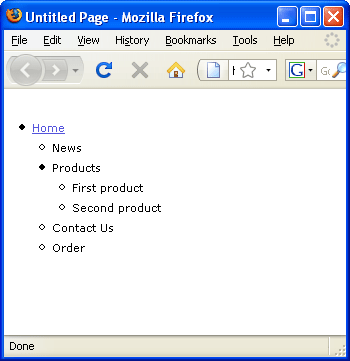
?> Let's analyze this file. You can see it is pretty self explanatory. We practically use only one tag, named siteMapNode to describe url, title and short description of every page on web site. Url values start with "~/" which indicates root of the web application. You also can add urls that are outside of your web application. There could be only one siteMapNode inside siteMap tag. But, inside first siteMapNode could be many nested siteMapNode tags to describe hierarchical structure between pages. Url, title and description are not only parameters of siteMapNode. For example, you can use siteMapFile attribute to add multiple map files or roles attribute to show different views to different users based on roles. How to add additional sitemap files with siteMapFile attributeYou can add multiple child sitemap files by using a siteMapFile attribute. For example, with code like this we can add additional Products.sitemap file where we will keep description of all products: <siteMapNode siteMapFile="Products.sitemap"/> Using Menu Control with Web.sitemapYou can use data from Web.sitemap file to enable site navigation with Menu Control. * First, drag Menu Control from the toolbox (it is on Navigation tab) to the web form. * Click small ">" button to show Smart Tags. * From Choose Data Source drop down list select "<New Data Source...>" * New "Data Source Configuration Wizard" dialog will appear. Select Site Map icon from dialog and click OK button. Your web form should look like in image bellow:  Menu control in design time * Now you can test your Menu, press F5 to start debugging. If you use Web.sitemap like in example above you'll see this output:  Menu control at run time You can customize how much menu levels will initially be displayed on form by changing StaticDisplayLevels property. Default value is 1, but in our example I will change StaticDisplayLevels to 2 to achieve more user friendly look. I also changed AutoFormat to Colourful.  Customized output with StaticDisplayLevels = 2 Using TreeView Control with Web.sitemapYou can use TreeView Control on similar way like Menu control. Just drug TreeView control from Toolbox (if you can't find it, TreeView is located on Navigation tab) and drop it to web form. Then set its data source like in example above with Menu Control. Add some formatting and run the application. You should get output similar to this:  TreeView Control at run time with data loaded from Web.sitemap file Using SiteMapPath Control (a.k.a bread crumbs) with Web.sitemapUsing of SiteMapPath Control is easiest of all three controls in Navigation tabs. Drag and drop SiteMapPath Control from toolbox to web form and it is ready to use :). You can test it to see how it works. Implementing two or more different navigations by adding additional sitemap providersSometimes you need to use two or even more different navigation systems that shows different urls. Very common example is page with two menus, first is vertical menu on left side and second is horizontal menu on top of the page. These menus show different links. To achieve this, you need two different site map providers with different .sitemap files. To achieve this you need to edit your web.config file inside <system.web> element: <system.web> As you can see, defaultProvider is AspNetXmlSiteMapProvider and we used it before in examples of Menu, TreeView and SiteMapPath controls. DefaultProvider reads content of Web.sitemap file. Inside <providers> element, I added two new providers: LeftMenuProvider which reads nodes from LeftMenu.sitemap file and TopMenuProvider which reads TopMenu.sitemap file. You can use these custom sitemap providers on the same way as defaultProvider. Only difference is that you need to set value for SiteMapProvider property of SiteMapDataSource control to select wanted provider: <asp:SiteMapDataSource SiteMapProvider="LeftMenuProvider" ID="SiteMapDataSource1" runat="server" /> How to load site navigation from databaseIf you worked with database driven web sites (well, who isn't?) then you probably had your site structure described in some table. It is pretty common case that one part of site navigation comes from static XML file, and other part dynamically from SQL Server or some other database. In this case, it would be great to have additional sitemap provider which reads from database. There is an example of SqlSiteMapProvider on MSDN site (scroll page in url down to SqlSiteMapProvider heading). To connect this provider to navigation controls, we need to edit web.config file like before, and add this line inside <providers> element: <add name="SQLServerProvider" type="SqlSiteMapProvider" connectionStringKey="YourConnectionStringToSqlServerDatabase" />
Remarks when using Menu, TreeView and SiteMapPath with Web.sitemapIt is probably not good idea to place navigation controls manually on all pages. Instead, place them just once in Master page. You can limit visibility of particular menu items by using roles attribute. In code bellow, "Administration" area will be visible only to users who belong to Administrator role: <siteMapNode url="~/Admin.aspx" title="Administration" description="Web site administration" roles="Administrator" /> Implementing of Menu, TreeView and SiteMapPath controls is fast and you usually don't need to write any additional C# or VB.NET code. Tutorial toolbar: Tell A Friend | Add to favorites | Feedback | Google |

