Products
Database Search Solution (New Version) Search Control SEO Pager Highlighter Shortcut Controls Crypt Package Free ASP.NET Controls
Geotargeting Component ASP.NET Media Player Control Flash Video Player Control Services
ASP.NET Telecommute Jobs Free IP Location Lookup Test .Net Regular Expressions CSS/Table/DIV Page Layouts Custom Programming Article Sites Master List |
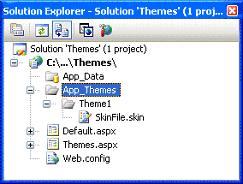
Themes and skins in ASP.NET 2.0As a web application developer, you always strive to give uniform and consistent look to your application. Clients have varied requirements; site should like aesthetic and should have a pleasing look. Good decent font and size and many more styles. We employ many different techniques like CSS, HTML style properties and any known methods to make the things work as desired. To make things bit easier for developer, ASP.NET 2.0 introduces new feature called Themes and Skins which let us to centrally define common style definitions. This new technique gives developer more fine control over the way the style properties are applied. You can define style definitions starting from individual control on a page to whole set of applications running on the server. To make things simple, Themes and Skins are extensions of Cascading Style Sheet (CSS) technique. Themes are set of elements like skins, Cascading Style Sheet, images and other resources like script files. Optionally, Theme should consist of minimum skin files. Themes are defined in special directory called App_Themes in application hierarchy. You can add this special directory by right-clicking on your project in Visual Studio and Selecting Add Folder->Theme folder. Within the App_Themes folder, you create an additional theme folder for each and every theme that you might use in your application. Here in our example we defined single Theme1 theme. You can define multiple themes to make your site customized for different users. Themes go further than CSS, in that they allow applying styles, graphics and even CSS files themselves to the pages of your application. You can apply ASP.NET themes at the application, page, or server control level.
Differences between Themes and CSS
You can apply theming for only those properties that have ThemeableAttribute attribute set to true in their control class. SkinsGenerally, Themes contain skins. A skin file contains style definitions for the individual server controls. You can define skin settings for a control using similar markup which we use to add server controls to web page. Only difference you may find between skinned versions of control is that skinned version do not include ID attribute for control. You should retain properties for which you want to configure through Themes. We create .skin files in Theme folder. We can also mix all server controls style definition in a single skin file. Make sure all style definition files like CSS, skin files, Image files and other resources are included in Themes folder in your application directory.
<asp:button
runat="server"
BackColor="lightblue"
BorderColor="AliceBlue"
Font-Bold ="true"
ForeColor="black"/> There are two types of control skins based on their scope. They are: Default Skins: Control skin for which SkinID attribute is not set which means control skin is applied automatically for the controls of same type. For example: if you create a default skin for button then default button control skin will be applied for all the buttons on the page. The scope of default skin depends on where you define default skin. Named Skins: Named Skins will have SkinID property set which means you can use named skins with a control only by setting control's SkinID property to specific named skinID. Named Skins do not apply for the controls by type. As we discussed in first few paragraphs, we can define Themes for entire site or for pages. So based on scope, we can define Themes into two types: Page ThemesPage Themes define themes for pages or for entire application. You can apply themes for single page using Theme attribute of @Page directive as shown below. <%@ Page Language="C#" AutoEventWireup="true" Theme="Theme1" CodeFile="Default.aspx.cs" Inherits="_Default" %> We can define themes which apply for entire application by setting
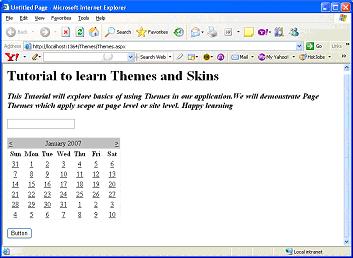
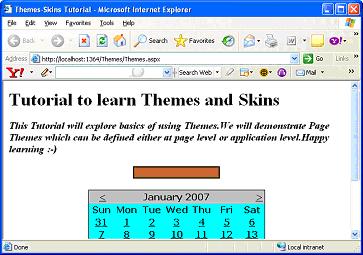
<configuration> Global ThemesA global theme is a theme that you can apply to all websites on a server. They are much alike to Page themes except that their scope is set at server level. You can define property settings, style settings and much more in a global theme. As mentioned in above paragraph, we need to add <pages> element with Theme attribute in Machine.config file which defines global theme for whole server. We can consolidate our understanding of Themes using an example. Create a webpage with simple server controls including textbox, button and a calendar control. When you run the page in the browser, you can observe all controls are displayed with default settings with no Themes applied. You can see below output listing.
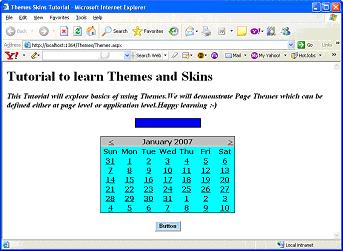
Now you can instantly change the appearance of this page without changing the style of each server control on the page. From with in page directive, you simply apply an ASP.NET theme that you have built like you can use Theme1 included in our sample project. To apply Theme to a particular page, we need to set Theme attribute for the @page directive <%@ Page Language="C#" Theme="Theme1" CodeFile="Default.aspx.cs" Inherits="_Default" %> Adding Theme attribute to @page directive changes the appearance of controls on the page that are included in theme definition. Using above theme, when I run the page in the browser. You can see the result as shown below
From the above listing, you can see that everything including font, back color and border style and border color of textbox, Calendar and button control have been changed. Similarly, if you want to apply same styles for all the pages where you have calendar control or textbox control, you can do it in very simple way. Include <pages> element in web.config file. We have already discussed it in the beginning of the article in configuration file listing. Once you specify the theme in the web.config file, you don't need to define the theme again in Page directive of your ASP.NET pages. This theme is applied apparently to each and every page within application. EnableTheming propertyYou can enable or disable applying themes to individual control on the page using EnableTheming property. When set, any defined themes will apply style definition for the control. When not set, control will be excluded from theme definition. Suppose we want to redefine the text box control properties in web page other than one already defined in theme. You can observe in below listing where we redefined Textbox control backcolor and forecolor and set EnableTheming to false. So this new settings will override style definitions in skin file as you can see in below output where the Theme1 theme is applied to every control on the page except the textbox because we set EnableTheming property to false.
<asp:TextBox
ID="TextBox1"
BackColor="ButtonShadow"
ForeColor="white"
EnableTheming="false"
runat="server"></asp:TextBox>
 Similarly, you can disable applying theme at page level by setting EnableTheming attribute to false in @page directive. This setting sets the theme to nothing and no skin files are applied to page. <%@ Page Language="C#" EnableTheming="false" Theme="Theme1" CodeFile="Default.aspx.cs" Inherits="_Default" %> Even if we disable themes at page level, you can still enable theme for specific controls on this page by setting the Enabletheming property for the control to true and applying a specific theme at the same time as shown below. <asp:TextBox ID="TextBox1" EnableTheming="true" Theme="Theme1" runat="server"></asp:TextBox> You can observe from below output even though we disabled theme for entire page still we are able to apply Theme to textbox control by setting EnableTheming and Theme properties for the textbox as shown above
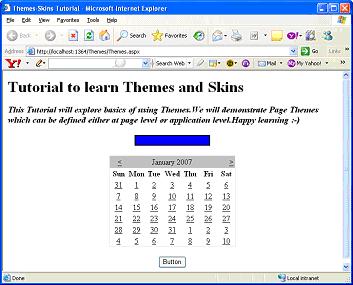
StyleSheetTheme AttributeYou can also use StyleSheetTheme attribute that you can use to apply themes to page but the big difference you may ask between the Theme attribute and StyleSheetTheme attribute. The difference is that the when attributes are set locally on the page within a particular control, the attributes are overridden by the theme if you use the Theme attribute. They are preserved however, if you apply the page's theme using the StylesheetTheme attribute. So, local settings take precedence over theme settings when settings are defined in both places if we set StyleSheetTheme attribute.
<%@
Page Language="C#"
EnableTheming ="true"
StylesheetTheme
="theme1" CodeFile="Themes.aspx.cs"
Inherits="Themes"
%>  In above example, the textbox BackColor theme setting is overridden by textbox local BackColor setting of chocolate color. This is because we have set StyleSheetTheme attribute in page directive. Remaining settings which doesn't have corresponding local settings set will be applied from theme as usual. CSS filesYou might have noticed, when using a .skin file, that you could define only the styles associated with server controls. But we tend to use quite a bit more than server controls like HTML server controls, raw HTML. To apply themes to this kind of controls we can include CSS files with in your themes folder. To create CSS file for your themes, right-click the Theme1 theme folder and Select Add New Item. In the list of options, select the style Sheet option to create CSS file.
body
Programmatic Access to ThemesTill now, we have seen examples of working with ASP.NET 2.0 Themes in a declarative fashion, but you can also work with themes programmatically.
protected
void Page_PreInit(object
sender, System.EventArgs e) } You must set the Theme property of the page property in or before the page_PreInit event for any static controls that are on the page. With Themes and Skins in ASP.NET 2.0, it has become quite easy to apply consistent look and feel across your entire application. Themes are more versatile in that they include support for CSS files, images and other resource files. You can apply theming only for properties which deal with appearance and layout of control. You cannot apply theming to properties which explicitly decide control's behavior like DatasourceID or DataSource properties. Themes help create a customized environment for the user. Tutorial toolbar: Tell A Friend | Add to favorites | Feedback | |