

Products
Database Search Solution (New Version) Search Control SEO Pager Highlighter Shortcut Controls Crypt Package Free ASP.NET Controls
Geotargeting Component ASP.NET Media Player Control Flash Video Player Control Services
ASP.NET Telecommute Jobs Free IP Location Lookup Test .Net Regular Expressions CSS/Table/DIV Page Layouts Custom Programming Article Sites Master List |
User Management in ASP.NETASP.NET has made it really easy for developers to quickly develop a functional website. In this tutorial we will develop a basic website using C#. The website will have functionalities like user registration and administration etc. Users will be able to upload pictures to their profiles and will be able to edit their profiles. To enjoy all these features a user should first register to the website. First of all make a new Website in Visual Studio 2005. Specify name of your choice and Visual C# as language. For the sake of simplicity, we will split our coding process into following phases:
Also, there is User Management web application, used in this tutorial. Login FunctionalityTo implement the login functionality in our ASP NET application we first need to create a database. Create an MS Access database and place it inside your wwwroot directory. Create a table named "users". Columns in the table along with their data types are shown in the following diagram: 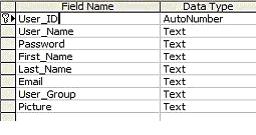 I also added "unique constraint" to the column "User_Name", so that user name is never duplicated. To add this constraint first select the desired column, in the general tab select Indexed attribute as "Yes (No Duplicates)". 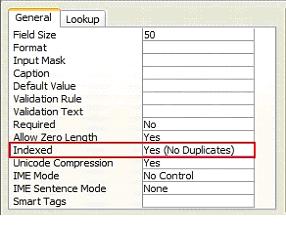 After adding the unique constraint, create an admin account for testing purposes. Just add a row to the users table. Now go back to your ASP NET application and look for a file named "web.config", in the Solution Explorer. If you cannot find solution Explorer just go to View menu and select Solution Explorer. In the config file you need to specify the database and provider information. You need to add a few lines of code as follows:
<configuration
xmlns="http://schemas.microsoft.com/.NetConfiguration/v2.0"> The purpose of web.config file is to store some information that you need throughout your application. On each webpage you can easily retrieve desired information from the config file. To proceed further, create a new web form for login. From the Toolbox, place labels, text boxes and a button as shown: 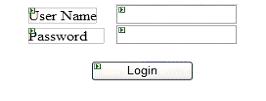 For connecting to a database you need to include the namespace System.Data.OleDb at start of the file. Double click the Login button to write the code for login process. First of all get the database connection string from the web.config file.
ConnectionStringSettings
settings = ConfigurationManager.ConnectionStrings["DatabaseConnection"]; Now we will open the connection and fill our dataset.
// create an SQL select command based on user name and password A data set is a disconnected array of records that is filled by using a data adapter. Data adapter acts as a bridge between our data set and the actual database. If you need to read from the database again you just have to access the data set. In ASP.NET the Session object is of global nature and can be assessed and manipulated by programmer on any webpage. After successful login you can redirect user to another page using Response.Redirect("Desired_Page.aspx") or you can display some welcome message. Profile ManagementWe will now move towards registering different user accounts. To register a user, create a page for registration. I placed all the controls inside a table control. That's made the whole process lot easier. The table control is available under HTML section in the Toolbox. I placed different controls as shown in the diagram.  On the Click event of Go button, get connection information from the web.config and create a connection object as described in the Login process. To execute a command you need to create an object belonging to the OleDbCommand class.
OleDbCommand
command = new
OleDbCommand(); MyCmd is your string for the insert query. The query will get composed on the fly based on the arguments provided by user.
string
MyCmd = "INSERT INTO users(User_Name, [Password],
First_Name, Last_Name, Email, User_Group, Picture) " +"
VALUES (" + "'" + FileStream class available in ASP.NET can be used for asynchronous and synchronous file read and write operations. Its Write function takes three parameters. First one (MyFileBuffer) is the buffer containing the data to be saved. The second parameter is byte offset in array which is zero in our scenario. Third parameter is size of the buffer. For viewing a profile you need to create a separate webpage. Place controls from the Toolbox according to your requirements. To show image for user than you will also need to place the Image control. On the page load event just execute a query based on the user that is logged-in. I executed the following command string:
string
MyQueryStr = "SELECT * FROM USERS WHERE User_ID="
+ To display image in an ASP.NET application you need to set content type as image/gif.
Response.ContentType = "image/gif"; "ds" is the data set filled by using our specified. Item array contains the individual elements of each row of a database, it is indexed from zero. Following screenshot displays the view profile form in action:  User ManagementNow we will move towards the user management part of this tutorial. First of all create a separate webpage and place a data grid control from the Toolbox. This data grid will show us the complete list of users. On the page load event we just need to execute select command and fill a dataset. string MyQueryStr = "SELECT User_Name, First_Name, Last_Name, Email, User_Group from users"; After filling a dataset, say "ds", using adapter we need to bind that dataset with our data grid control. UsersGrid.DataSource = ds; To delete and edit users we will use a simpler technique. Drag and drop a Label, a TextBox and two Button controls, as in the following image:  On the Delete button click event you need to execute a simple delete query based on user name provided in the TextBox. User name is always unique. Here is the query that needs to be executed on the Delete button click event:
string
MyCmd = "DELETE from users WHERE User_Name='"
+ For editing a user profile you need to create a separate Web Form. The layout of this form will be exactly same as the register profile form. The only difference in edit profile form is that instead of inserting a new record in the database you edit the specific record. The record will be identified by user name saved in the session object. On the click event of Edit button save user name in session
// place user name to session We will execute "update" query on the Go Button on the edit profile page
string
MyCmd = "UPDATE users" + After the query string you just need to use the command object to execute the command. Site NavigationImplementing site navigation is a breeze in ASP.NET. Create a form for home page. From the Toolbox drag and drop Menu control to the .aspx file. Menu control is available under the Navigation section in the Toolbar. Clicking the smart tag of the menu control will reveal the following menu: 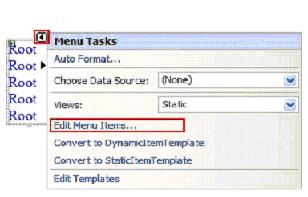 Click the link "Edit Menu Items..." This will display a dialogue box in which you can add menu items in a hierarchical fashion. Add items one by one by clicking a plus button at the top left corner of the dialogue box. 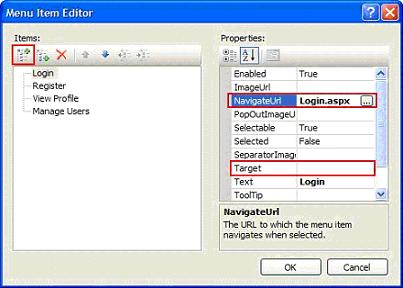 You also need to specify the NavigateURL property. Just browse your target file you want this item to point to. Leave the Target property blank if you want to open the target page in the same window. After you are done click the OK button. ASP.NET also allows you to choose different predefined menu layouts. For this purpose you need to click the Auto Format link available on the menu task dialogue box. You can copy paste same menu control on other pages if desired. Finally for implementing security features your ASP.NET application you just need to check user name value available in the session object. For example only logged-in users can view their profile. In the view profile page just add the following code at start of Page_Load function:
if
( Convert.ToString(Session["User_Name"])
== "" ) Similarly in the manage users page, add similar code to prevent anonymous or unauthorized access.
if
(Convert.ToString(Session["User_Group"])
!= "admin") Tutorial toolbar: Tell A Friend | Add to favorites | Feedback | Google |