

Products
Database Search Solution (New Version) Search Control SEO Pager Highlighter Shortcut Controls Crypt Package Free ASP.NET Controls
Geotargeting Component ASP.NET Media Player Control Flash Video Player Control Services
ASP.NET Telecommute Jobs Free IP Location Lookup Test .Net Regular Expressions CSS/Table/DIV Page Layouts Custom Programming Article Sites Master List |
How to use TreeView control in ASP.NET 2.0Introduction to TreeView ControlASP.Net 2.0 introduces many new controls including a TreeView Control, which can be used to consume information from hierarchical data sources like an XML file and then display that information. In this tutorial, I am going to statically data bind the TreeView control with the contents of an XML file. Working the Code: TreeView Control ExampleCreate a new web application, and open the Default.aspx page in design view. Locate the TreeView control in the toolbox and drag it onto the form. Here is what it looks like by default: 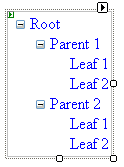 Click on the small box located in the upper right-hand corner of the control, choose Auto Format, and select Contacts style: 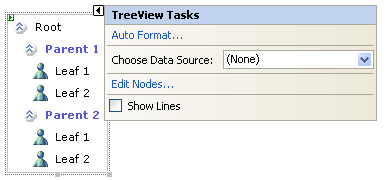 This will update the control to look like the above. There are many pre-defined formats for you to choose from, take a few moments to look at each of them. The next step is to add a new XML file to the project and create your data file:
<?xml
version="1.0"
encoding="utf-8"
?> </Contacts> Switch back to Default.aspx and add an XMLDataSource object to the form. Set its DataFile to the new XML file. Select the TreeViewControl, and set it's DataSourceID to the XMLDataSource object. Select the DataBindings property and open the TreeView DataBindings Editor. It will automatically have loaded the nodes. Select "Description" and click ADD. Set ValueField to Value. (Note: you can set value field and display field separately. Like for instance, you could display Client Names, but set the node's value equal to their ID.) Click on Apply and exit the Editor. Switch to the XML file and set some real-time entries, and run the application. 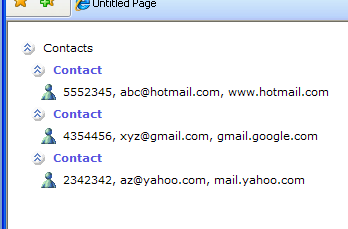 That's all there is to it. Simple and clear... now switch back to the Default.aspx page and open the TreeView DataBindings Editor again. This time add databinding settings for the Contact nodes. 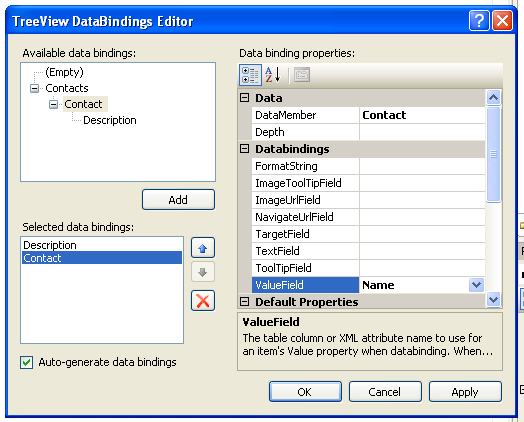 Save and run the application again. 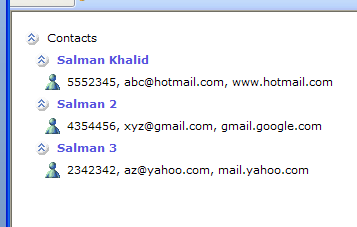 Change the values in the XML file, and refresh your web-page to see the changes in the tree. Sample project for this tutorial you can download here. Also, you can extend common facilities of TreeView control by combining with AJAX and develop really powerful applications. If your web application demands more than standard ASP.NET Menu Control can give you, it is often smarter to take some professional solution like ExpertTree, FlyTreeView or APN TreeView (APN is my favorite) and avoid losing too many working hours in programming and debugging. Depending of your hourly rate, you can easily calculate is it better for you to go develop a desired facility or it is better to just include one more assembly in your /bin folder. These controls are already well tested in many other web sites worldwide and have built in features like drag & drop, context menus, animation effects, dynamic nodes population, keyboard shortcuts, very important cross browser compatibility, skins etc. See some demo to get closer picture. Happy programming! Tutorial toolbar: Tell A Friend | Add to favorites | Feedback | |