Products
Database Search Solution (New Version) Search Control SEO Pager Highlighter Shortcut Controls Crypt Package Free ASP.NET Controls
Geotargeting Component ASP.NET Media Player Control Flash Video Player Control Services
ASP.NET Telecommute Jobs Free IP Location Lookup Test .Net Regular Expressions CSS/Table/DIV Page Layouts Custom Programming Article Sites Master List |
Validation in ASP.NET 2.0Validation server controls are set of controls that enable you to work with the information your end users inputs into application. Application should always ensure that valid data is recorded. To ensure valid data is collected, we apply set of validations to data we collect. Validation is a set of rules that you apply to the data you collect. In this way, we can bring certain degree of discipline in end user. We can understand validation under two categories: Client side validation and Server side validation. Client side validation involves validating user input before the page is posted to server. Server side validation involves performing checks on server instead of client. This is most secure form but comes at cost of performance. ASP.NET introduced smart validation server controls to implement page level validations. They are capable of performing both server side and client side validations. So, Validation server controls offer the combined power of both approaches such that the security of application is never compromised. ASP.NET 2.0 Validation server controlsPresently, ASP.NET 2.0 offers six validation controls. It also added new features like Validation groups and new JavaScript capabilities.
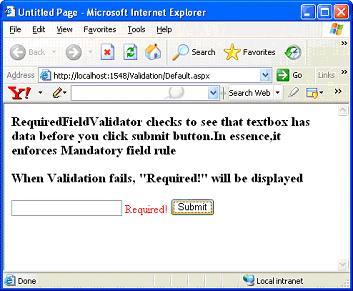
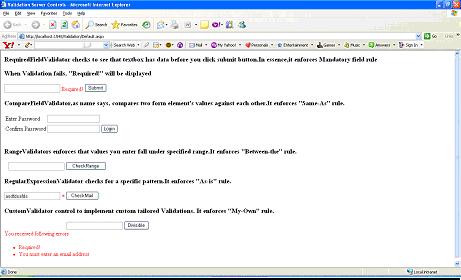
You can download sample Validation Visual Studio .NET project, used in this tutorial. Validation PropertiesUsually, Validation is invoked in response to user actions like clicking submit button or entering data. Suppose, you wish to perform validation on page when user clicks submit button. To make this happen, simply set the CauseValidation property to True for submit button as shown below <asp:Button ID="Button1" runat="server" Text="Submit" CausesValidation=true /> RequiredFieldValidatorThe RequiredFieldValidator control is simple validation control which checks to see if the data is entered for the attached control. You can have a RequiredFieldValidator control for each form element on which you wish to enforce Mandatory Field rule.
<form
id="form1"
runat="server">
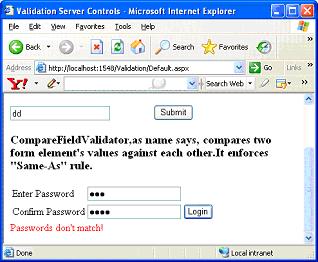
As shown in above output, RequiredFieldValidator control ensures that you enter data in textbox before you click submit button. You can throw appropriate error message if the validation fails. You can set error message using ErrorMessage property and control to validate using ControltoValidate property. Similarly, you can use InitialValue property to control the initial value of attached control. CompareValidator Server ControlThe CompareValidator control allows you to make comparisons between two form elements as well as to compare values contained with in form element to constants that you specify. For instance, you can specify that a form's element value must be an integer and greater than a specified number.
<td>
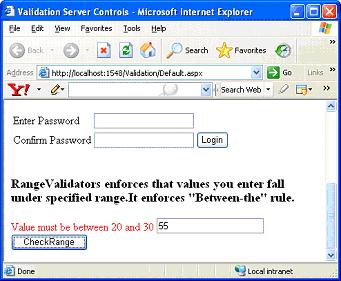
As shown in above output, you can see that ComparisonValidator makes comparisons between two form elements. You can see that Enter password textbox value is matched against Confirm Password textbox values to make sure that they match. If they don't match in their values, you can display error message by setting ErrorMessage property as shown above. In above example, we need only a single CompareValidator control on the page because a single comparison is made. Therefore, you use the ControlToCompare property. This specifies what value is compared to Textbox2. In this case, the value is Textbox3. RangeValidator Server ControlThe RangeValidator Server Control makes sure that the end user value or selection provided is between a specified ranges. Below given example should give you clear picture.
<asp:RangeValidator
ID="RangeValidator1"
runat="server"
ErrorMessage="Value must
be between 20 and 30" ControlToValidate="RangeTextbox"
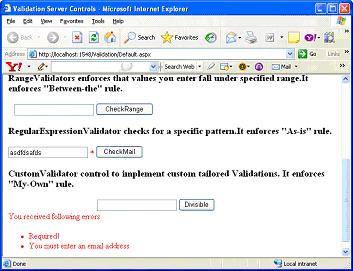
In above example, you might observe that we are using RangeValidator control to see that valid values in the specified range are entered. We can use MinimumValue and MaximumValue property to set the beginning and ending range values. I have entered 55 which did not fall under given range, so validation fails giving out this error message. You can use RangeValidator not only for validating numbers but also about validating a range of string characters, calendar dates. You can use Type property to specify the type of range. RegularExpressionValidator Server ControlUsing RegularExpressionValidator server control, you can check a user's input based on a pattern that you define using a regular expression. This means that you can define a structure that a user's input will be applied against to see if its structure matches the one that you define. <asp:TextBox
ID="TextBox4"
runat="server"></asp:TextBox>
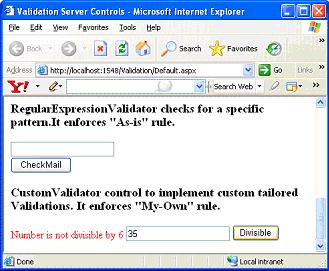
As indicated above, we are using RegularExpressionValidator to define the structure of input to be entered in above textbox. You can specify the pattern for RegularExpressionValidator using ValidationExpression property. ASP.NET 2.0 provides predefined set of universal patterns (Regular Expressions) to choose from through Regular Expression Editor. To see Regular Expression Editor in action, switch to Design mode. Open RegularExpressionValidator control in Design View. From Properties dialog box, click button next to ValidationExpression Property. You can see below given Regular Expression Editor window
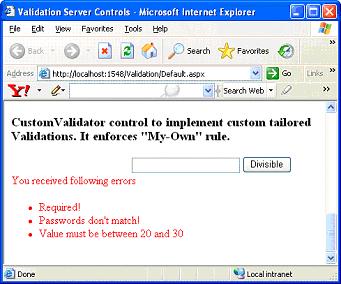
CustomValidator Server ControlSometimes, predefined Validation controls cannot address some of our critical requirements. You have to go beyond what they offer. This is where the CustomValidator control comes into play. The CustomValidator control allows you to build your own client-side or server-side validations that can then be easily applied to your web forms. Let's see an example where you require a number that is divisible by 6. We use CustomValidator control to perform a custom client-side validation on the user input to make sure that the number provided is divisible by 6.
<asp:CustomValidator
ID="CustomValidator1"
runat="server"
As shown above, we are using custom JavaScript. This is the script we want the CustomValidator control to use when making its validation checks on the information entered into the textbox. The JavaScript functions you employ are going to use the args.IsValid property and set this property to either true or false depending on the outcome of the validation check. In this case, the user input (args.Value) is checked to see if it is divisible by 6. The Boolean value returned is then assigned to the args.IsValid property, which is then used by the CustomValidator control. We use ClientValidationFunction property to set the name of the client-side function that you want this validation check to employ when the CustomValidator control is triggered. In this case, it is validatenumber function as shown above. ValidationSummary Server ControlThe ValidationSummary control is reporting control, which is used by the other validation controls on a page. You can use this validation control to consolidate errors reporting for all the validation errors that occur on a page instead of leaving this up to each and every individual validation control. <asp:ValidationSummary ID="ValidationSummary1" DisplayMode="BulletList" HeaderText="You received following errors" runat="server" />
From above output, you might understand that ValidationSummary control simply displays all the Validation errors at one location. DisplayMode decides the mode of display like displaying the results in bulleted list or simple list as shown above. As in earlier examples, these validation errors appear next to each of the textboxes. You can see, however, that the ValidationSummary control also displays the validation errors as bulleted list in red at the location of the control on form. In most cases, you do not want these errors to appear twice on a page for the end user. You can change this behavior by using Text property of the validation controls, in addition to ErrorMessage property as shown below.
<asp:RegularExpressionValidator
ID="RegularExpressionValidator1"
Text="*"
ControlToValidate="Textbox4"
runat="server"
Now you can see that error message for RegularExpressValidator is displayed in ValidationSummary control instead of RegularExpressionValidator control. Validation Groups
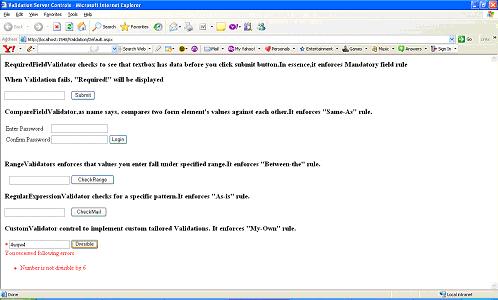
You might observe in above figure that u could see two error messages. Though, I clicked Divisible button to look for Customvalidator control, the RequiredFieldvalidator is also fired. Since textbox is empty, you can see error for RequiredFieldValidator. If there are multiple validation controls on the page and you do not want all the Validation controls to fire together. You just want them to fire only when certain condition is met. ASP.NET 2.0 now provides you with a ValidationGroup property that enables you to separate the validation controls into separate groups. It enables you to activate only the required validation controls when an end user clicks a button on the page. To achieve this, you can set the ValidationGroup property for each validation control. The core server controls have the ValidationGroup property because things like button clicks must be associated with specific validation groups.
<asp:RequiredFieldValidator
ID="RequiredFieldValidator1"
runat="server"
ValidationGroup="Submit"
ErrorMessage="Required!"
ControlToValidate="TextBox1">
Now you can see that you could see only one error message specific to CustomValidator control. You don't see any RequiredFieldValidator related messages. This is made possible by assigning RequiredFieldValidator controls to different ValidationGroup called submit. Now RequiredFieldValidator will be fired only when Submit button is clicked. Tutorial toolbar: Tell A Friend | Add to favorites | Feedback | |