

Products
Database Search Solution (New Version) Search Control SEO Pager Highlighter Shortcut Controls Crypt Package Free ASP.NET Controls
Geotargeting Component ASP.NET Media Player Control Flash Video Player Control Services
ASP.NET Telecommute Jobs Free IP Location Lookup Test .Net Regular Expressions CSS/Table/DIV Page Layouts Custom Programming Article Sites Master List |
Web Forms in ASP.NETIn ASP.NET Web forms, it is essential to write all the server controls within the <form> tag and runat="server" attribute must be included in it. This attribute shows that the form is to be processed on the server. Also it indicates that the controls enclosed in the <form> tag can be accessed by server scripts. For instance: <form runat="server"> …HTML + server controls </form> If you don't specify the action attribute, it will be ignored as the form is always submitted to the page itself. If method attribute is left out, by default it will be set to method="post". Other attributes like name and if are also automatically assigned by ASP.NET if you don't mention them. Important point to keep in mind here is that an .aspx page can have only one <form runat="server"> control. If you leave out name, method, action and ID attribute, the .aspx page will look as follows if you view the source: <form name="_ct10" method="post" action="page.aspx" id="_ct10"> // code </form> Submitting a FormA button is used mostly to submit a form. The format of the Button server control is as follows in ASP.NET: <asp:Button id="id" text="label" OnClick="sub" runat="server"/> Here the id attribute sets a unique name for the button and the text attribute assigns a label to the button. The onClick event handler sets a named subroutine to execute. In the following example we declare a Button control in an .aspx file. A button click runs a subroutine which changes the text on the button: <script
runat="server"> The above example will show the following page:  When you will click on this button, the output will be as follows:  Maintaining the ViewStateIn Classic ASP, on the submission of the form all the values are cleared out. For instance, you submit a form with a mass of information and it comes back with an error. For this, you will need to correct the information in the form. As soon as you hit the "back" button you go back to the previous page where all the values would be cleared and you will have to write all the information again. In short, it means that Classis ASP didn't offer to maintain your ViewState. In ASP.NET when you submit a form, the form will re-appear in the browser with the values that you filled-in. This is possible because your ViewState is mainted by ASP.NET. It indicates the status of the page when the form is submitted to the server. A hidden field on each page is placed with a <form runat="server"> control to define this status. The code would look like as follows: <form
name="_ctl0"
method="post"
action="page.aspx"
id="_ctl0"> ASP.NET by default maintains the ViewState for the Web Forms. If you don't want to maintain it then include the directive <%@ Page EnableViewState="false" %> at the top of an .aspx page or add the attribute EnableViewState="false" to any control. Following code shows the old method of doing it. As soon as you click on the submit button, the values on the forms will disappear. <html> Following screen will appear when you run the page: 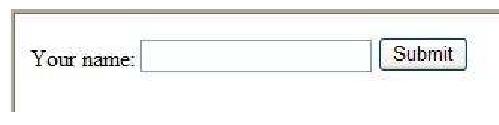 I entered my name and clicked on the submit button, following is the output: 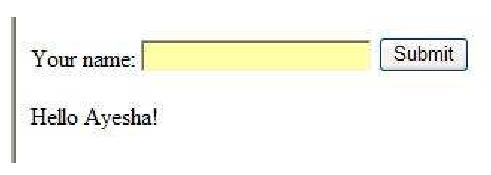 Following code demonstrates the new way adopted in ASP.NET. The form values don't disappear when you click on the submit button. <script
runat="server"> You see the following output when you run this page: 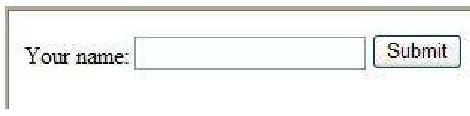 I typed my name and clicked on the submit button, following is the output: 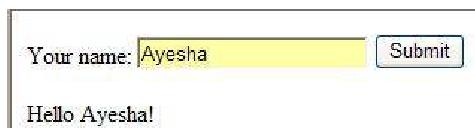 The TextBox ControlThere are scenarios where you require taking input text from users, for this the TextBox control is used to create a text box. The following table shows the properties and description of TextBox control:
The example below demonstrates some of the attributes you may use with the TextBox control: <html> <html> The above example has the following output: 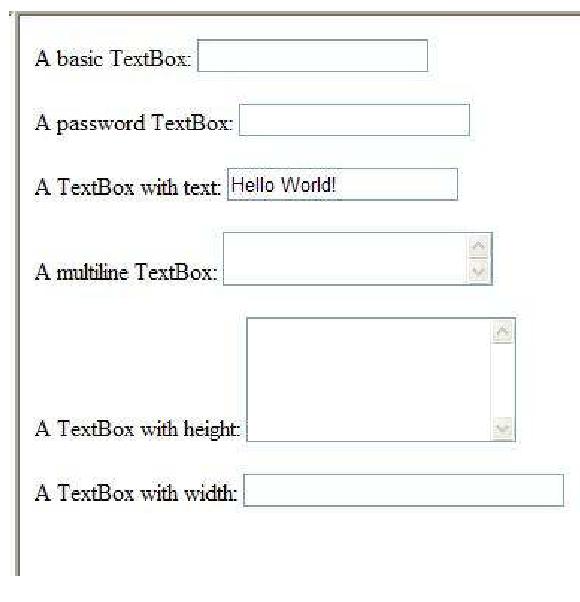 To change the contents and settings of a TextBox control when a form is submitted, you may use server scripts. To submit a form you may make the user click the button or enter a value in the TextBox control. Let us see the following example for a better clarification. In an .aspx file, one TextBox control, one button and one label is declared. When the user clicks the submit button, the submit subroutine is executed, which consequently writes some text on to the label control. <script
runat="server"> The above example will show the following page, where I typed my name and clicked on the submit button and see the following output: 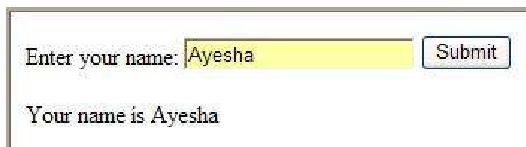 The Button ControlTo use a push button in your .aspx pages, you may use the Button control. This push button can be a submit button or a command button. This control is a submit button by default. When you click the submit button it will post back to the server. It doesn't have a command name. You can write an event handler to control the actions performed when it's clicked. Where as a command button do have a command name. It permits to create multiple Button controls on a page. You can write an event handler to control the actions performed when it's clicked. The following table shows the attributes and properties of the button control.
To elaborate a bit more, let’s have a look at the following example. <html> To submit a form you click on a button. In the example below, one TextBox, one Button control and one Label control is declared in an .aspx file. When the submit button is clicked, the submit routine will be executed, which will write some text on the Label control. <script
runat="server"> The above example will show the following page, where I typed my name and clicked on the submit button and see the following output: 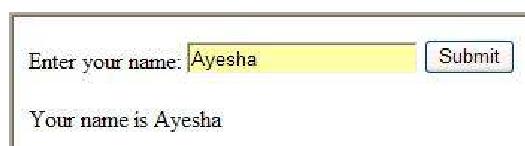 Tutorial toolbar: Tell A Friend | Add to favorites | Feedback | |