Products
Database Search Solution (New Version) Search Control SEO Pager Highlighter Shortcut Controls Crypt Package Free ASP.NET Controls
Geotargeting Component ASP.NET Media Player Control Flash Video Player Control Services
ASP.NET Telecommute Jobs Free IP Location Lookup Test .Net Regular Expressions CSS/Table/DIV Page Layouts Custom Programming Article Sites Master List |
Implementing Web Service ClientsLet's start by creating a simple "Hello world" web service.
When we create and run this web service , it will be run by a web browser. However, in real life, the true aim of web service can only be achieved if we can call it from some web application or a console application.
Creating a console application client for web serviceBefore further description, let me introduce the concept of proxy class to you. This class plays a third party role for interacting between a client and a server. It facilitates all the communication between the client and the server, be it connecting client to the server or passing parameters and methods to the server or returning results from the server. We should create a proxy as a first step to enable console application to call a web service. Creating Web proxyA utility named WSDL.exe is available in .NET to create proxies. This utility needs to know the WSDL which the proxy should use. Follow these steps to create a proxy using WSDL.exe: 1. Choose Start >> Visual Studio.NET >> Visual Studio.NET Tools >> Visual Studio.NET Command Prompt to open the Visual Studio.NET command prompt. 2. Create a new directory for storing client projects. 3. In the command prompt, type: - C:> cd projects \ wsclient (directory where client project is stored) - C:\ src \ wsclient > wsdl /l:CS /n:WebBook /out:HelloworldProxy.cs http://localhost/TimeService/Hello.asmx?WSDL This command needs explanation: /l:CSindicates a proxy built in C Sharp Language. /n:WebBookspecifies namespace /out:HelloworldProxy.cs specifies the proxy name. In this case, it is HelloWorldProxy. http://localhost/TimeService/Hello.asmx?WSDL is the url which is description of the web service for which proxy class is being created. 4. As the last step, Compile the proxy you have made by typing: C: \ projects \ wsclient> csc /t:library HelloWorldProxy.cs WSDL utility generates the source code of HelloWorldProxy.cs in result. This proxy file will contain a new definition for HelloWorld class that we developed in Listing 1.1. This class definition is different from the definition we have created before but our clients will use this definition. Instead of executing methods directly, it invokes the methods of original class (HelloWorld in this case). When you see the source code of this file, you will also notice two functions BeginGetMessage() and EndGetMessage(). These two functions have been created to facilitate calling the web services asynchronously. The proxy class has been created. Now, we can write console applications as clients:
Since you have created a proxy class and compiled it, you no longer need to worry how this client application calls the web service or how methods and parameters are sent. The proxy class handles all the work in background. All you need to do for creating a console application client is: Create a proxy class and tell it the WSDL url of the web service to be accessed. Creating a web service client (Web Application)ASP.NET has made it an easy task for calling web service from a web application. Now this is only few clicks game. Follow these steps to call a web service from a web application. 1) Create a new ASP.NET web application. Choose Visual C# from Languages and ASP.NET Web Application from the options in the right hand menu. (See Figure 1)
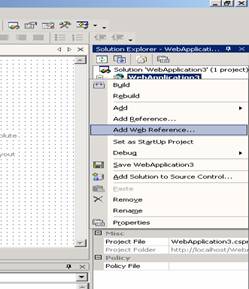
2) Right click on project name as shown in window on right hand side. Select "Add Web Reference". A window like figure 2 below would be shown.
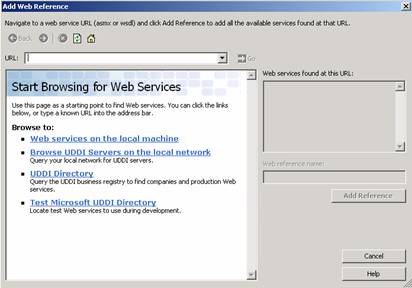
3) In "Web services on the local machine" portion, it would list down all the web services that you have created and executed on local machine.
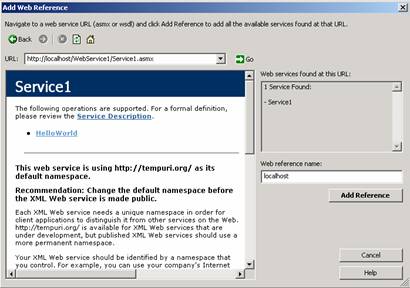
Click on this link and then click on your desired web service. (If your web service does not appear when you click it, Paste the WSDL url of desired web service in the Address bar on the top of this window)
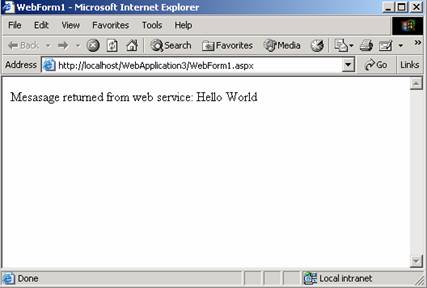
4) Click on "Add reference" button. 5) You would need to do some changes in Page_Load method. 1) localhost.Service1 lh1 = new localhost.Service1(); 2) String ret = lh1.HelloWorld(); 3) Response.Write(" Message returned from web service: " + 4) ret); Where the name of web reference is "localhost" (See the project pane) and its function was named "HelloWorld". 6) Now, run the project to see the results from web service.
How web services work?To communicate between clients and web services, a protocol called SOAP (Simple object access protocol) is used. This protocol is higher in level than HTTP. SOAP is platform and language independent protocol based on XML to exchange information between applications or simply To access a web service by its clients. Basically this is SOAP which provides technology and language independence and due to this, web service can be accessed by any application written in different language. SOAP requests are ordinary XML files. To call the GetMessage() method of our web service Hello.asmx, the SOAP request would be something like:
As I said, SOAP is one level above than HTTP, this means an HTTP request would be generated after the SOAP request. Moreover, there are few header lines added to SOAP request in order to generate the HTTP request. Summary
Tutorial toolbar: Tell A Friend | Add to favorites | Feedback | |