

Products
Database Search Solution (New Version) Search Control SEO Pager Highlighter Shortcut Controls Crypt Package Free ASP.NET Controls
Geotargeting Component ASP.NET Media Player Control Flash Video Player Control Services
ASP.NET Telecommute Jobs Free IP Location Lookup Test .Net Regular Expressions CSS/Table/DIV Page Layouts Custom Programming Article Sites Master List |
Generating WordML Reports Using Templates and XPathIntroduction to ASP.NET Reporting ProblemsReporting is an import part of almost any web-oriented application. A couple of ways is used to deliver reports to the end user. They vary from simple csv (coma separated values) file generation to expensive complex reporting solutions, such as Crystal Reports. Choosing the optimal solution you should pay attention to such aspects as solution price, ability for end-user editing of the template, ease of use for target audience, etc. One of such ways, delivering relatively cheap reporting solution with end-user editable templates is using WordML. XML Support in Word 2003XML support in Word 2003 is new exciting feature. Word 2003 now supports native XML vocabulary called Word Markup Language (WordML). Each document has the following basic structure: <?xml
version="1.0"
encoding="UTF-8"
standalone="yes"?> As you can see, it's simple XML document with custom namespace. So what's this all about? XML support in Word 2003 gives the end-user ability to add custom tags (and namespaces) to the document without corrupting its structure. This in its turn is useful for getting data from Word file and for custom transformation (using XSLT for example). In this tutorial we will use XPath, ASP.NET 2.0 and WordML to create reporting solution from scratch. Define data structureMost reports are based on aggregated data and several rows of details. Let's imagine we have an internet trading system. And we want a customer to print their purchase history. Let's assume we have following tables: 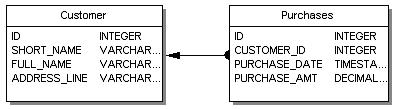 The first step is to define query we will use in our report. They're pretty straightforward. We will just select one customer record along with amount of purchases and all rows related to this customer from Purchases table.
Now we should load these queries in DataSet and add a relation. We that will use DataSet to provide us with target xml, which in turn will be used to create XML schema file. Now let's create a simple standalone application (in future you can either create your own console application for this purpose or design XML schema yourself, the last is probably the right variant). Paste the following contents in created class:
static
void Main(string[]
args) { This example is fair simple. We simply load all data to DataSet and then add a relation between Customer table and Purchases table in the DataSet. Please remember LoadData function which we will use later as well. After that we simply output the data to XML file. It's an intermediate file and we need it only to create matching XSD file. In order to make Word generate XSD file for us - we will use Word Xml Toolbox, which should be downloaded from Microsoft site and installed. Now we can try to open our XML file using word. We will see nothing special - just XML structure and data. Our goal is to create XSD file now and it can be achieved by clicking "Generate Inferred Schema" From XML Toolbox menu (see image below). 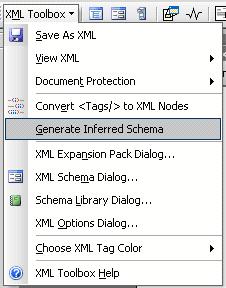 In appeared dialog you should provide namespace for the schema (you can leave Root node as is). This namespace we will use later in our application. Let's make namespace be "test-customers". Enter the path to XSD file and click "Generate Schema" button.  A new document with attached XSD will be opened. Now we can start creating our report template. You start by writing text, applying styles and formatting and so on and leaving space for the text to be inserted. In our case we will create document with simple header (Customer info), footer (total amount of all purchases) and a table containing purchase details. You should remember that each customer has several purchases he made - so we will need to create some sort of the ASP.NET repeater control, which will iterate through purchases and print each one in a row. As you can see later it's really easy with WordML and XPath. The template can look like one shown below: 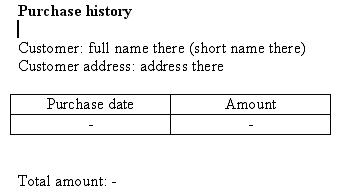 With "full name there", "short name there", "address there" and "-" signs we mark the position where we will put details from our database. Now we should place our custom XML tags in the document. You should select desired area (area that will be later replace from our custom data, in this case it's "full name there", "short name there" and so on). Then in right-click menu you should see "Apply XML tag" and a list of all fields from your XML schema. If you look at our queries and generated XML and XSD file you will notice that each tag in both files represent exact field from our tables. So, for example, if we have a field called SHORT_NAME then we will have a matching tag <SHORT_NAME> in XML file and matching element in XSD file. So you just need to place respective tags of the customer in the document. The next step - is to provide design area for purchase details output. As you remember each customer has many purchases, so we will need to repeat table rows for each purchase. You just need to mark the entire row and then apply "Purchases" (or "CustomerPurchases") tag to the whole row. Once you get in the row cell you will see that a list of available tags has changed - now you can see tags, belonging to Purchases table. Place them in respective cells, save document in XML format (setting ignore schema errors tick box) and consider we're done with the template. Adding some data to template with XPathNow we can manipulate our WordML document. You don't need to know much about WordML schema and tags used by Word - we will use relative paths to select our XML nodes. The basic idea is to iterate through columns in Customer DataSet, find matching tags in WordML (don't forget that our custom tags has names exactly matching columns in our DataSet), and place data inside of this tags. The first to things to do – is to define namespace manager, which will resolve our tags (because they have their own namespace) and create XmlDocument instance.
private
static
XmlNamespaceManager nsmgr =
There we initialize empty namespace manager - and will allow our reports to register their own namespaces in this manager, thus we create public property for nsmgr field. Opening XmlDocument is easy as well:
XmlDocument
xmlDoc = new
XmlDocument(); Next thing is to fill namespace manager with our namespaces:
nsmgr.AddNamespace("w", As you can see we register two namespaces within manager. The first one is WordML native namespace - second is ours. As you should know - each namespace has its URI and prefix. In this case WordML namespace should always have "w" prefix, while custom namespaces may vary. You should check the beginning of our XML template to find what prefix is used for our "test-customer" namespace (just try to search for "test-customer" string in the file, while it's opened in FireFox or any other browser). As we're intending to create flexible solution - that will be independent on number of tables in resulting DataSet we will iterate through all tables in the DataSet:
foreach
(DataTable dt in
ds.Tables) } If we found only 1 row in resulting table - then we will add data to custom tags only once, in case there are may records in table we will clone XML nodes and insert one before another, filling each with data. Now let's start working with XPath. As you may see we're calling two methods - processSingleRow and processRepeatignRows, where we pass ours namespace prefix, data table and template. Let's assume we want to select SHORT_NAME tag in our template. There are several ways to do this, but we will use only one (the most convenient): //ns0:CUSTOMER/descendant::ns0:SHORT_NAME With this XPath expression we will select all SHORT_NAME nodes inside CUSTOMER node. As our customer has only one column SHORT_NAME this XPath expression will return us only one node. // denotes searching in whole document, while /descendant:: is used to search child nodes of current node. In terms of C# it will look like: XmlNodeList childNodes = template.SelectNodes("//" + pref + ":" + tbl.TableName + "/descendant::" + uri + ":" + dc.ColumnName, nsmgr); Once we've got list of all nodes matching current criteria (current table name and column name) we can iterate through it and set respective value:
foreach
(XmlNode childNode in
childNodes) As our custom tags will have some WordML tags inside it we can't simply replace the inner XML with our column value, so we use SetValue method, described below. It simply finds w:t(WordML text) tag inside our custom tag and set it’s InnerXML property:
private
static void
SetValue(DataRow row,
string columnName, XmlNode node) If you look at our template you will find that w:t node is inside w:r, which in turn can be place insite w:p (paragraph) node. That's why we use conditional XPath expression (| symbol denotes OR condition on two XPath expressions). Now it's a half done. All we need now is to create a similar routine for data tables that have several rows(processRepeatingRows).
private
static void
processRepeatingRows(DataTable tbl, It's a bit complex rather that processSingleRow method. First of all we find a template row.
XmlNode
parentNode = Then we clone this node, fill it with data and place it before template row in parent node. All the magic in following two lines of code:
XmlNode
newNode = parentNode.CloneNode(true); Once we're done with all the rows in data table we can simply remove our template row (node) from the document as we don't want unnecessary empty rows in our purchases table. Delivering report to Web usersNow we're done with XPath and got our template fill with data. Now we need to outuput the result to HTTP Response. First of all we should print XML document to the stream:
XmlWriter
xw = XmlWriter.Create(targetStream); The next step is to set proper content type of the response. This is done by the following lines: Response.Clear(); Now we can simply call our WordMLGenerator class GenerateDocument method from our web page passing response stream to it:
WordMLGenerator.NsMgr.AddNamespace("ns0",
"test-customer"); It's pretty easy and rather good-looking. Sample Visual Studio 2005 project for this tutorial you can download here. The only drawback of using WordML as templating solution is that it requires MS Word 2003 to be instaled at your user's computer (it don't need to be installed on server). Tutorial toolbar: Tell A Friend | Add to favorites | Feedback | |