

Products
Database Search Solution (New Version) Search Control SEO Pager Highlighter Shortcut Controls Crypt Package Free ASP.NET Controls
Geotargeting Component ASP.NET Media Player Control Flash Video Player Control Services
ASP.NET Telecommute Jobs Free IP Location Lookup Test .Net Regular Expressions CSS/Table/DIV Page Layouts Custom Programming Article Sites Master List |
XML Automatic Documentation TagsRecall that ...In tutorial Automatic Documentation Generation in ASP.NET Applications we have explained to you why it's hard to produce software documentation using the traditional documentation schemes of Software Engineering. We, then, proposed a much more practical and super fast technique for producing documentation by writing them within your source code and then extracting them into a comprehensive and easy to read / browse complete document. In our previous work, we used Microsoft Visual Studio 2005 to extract the documentation from source code into an XML file. We then worked out the procedure of how to feed this XML file to NDOC to produce our complete documentation CHM file. As you may recall, writing these documentation within your source code needs a special syntax to be followed. We have presented some brief information about the <summary> tag along with some other elementary tags as well. Here, in this tutorial, we will illustrate in more details how you can benefit from this technique to the most extent by using some other recommended XML tags to give more comprehensiveness and functionality to your final documentation file. The <summary> tagUsage: <summary>text</summary> Use the summary tag to give an overall description about your class member. Summary text is the only text that appears in the IntliSense feature. This tag is generated automatically after you type the famous ('''). As an example about this tag see the following lines, then see the final generated document in figure1.
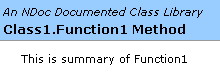
Figure 1 The <remarks> tag
| |||||
10 ''' <remarks> |

Figure 2
The <c>, and the <code> tags
Usage: <c>text</c>
The <c> tag identify that the text within it is source code. This tag is for a single line of source code, use <code>text</code> to indicate multiple lines of source code.
The significance of those two tags is that if you wrote your code directly inside any other tag without specifying then, then your code will of course appear in the final documentation but will be handled differently. For example, your code will be warped according to the width of the window inside which it appears and this is of course is an undesirable behavior.
The following lines give you an example about that. See the final document in figure 3.
2 ''' <summary> |
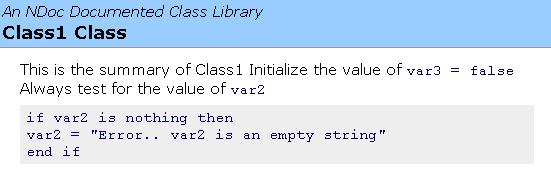
Figure 3
The <example> tag
Usage: <example>text</example>
The <example> tag gives you the ability to list an example describing how to use a given class member in your code. It lists this under the Example section in the final document.
Here's an example about this tag:
15 ''' <summary> |
The <exception> tag
Usage: <exception cref="XXX">text</exception>
The exception tag lists the exceptions that can be thrown by the current method. The XXX is the exception complete qualification reference. This must be a valid exception reference, and the compiler will check the validity of the given reference within the working environment. Note that XXX must be within double quotation marks (") .
As an example, see the following lines, then see the final document in figure 4.
38 ''' <exception cref="System.DivideByZeroException"> |
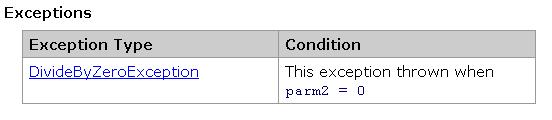
Figure 4
<param>
Usage: <param name="XXX">text</param>
This tag is used to list and describe the parameters of your method in the method declaration section.
XXX is the name of the parameter, and it should come within double quotation marks ("). The 'text' is the supplied description of the mentioned parameter. Note that the <param name=".."> tag is generated automatically above the method declaration, which means that you need not to write it yourself, you only need to write the description.
As an example, see the following lines, then see the final document in figure 5.
27 ''' <param name="parm1">the first parameter</param> |
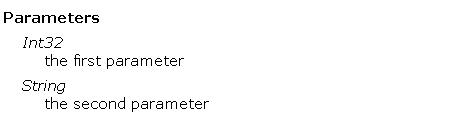
Figure 5
The <returns> tag
Usage: <returns>text</returns>
This tag is used to specify and describe the return value of a method or property. This tag is always used above function declaration and is generated automatically.
As an example, see the following lines, then see the final document in figure 6.
38 ''' <returns> |

Figure 6
The <see> tag
Usage: <see cref="member"/>
Use this tag to specify a link to another member in your application (like another function or class). You must supply a valid member within the double quotation marks. The compiler will check the validity of the supplied member.
As an example of how to use this tag, see the following lines, then see the final document in figure 7.
29 ''' <remarks> |

Figure 7
The <seealso> tag
Syntax: <seealso cref="member"/>
This tag do exactly as what <see> tag do, except the member of this
tag will be shown under the see also section in the final generated
document not within text as <see> tag do.
As an example, see the following lines, then see the final generated document in
figure 8.
45 ''' <exception cref="System.DivideByZeroException"> |

Figure 8
<para>
Usage: <para>text</para>
This tag is useful when you want to structure your text into paragraphs. The abbreviation 'para' stands for a paragraph. This tag can be used within the <summary>, the <remarks>, or the <return> tags to split the text into paragraphs. This gives more readability to the final document.
As an example, see the following lines, then see the final document in figure 9.
10 ''' <remarks> |
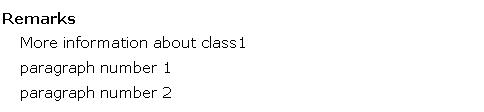
Figure 9
The <paramref> tag
Usage: <paramref name="paramName"/>
This tag is used to indicate that the word "paramName" will be formatted as a parameter not as a normal word. The name of the parameter you want to refer to must be enclosed within double quotation marks.
As an example, see the following lines, then see the final document in figure 10.
46 ''' <remarks> |

Figure 10
The <permission> tag
Usage: <permission cref="member">text</permission>
This tag is used to specify what permissions are needed. The member must be a valid class member or field within the current compilation environment. The compiler will check for that. The text is the description you will write to describe the situation. The member must be enclosed by double quotation marks.
As an example, see the following lines, then see the final document in figure 11.
63 ''' <permission cref="System.Security.Permissions.FileIOPermission"> |

Figure 11
The <list> tag
Usage:
<list type="type">
<listheader>
<term>term</term>
<description>text</description>
</listheader>
<item>
<term>term</term>
<description>text</description>
</item>
</list>
This tag is used to define a table or a definition list. The list can be either bulleted list or numbered list.
Type can be "bullet" for bulleted list, or "number" for numbered list. It can be "table" for a table of two columns.
The <listheader> block is used to specify the heading of the table or the list. In case of the table type you have to supply the 'term' only.
The <item> block identifies an item within list or a row inside the table. You can supply both 'term' and 'description' for each item to create a definition list, or you can supply only the description field for bulleted list, numbered list, or table. You can create as many <item> blocks as you need.
A final note, you can not include the <listheader> block if you do not want to create a header for your list.
As an example, see the following lines that create a bulleted list, then see the final document in figure 12.
62 ''' <remarks> |
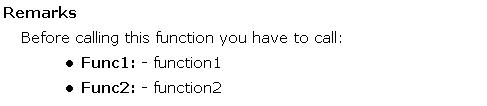
Figure 12
The following figures may give you some feelings about the final generated document as a whole:

Figure 13
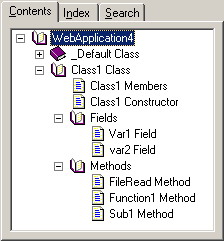
Figure 14
For further information
- Refer to the online copy of Microsoft Developers Network at http://msdn.microsoft.com or use your own local copy of MSDN.
Tutorial toolbar: Tell A Friend | Add to favorites | Feedback |