

Products
Database Search Solution (New Version) Search Control SEO Pager Highlighter Shortcut Controls Crypt Package Free ASP.NET Controls
Geotargeting Component ASP.NET Media Player Control Flash Video Player Control Services
ASP.NET Telecommute Jobs Free IP Location Lookup Test .Net Regular Expressions CSS/Table/DIV Page Layouts Custom Programming Article Sites Master List |
Common Dialog ClassesIn .NET, the CommonDialog class is the base class for displaying common dialog boxes, such as the Color dialog box, the Font dialog box and the File dialog box. All the classes that inherit from the CommonDialog class override the RunDialog() function to create a specific common dialog box. The RunDialog() functionis automatically invoked when a user of a common dialog box calls the ShowDialog() function. The following are the types of CommonDialog classes: ColorDialog: Displays the color picker dialog box that enables users to set the color of an interface element. FontDialog: Displays a dialog box that enables users to set a font and its attributes OpenFileDialog: Displays a dialog box that enables users to navigate to and select a file. SaveFileDialog: Displays a dialog box that allows users to save a file PrintDialog: Displays a dialog box that enables users to select a printer and set its attributes. PageSetupDialog The ColorDialog ClassTo change the background color and the foreground color of the text, you can use the default color dialog box. This is how the color dialog box appears. 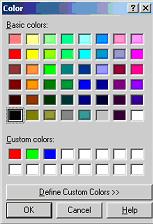 To use this, you can either add a ColorDialog control to the from or create an instance of the inherited ColorDialog class. Properties of ColorDialogAllowFullOpen: Gets/Sets whether the user can use the dialog box to define custom colors. AnyColor: Gets/Sets whether the dialog box displays all the available colors in the set of basic colons. Color: Gets/Sets the color selected by the user. CustomColors: Gets/Sets the set of custom colors shown in the dialog box. FullOpen: Gets/Sets whether the controls used to create custom colors are visible when the dialog box is opened. ShowHelp: Gets/Sets whether the dialog box displays a help button. SolidColorOnly: Gets/Sets whether the dialog box will restrict users to selecting solid colors only. The following code snippets illustrate how you can invoke the default color dialog box by two ways. To execute the following code snippets, you need to add one text box and two buttons to the form. You also need to change the Name and Text property of buttons to Background and Foreground. Using ColorDialog Control Code Example:
Private Sub
Background_Click(ByVal sender
As System.Object, ByVal
e As System.EventArgs)
Handles Background.Click Instantiating ColorDialog Class Code Example:
Dim CDialog1 As
New ColorDialog When you click any of the two buttons, the color dialog box appears and you can change the background and the foreground colors for the text in the text box. FontDialog BoxYou can use the default Font dialog box to change the font, the font style, and the size of the text. This is how the FontDialog box looks like. 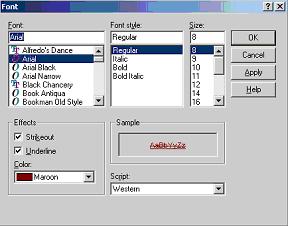 Properties of the FontDialogAllowSimulations: Gets/Sets whether the dialog box allows graphics device interface font simulations. AllowVectorFonts: Gets/Sets whether the dialog box allows vector fonts. AllowVerticalFonts: Gets/Sets whether the dialog box displays both vertical and horizontal fonts or only horizontal fonts. Color: Gets/Sets selected font color. FixedPitchOnly: Gets/Sets whether the dialog box allows only the selection of fixed-pitch fonts. Font: Gets/Sets the selected font. FontMustExist: Gets/Sets whether the dialog box specifies an error condition if the user attempts to select a font or size that doesn't exist. MaxSize: Gets/Sets the maximum point size the user can select. MinSize: Gets/Sets the mainimum point size the user can select. ShowApply: Gets/Sets whether the dialog box contains an apply button. ShowColors: Gets/Sets whether the dialog box displays the color choice. ShowEffects: Gets/Sets whether the dialog box contains controls that allow the user to specify to specify strikethrough, underline and text color options. ShowHelp: Gets/Sets whether the dialog box displays a help button. Again you can do these using two ways, same as for color dialog box. 1. By Using FontDialog Control:
Private Sub
DisplayFont_Click(ByVal sender
As System.Object, ByVal
e As System.EventArgs)
Handles DisplayFont.Click 2. By Instantiating FontDialog Class
Dim FDialog1 As
New FontDialog When you click any of the two buttons, the font dialog box appears and you can change the font, font size, font style for the text in the text box. FileDialog ClassThe FileDilaog Class is an abstract class that is inherited from the CommonDialog class. Since it is abstract you cannot instantiate it directly. However you can use the OpenFileDialog or SaveFileDialog class to open a file or save an existing file. These two are inherited form FileDialog class. Note: It is important to remember that just selecting a file in the open or save as dialog box will not open or save the file. To open or save a file, you need to use file I/O features of .Net. OpenFileDialog ClassThe dialog box looks as: 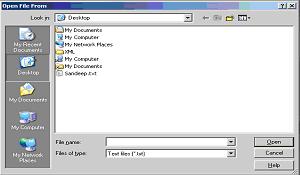 Properties of the OpenFileDialogAddExtension: Gets/Sets if the dialog box adds extension to file names if the user doesn't supply the extension. CheckFileEixsts: Checks whether the specified file exists before returning from the dialog. CheckPathExists: Checks whether the specified path exists before returning from the dialog. DefaultExt: Allows you to set the default file extension. FileName: Gets/Sets file name selected in the file dialog box. FileNames: Gets the file names of all selected files. Filter: Gets/Sets the current file name filter string, which sets the choices that appear in the "Files of Type" box. FilterIndex: Gets/Sets the index of the filter selected in the file dialog box. InitialDirectory: This property allows you to set the initial directory which should open when you use the OpenFileDialog. MultiSelect: This property when set to True allows to select multiple file extensions. ReadOnlyChecked: Gets/Sets whether the read-only checkbox is checked. RestoreDirectory: If True, this property restores the original directory before closing. ShowHelp: Gets/Sets whether the help button should be displayed. ShowReadOnly: Gets/Sets whether the dialog displays a read-only check box. Title: This property allows to set a title for the file dialog box. ValidateNames: This property is used to specify whether the dialog box accepts only valid file names. Its works in the similar way as the above two dialog boxes i.e. you have two ways of using them. To execute the following code snippets add one button to the form and change its name and text to open. 1. By Using OpenFileDialog Control:
Private Sub
open_Click(ByVal sender
As System.Object, ByVal e
As System.EventArgs)
Handles open.Click 2. By instantiating OpenFileDialog Control:
Private Sub
open_Click(ByVal sender
As System.Object, ByVal e
As System.EventArgs)
Handles open.Click SaveFileDialog ClassIt looks like: 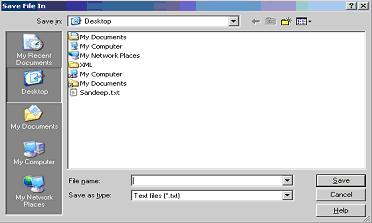 Properties of the Save File Dialog are the same as that of the Open File Dialog. Please refer above. Notable property of Save File dialog is the OverwritePrompt property which displays a warning if we choose to save to a name that already exists. If you want to invoke the default Save As dialog Box. Its works in the similar way as the above two dialog boxes i.e. you have two ways of using them. To execute the following code snippets add one button to the form and change its name and text to save. 1. By Using SaveFileDialog Control:
Private Sub
save_Click(ByVal sender
As System.Object, ByVal e
As System.EventArgs)
Handles save.Click 2. By instantiating SaveFileDialog Control:
Private Sub
save_Click(ByVal sender
As System.Object, ByVal e
As System.EventArgs)
Handles save.Click PrintDialog ClassYou can use the default Print dialog box to print any text or graphics. For this you need to either add a PrintDialog control and a PrintDocument control to the form or create an instance of the PrintDialog and PrintDocument classes. You also need to set the Document property of the PrintDialog object either to the instance of the PrintDocument class or to PrintDocument control that you have added to the form. The following code snippet shows the working.
Imports
System.Drawing.Printing 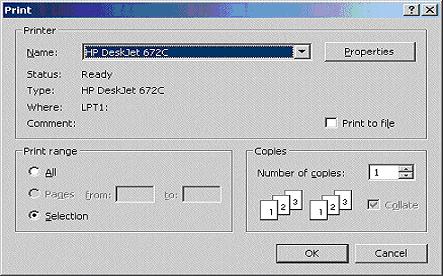 PageSetupDialog ClassAs opposed to directly printing a file, a user may want to perform some preliminary preparation on the file or the printer. Microsoft Windows provides another dialog box used to control printing. It is called Page Setup. 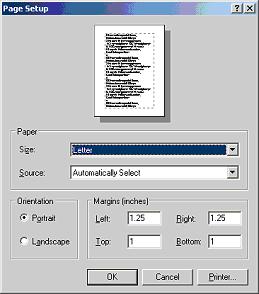 To invoke this dialog box, you will need to create an instance of the PageSettings class. The PageSettings class is included in the System.Drawing.Printing namespace. It actually specifies the settings to be applied to every printed page. When using the Page Setup dialog box, the user must first select a printer. This is usually done already by the operating system that selects the default printer of the computer that called this dialog box. Otherwise, to select a printer or to change the printer, the user can click the Printer button and select change it using the Name combo box: 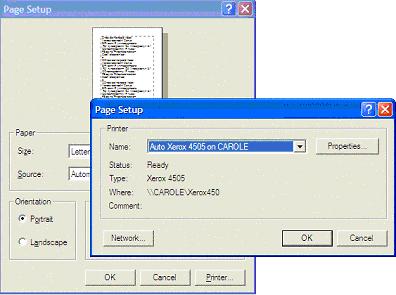 Displaying the Page Setup Printer dialog box also allows you and/or the user to customize the printing process if necessary. If you want to do this, you can use the PageSetupDialog.PrinterSettings property which is a value of the PrinterSettings class reviewed earlier. After selecting the printer, the user can click OK. The options of the Page Setup dialog box depend on the driver of the printer selected in the Name combo box. The Page Setup dialog box allows the user to customize the appearance of the paper on which the document would be printed. On the Page Setup, the user can click the arrow of the Size combo box and select one of the configured sizes of paper. The characteristics of the paper are controlled by the PageSettings class that we mentioned earlier. For example, if the printer has many trays, as indicated by the driver of the selected printer, the user can select which tray would be used when printing. As it happens, one printer can have only one tray while another printer can have 3, 5, or more. If the desired printer is on a network, the user can click the Network button to locate it. He or she also has the option to print the document in Portrait (vertical) or in Landscape (horizontal) position. Tutorial toolbar: Tell A Friend | Add to favorites | Feedback | comments powered by Disqus |