

Products
Database Search Solution (New Version) Search Control SEO Pager Highlighter Shortcut Controls Crypt Package Free ASP.NET Controls
Geotargeting Component ASP.NET Media Player Control Flash Video Player Control Services
ASP.NET Telecommute Jobs Free IP Location Lookup Test .Net Regular Expressions CSS/Table/DIV Page Layouts Custom Programming Article Sites Master List |
Creating Web Spider ApplicationIntroductionIn this part and in the next part of our tutorial we will create our web spider application step by step. As we mentioned previously our application's main purpose is to take a site address (URL), get all the site pages, and store each page along with its URL to a backend database. To do this, our program will work into two stages. The first one is to take the web site URL, navigate to it, extract all the links in the web page, store them in a list, navigate to each link in the list and get the links in it, and again store them to the same list till the whole web site is traversed. After constructing this list of URLS, the second part of our program will start get the HTML text of each link in the list and save it as a new record in the database. In the next lines we will browse and explain each function of each class in our application and show how all parts work together to achieve the program's purpose. Creating our Web Spider ApplicationOpen up your Microsoft Visual Studio 2005. Create a new desktop application choosing Visual Basic as programming language. Give it a name (we name it "3OXO") and location, then click ok. Add both the web browser control and the MSHTML DLL using the two ways mentioned in the first and second part of this tutorial. First, to keep things organized, go to "Solution Explorer" tab and add two new classes to your application. Left clicking your application name. The pop up menu will appear. choose "Add \ Add New Item ...". The "Add New Item" dialog box will appear. Choose "Class" from the icons list, give it a name like "C_3OXO", and click ok. Add another one and call it "C_3OXO_DB". The first class will contain all functions and data needed for the spider to operate. The second one will contains all the functions and data needed to access the database and add records to it. As we mentioned before our backend database will be an Ms Access database contains one table called "TheWebSite". This table has three columns: "ID" of type "AutoNumber" and this is the table primary key, "URL" of type "Text" with field size of 255, and "Data" of type "Memo". The following three figures shows three fields in more details. 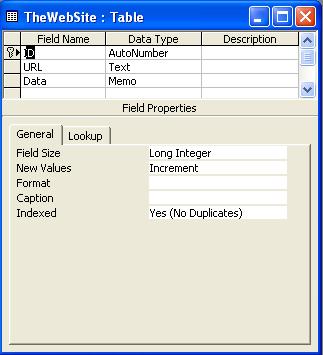 Figure 5 - ID field properties 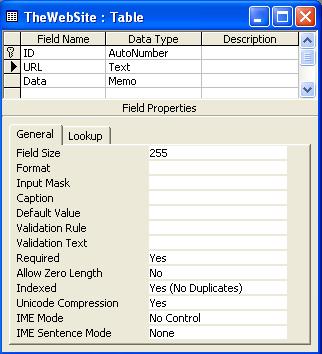 Figure 6 - URL field properties 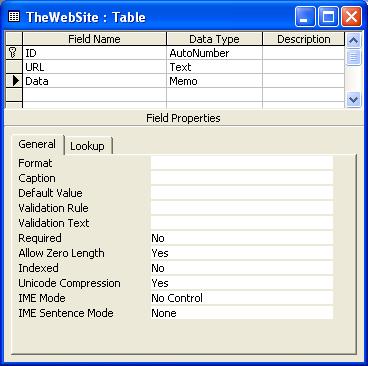 Figure 7 - Data field properties Create the above database and give it a name of "3OXO_DB.mdb", and locate it at the same directory where your EXE do exist. We will use this database file as a template for all the databases that will be created using our web spider application. The "Form1.vb" class will contain all functions and data related to the user interface of our program. The user interface itself will be located on the surface of "Form1" design area. Now, let's be more detailed. 3OXO User InterfaceView "Form1" design view and design the user interface using the toolbox and each control properties. See the following figure. 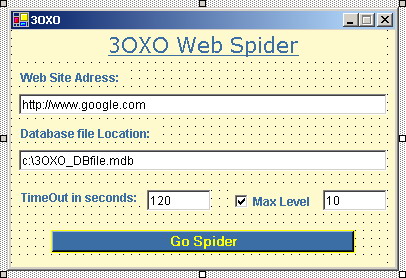 Figure 8 - GUI of 3OXO The above figure is the final appearance of our user interface which consists of: 4 labels, 4 text boxes, 1 check box, 1 button, and 1 hidden web browser control. You can download the program to see more details about each control properties. To keep things understandable I will mention the important properties of each control in the following table.
After adding these controls as shown in the above figure, adjust your user interface design to what you see suitable in colors, fonts, controls position but please restrict the above mentioned properties values to what we agree in the above table to avoid misunderstanding in the following code explanations. As you may note, the web browser control is do exist in the previous form figure but it is not visible. It is "Visible" property is set to "True" too. To hide this control without disabling its visibility property we send it back the label that carries the name of our spider. We do this because we don't need its interface and at the same time when we set its visible property to false the control stop sending the suitable messages and flags that determine loading document completion. "C_3OXO_DB.vb" ClassThis is the class that contains every function and data related to the database accessing, and updating process. At first import the "System.Data.OleDb" namespace to your class, then define a public class named "C_3OXO_DB" and add the following declarations to it. Imports System.Data.OleDb
Public Class c_3OXO_DB Public Const DBTemplateFPN As String = "3OXO_DB.mdb" Const TableName As String = "TheWebSite" Const URLField As String = "URL" Const PageField As String = "Data" Private URL As String Private Page As String Private Conn As OleDbConnection Private InsComm As OleDbCommand The following is a description for each of the above variables. DBTemplateFPN : is a constant public string define
the database template file name. This template file is the one we was created
before an save it at the same directory where the EXE file do exist. Initialize Public Sub Initial(ByVal DBfile As String) CeateDBConnection(DBfile) CreateInsertCommand() End Sub This subroutine is the constructor of our database class. Its main purpose is to create a database connection using the current database file name specified by the user, and create an insert command depends on that connection. Create Database Connection Private Sub CeateDBConnection(ByVal DataSource As String) Conn = New OleDbConnection
Conn.ConnectionString = "Jet OLEDB:Global Partial Bulk Ops=2;Jet OLEDB:Registry Path=;" &
_"Jet OLEDB:Database L" & _
"ocking Mode=1;Data Source=" & DataSource & ";Mode=Share Deny None;Jet OLEDB:Engine" & _ "Type=5;Provider=""Microsoft.Jet" & _
".OLEDB.4.0"";Jet OLEDB:System database=;Jet OLEDB:SFP=False;persist security info" & _
"=False;Extended Properties=;Jet OLEDB:Compact Without Replica Repair=False;Jet O" & _
"LEDB:Encrypt Database=False;Jet OLEDB:Create System Database=False;Jet OLEDB:Don" & _
"'t Copy Locale on Compact=False;User ID=Admin;Jet OLEDB:Global Bulk Transactions" & _
"=1"
End Sub The above subroutine's purpose is to create a database connection of type OLE and assign its connection string with the above string. The data source parameter in the connection string in bold face above is assigned the value of the "DataSource" input parameter to give the connection object the ability to connect to a new database each time the application's user choose to do so. Create Insert Command Private Sub CreateInsertCommand() InsComm = New OleDbCommand
InsComm.Connection = Conn InsComm.CommandType = CommandType.Text End Sub The purpose of this subroutine is to just create the insert command, set its connection, and command type properties to be ready for later usage. Insert Public Function Insert(ByVal R As String, ByVal P As String) As Integer URL = Fix(R) Page = Fix(P) Return InsertRecord()
End Function This function receives two parameters: the URL and Page of the current HTML document, fixes them then call the "InsertRecord" function to insert them into the database. Insert Record Private Function InsertRecord() As Integer Try
Conn.Open() Catch ex As Exception ' Can not open the connection
Return 2
End Try Try
InsComm.CommandText = "INSERT INTO " + TableName + " (" + URLField + "," + _ PageField + ") VALUES(" + URL + "," + Page + ")" InsComm.ExecuteNonQuery() Catch ex As ConstraintException 'Duplicate record
Conn.Close() Return 1
Catch ex As Exception 'Error with Insertion
Conn.Close() Return 3
End Try Conn.Close() Return 0
End Function This function adds a new record into the database specified in the connection string and return an integer value indicates succession or failure of the process. First we open the connection to our database. Then we construct the insert command text (SQL statement). The "ExecuteNonQuery" function is carried out to do the insertion process. The second Try/Catch block checks for record duplication and avoid insertion in this case. Fix the Inserted String Private Function Fix(ByVal S As String) As String S = S.Replace("""", """""") S = """" + S + """" Return S
End Function The purpose of this function is to take an input parameter as a string and return it as a string too but with every double quote replaced with twice double quote. This is the acceptable form of string in the SQL language. This function is used to fix every string that need to be stored in the database. To download the complete program, just click here. Tutorial toolbar: Tell A Friend | Add to favorites | Feedback | comments powered by Disqus |