

Products
Database Search Solution (New Version) Search Control SEO Pager Highlighter Shortcut Controls Crypt Package Free ASP.NET Controls
Geotargeting Component ASP.NET Media Player Control Flash Video Player Control Services
ASP.NET Telecommute Jobs Free IP Location Lookup Test .Net Regular Expressions CSS/Table/DIV Page Layouts Custom Programming Article Sites Master List |
.NET Framework Assemblies - Part 2Recall that...In the first part of this tutorial, we introduced the new concept of .NET framework assemblies. We have explained what are they, and why we do need them. We talked also about the versioning problems and DLL conflicts. We explained the assembly contents, versioning, naming conventions, and locations. In this part we will proceed with assemblies, explaining the concept of global assembly cache, and giving you an idea about how to create an assembly, and how to view an assembly's contents. What Is the Global Assembly Cache?wherever the common language run time is installed on a computer, this computer will has a machine-wide code cache called the global assembly cache. The global assembly cache is the place where the shared assemblies are installed. A shared assembly is an assembly required or used by many applications. It is recommended to keep assembly dependences private as much as you can, and do not install an assembly in the global assembly cache unless you really need it there. Note that: an assembly must have a strong name to be installed in the global assembly cache. There are several ways you can use to deploy or install your assembly in the global assembly cache. You can, for example, use a tool called "Global Assembly Cache Tool (Gacutil.exe)" provided by the .NET framework SDK. This tool allows you to view and manipulate the contents of the global assembly cache. You can also use the Windows Explorer to drag assemblies into the cache. Another alternative is to use an installer designed and developed to work with the global assembly cache, and this is the preferred option over the aforementioned three options. There are some benefits from installing an assembly into the global assembly cache like:
How to Create an Assembly?There are two types of assemblies, single file assembly, and multi file assembly. You can create a single file assembly or a multi file assembly by using Visual Studio .NET and in this case the created assembly will be produced with the extension of '.EXE'. You can, as well, use the compiler and tools shipped with the .NET framework SDK to create both .EXE and DLL assemblies. Single-File Assembly This is the simplest type of assemblies. It contains the type information and implementation as well as the assembly's manifest into a single physical file. To create an .EXE assembly You have first to create a module with a single entry point such as a "Main" or a "WinMain" method, then you can either use the command line or the IDE to compile your assembly into the .EXE format. The following is an example of creating a single-file assembly with .EXE extension using command line compilers. Create a module file using Visual Basic.NET with the name "Assembly1.vb". On the command line prompt type the following command and press enter: > vbc Assembly1.vb The "vbc" is the compiler to be used to compile Visual Basic.NET modules. "Assembly1.vb" is the name of the module source code file written in Visual Basic.NET. This command will create a file with the same name and with .EXE extension "Assembly1.exe". To give the output file (.EXE file) a different name other than the input source code file (.vb), use the following command line: > vbc /out:Assm.exe Assembly1.vb The output EXE file from the above command will have the name of "Assm.exe" instead of "Assembly1.exe" as in the previous example. Note that: if your source code module does not contain an entry point, the compiler will notify you. To create a .DLL assembly If you do not want your assembly to have an entry point, create a library assembly (.DLL). A library assembly is a set of classes and methods referenced by other assemblies and have no entry point. To create a library assembly from a module file named "Assembly2.vb", write the following at the command line then press enter: > vbc /out:AssmLib2.dll /t:library Assembly2.vb "AssmLib2.dll" is the name of the output file, "Assembly2.vb" is the name of the source code module file written in Visual Basic.NET which is the input file to the "vbc" compiler. After running the previous command a new library file will be created with the name "AssmLib2.dll". Multi-File AssemblyYou can create a multi-file assembly by using Visual Studio.NET with the managed extensions for C++, or the command line compilers. You can not use Visual Basic.NET or C#.NET to create a multi-file assembly, they can be used only to create single file assemblies. Suppose now we want to create a multi-file assembly that consists of the following files: Two code modules, module1.vb, and module2.vb. Note that: to be able to create an executable multi file assembly from the above two modules, one and only one of them must have an entry point or otherwise your program will have no specification for from where to start running. Now use the following two command lines to compile both of your source code modules (.vb) to (.netmodule): > vbc /t:module module1.vb
> vbc /t:module module2.vb
When you use the '/t:module' compiler option, your file will be compiled as a module rather than an assembly. The module file is a Microsoft Intermediate Language (MSIL) file that does not have an assembly manifest. The output of the above two commands is two compiled modules files with same names as the input source code files but with the extension of (.netmodule). The output two files are 'module1.netmodule', and 'module2.netmodule'. To create an assembly from the above two compiled modules, you have to use a tool called "Assembly Linker (AL.EXE)". The assembly linker is used to generate an assembly manifest file given one or more files that are either modules or resources files. The output file will contain the assembly manifest which contains reference information for all needed modules or resources. In this case, the manifest can act as the executable for the application. Assume that "Module1.vb" contains a class called "Class1", and this class has a "Main" method as the entry point. To create a multi file assembly from the above two compiled modules using the assembly linker tool, write the following command line: > AL module1.netmodule module2.netmodule /main:Class1.Main /out:MAssembly.exe /target:exe As you can see in the above command line, you first list all of your compiled modules included in the assembly. The /main: option specifies the method name that is the entry point of the assembly (which is obviously the entry point of the final executable as well). The /out: option specifies the output file name which will contain the assembly's manifest. The /target: option specifies the type of the assembly. You can choose from console application executable (EXE), windows application executable (WIN), or a library (DLL). How to View Assembly's contents?Viewing an assembly is to view its attributes, and references to other assemblies or modules. This will be a great aid if you need to know on which other components your assembly depends. You can use this information to determine whether the viewed file is an assembly or part of an assembly, and whether the file has references to other modules or assemblies. To view an assembly file you have to use the MSIL Disassembler (Ildasm.exe). This tool is shipped with MS Visual Studio.Net. You can use this tool to view Microsoft intermediate language (MSIL) information in a file. If the examined file is an assembly file, you will be able to view its attributes and references. Run Ildasm.exe to view the content of any portable executable (PE) file that contains MSIL. Open the required assembly file to view its contents as shown in the following figure: 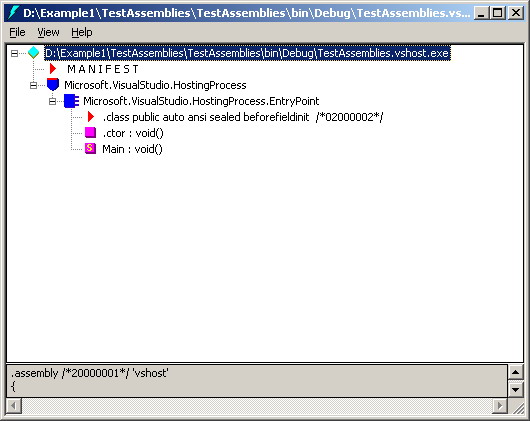 Figure 1 - An assembly file opened on 'Ildasm' GUI From the menu options available in this tool you can view many statistics and information about the file. You can also save these information by clicking the File / dump menu item and then supply a file name. You can use MS Notepad to view the contents of the output file of the this dump operation. For further informationRefer to the online copy of Microsoft Developers Network at http://msdn.microsoft.com or use your own local copy of MSDN. Tutorial toolbar: Tell A Friend | Add to favorites | Feedback | comments powered by Disqus |