

Products
Database Search Solution (New Version) Search Control SEO Pager Highlighter Shortcut Controls Crypt Package Free ASP.NET Controls
Geotargeting Component ASP.NET Media Player Control Flash Video Player Control Services
ASP.NET Telecommute Jobs Free IP Location Lookup Test .Net Regular Expressions CSS/Table/DIV Page Layouts Custom Programming Article Sites Master List |
Practical .NET Internet Application ExampleRecall That ...In the first part of our tutorial we talked about what is an internet application explaining how does it work. We then introduced you to the solutions the .NET framework provides to make your task in coding such an application an easy and quick, yet powerful, task. Now, and in this partl, we will apply this knowledge using the following example. We will then give you some hints regarding some other ways you can use to allow your application to access the internet. You will learn also how to benefit from using the "System.Net" classes. Practical Example of .NET Internet ApplicationTo demonstrate the concept of pluggable protocols and to test creating an internet application, let's see an example. To download the complete example, just click here. Open up your Visual Studio .NET 2005 and create a new application. In "Form1.vb" design view draw some user controls as shown in the following figure: 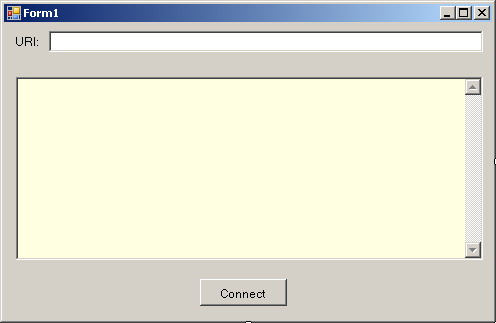 Figure 1 - The Graphical User Interface of our application The controls along with their important properties / values are listed in the following table:
Now double click the "Connect" button to activate its click event handler then type the following lines of code. 7 If Me.TB_URI.Text = "" Then 8 MsgBox("You have to Enter a URI") 9 Return 10 End If 11
12 Dim RI As New Uri(Me.TB_URI.Text) 13 Dim WReq As WebRequest = WebRequest.Create(RI) 14 Dim WRes As WebResponse = WReq.GetResponse() 15 Dim RStream As Stream = WRes.GetResponseStream 16 Dim SR As New StreamReader(RStream) 17
18 Me.TB_Display.Text = SR.ReadToEnd 19
20 MsgBox("Content Length = " & WRes.ContentLength.ToString & _ 21 Chr(13) & Chr(10) & "Response URI: " & _ WRes.ResponseUri.ToString) 22
23 WRes.Close()
24 RStream.Close()
25 SR.Close()
Add the following to lines of code above "Form1" class definition on the top of your code page. 1 Imports System.Net 2 Imports System.io Now, run your application by pressing F5 on your keyboard or choose "Start Debugging" from the "Debug" menu. While the application is running, type the following URL address "http://www.microsoft.com" into the "URI" text box as shown in the following figure. 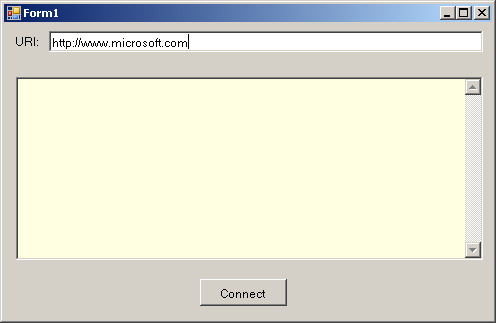 Figure 2 - Typing an internet resource in the URI text box After typing the address, click the "Connect" button. You have to wait for some time that depends on your connection speed, before you can get a result. A message box showing some information about the URI you requested will appear as shown in the following figure. 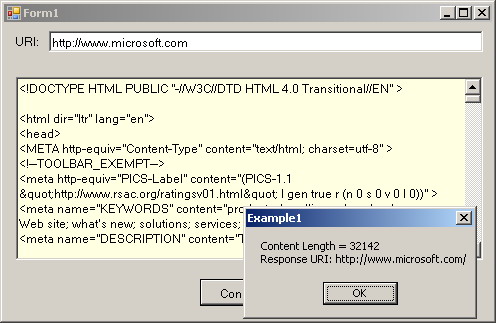 Figure 3 - The response you will get when you click the "Connect" button. Click "Ok" then view the incoming HTML source text laying in the center text box. This is the HTML source code of the page you requested. You can type a different address in the "URI" text box, click the "Connect" button and get other results. Now, let us explain our code. First you import both "System.Net" namespace which contains all the internet accessing classes you may need, and "System.IO" namespace which contains all IO classes you need to access and manipulate the incoming response as a stream of data. The two imports lines are shown in the above code at lines 1 and 2. Starting from line number 7 to line number 10 of our code, we check to see if the "URI' text box is empty or not. If it is empty the Subroutine will return, otherwise we will move to line number 12. At line number 12, we define and create a new URI class instance using the text value typed in the "TB_URI" text box. At line number 13, we define and create a new "WebRequest" instance passing the created "URI" at line number 12 to the "WebRequest" class's "Create" method. At line number 14, we define and create a "WebResponse" class instance by calling the "GetResponse" method of the created "WebRequest" instance "WReq" at line number 13. This is the operation that takes a while depending on your connection speed and makes you wait while getting a response from the desired server - which is "microsoft.com" in our case - using the "Http" communication protocol as the input "URI" implies. After responding, and at line number 15: A stream instant "RStream" is defined and created passing to it the "GetResponseStream" method of the created "WebResponse" at line number 14. Now you can use this "Rstream" as you normally use any other ordinary stream. In our case, we will define and create a "StreamReader" from "RStream". We will then call the "ReadToEnd" method of this stream reader and assign its returned text to the text property of the text box control in the middle of our interface ("TB_Display") to display it. To show you how to get some information from your response object, we display two pieces of this information via a message box as shown in the code line number 21. At the end, and as shown in code lines 23, 24, and 25 we call the "Close" method of all open streams. That's it, easy and quick coding enables your application simply to access the internet. Another Way There is another more simple way you can use to get the same results, that's through using the "WebClient" class instead of the three used classes we mentioned before. "WebClient" class provides the easiest method you can use to access the internet. "WebClient" uses the "WebRequest" and "WebResponse" classes to make the actual connections to the internet resources. Let us see a quick example: Dim Client1 As WebClient = New WebClient Dim St As Stream = Client1.OpenRead(Me.TB_URI.Text) Dim SR As New StreamReader(St) Me.TB_Display.Text = SR.ReadToEnd
St.Close() SR.Close() The above code does the same function as the code we explained in the above example. Same results but much more easier way, but as you may notice that we are no longer able to display a message box containing information about the response stream as we did in the previous example, this is the limitation of this new method. Despite of this limitation, the "WebClient" class comes with a set of wonderful methods for uploading and downloading files, sending and receiving streams, and sending a data buffer to the server and receiving a response. Non Request/Response ModelFor applications that can not use the request / response communication model - like applications that need to listen on the network - the aforementioned scenario is not applicable. We can not use the technique of pluggable protocols in this case. Instead, we need to deal with each network type, or protocol, separately. The .NET framework provides the "System.Net.Sockets" namespace for this type of applications. This namespace contains a managed implementation of the Windows Sockets interface, and socket services provided by Winsock32 API. The "System.Net.Sockets" provides classes like "TCPClient", "TCPListener", and "UDPClient". These classes handles the operation of accessing the internet providing all the details of using different communication protocols and exposes the network connection to the application as a stream. Developers who have pervious experience in Windows Sockets interface, or developers who need more control over the communication process will find that the "System.Net.Sockets" classes suitable for their needs. Tips on using "System.Net" ClassesHere we will demonstrate some recommendations helping you to achieve the best when using the "System.Net" classes.
For further informationRefer to the online copy of Microsoft Developers Network at http://msdn.microsoft.com or use your own local copy of MSDN. Tutorial toolbar: Tell A Friend | Add to favorites | Feedback | comments powered by Disqus |