

Products
Database Search Solution (New Version) Search Control SEO Pager Highlighter Shortcut Controls Crypt Package Free ASP.NET Controls
Geotargeting Component ASP.NET Media Player Control Flash Video Player Control Services
ASP.NET Telecommute Jobs Free IP Location Lookup Test .Net Regular Expressions CSS/Table/DIV Page Layouts Custom Programming Article Sites Master List |
Building a .NET Remoting ApplicationBe Ready...You should now recall that a .Net remoting application consists of three components. These are the remotable type, the host or server, and the client. In this part of our tutorial we will build a .NET remoting application using a technique nearly suitable for any scenario you may need to use .NET remoting with. Building a .Net Remoting Application.NET remoting has a very straightforward technique. If you want to build an application that uses .Net remoting to communicate across application domain boundaries all what you have to do is to implement the three components mentioned above. You also need to configure the remoting system to use remote activation for the remotable type. This requirements applies whatever the complexity of your remoting scenario. Building a Remotable Type The remotable object is a very typical / standard object, the difference is just it is being called from outside its application domain. To give any object the ability to be called from outside its application domain boundaries, the class that declare that object must inherit from "MarshalByRefObject" class. The "MarshalByRefObject" class is the base class for objects being communicated across application domains boundaries by exchanging messages using a proxy. So, when our class inherits this class, it automatically gets the same ability of communication as the "MarshalByRefObject" class. Also, the remotable class must be compiled into a .DLL library to be able to call its services. The following lines of code shows you an example of how to code a remotable type. First, open up your MS Visual Studio .NET, create new project, then add a new class to the created project. As shown in our example below the class name is "TheRemotableObject".
Public Class TheRemotableObject Inherits MarshalByRefObject
Private List As String() = {"String1", "String2", "String3"} Public Function ViewItem(ByVal ItemNum As Integer) As String If ItemNum > List.GetUpperBound(0) _
Or ItemNum < List.GetLowerBound(0) Then Return "Error" Return List(ItemNum)
End Function End Class The class shown in the above piece of code is a remotable class because it inherits the "MarshalByRefObject". It has a private list of strings and one public method or service. The method's mission is to take an integer list index as an input parameter, checks that the input is within the list boundaries and if so returns the specified or selected string to the caller. Save the file containing the above created class - in our case it will be saved as "TheRemotableObject.vb". To compile this class into a library, use your command line tools shipped with the .NET framework SDK as shown in the following command line. Note that: you should first run the [ Start / Programs / Microsoft Visual Studio 2005 / Visual Studio Tools / Visual Studio 2005 Command Prompt ] to be able to use the "vbc" compiler. You also have to run the following command from inside the directory inside which you saved the class file.
> vbc /t:library TheRemotableObject.vb As a result of running the above command a new file "TheRemotableObject.dll" is now created at the same location as the "TheRemotableObject.vb" file. To download the remotable type application click here. Building a Host Application Building such a remotable object as shown in the pervious section is not enough to make the required communication across application domains boundaries. Indeed, you need to build another kind of application to perform the communication process. You can think of building such a remotable type or object as just remarking this object as "could be shared or called remotely" but no more. You stilll need some kind of application being able of receiving calls to this newly created remotable object, identifying these calls, creating an instance from the called object, running the required service or method, and finally returning results to the caller. This is the host / server / listener application. A host application does its job by the mean of using channels. Channels are objects responsible of handling the network protocols and serialization formats on your behalf. In addition, the host application registers your remotable type with the .NET remoting system so that it can use your channel to listen for requests for your object. Host applications can be of any type. It can be a Windows forms application, an ASP.NET application, a Windows service application, a console application, or any type of a managed application. Now, to an example: Close all open projects or solutions, and create a new console application in a new directory (in our example we will name it example2). As a console application you will find module that is created by default (Module). Rename "Module1" as "Listener". Double click the "Listener" icon and change the module name shown in the code window. Add the imports statement and the lines of code inside the "Main" sub as shown in the following code snippet: Imports System.Runtime.Remoting
Module Listener
Sub Main()
RemotingConfiguration.Configure("Listener.exe.config")
System.Console.WriteLine("Listener: Press <Enter> to exit ...")
System.Console.ReadLine() End Sub End Module In the above code we firstly configure the remoting infrastructure by using a configuration file named "Listener.exe.config". Then we send a message to the user, and waiting till the user hits the <enter> key to exit. The last line main and only purpose is to keep the application running till the <enter> key is pressed. The configuration file is an XML file specifying some configurations like the name and the URI of the remotable type, the kind of the used channel (whether it is an http or tcp channel), the port number to listen on, and the server activation mode. The remoting system uses the information in this file to listen for remote requests and route them to an instance of the remotable object or type. Below is a copy of the listener configuration file.
<configuration> <system.runtime.remoting> <application> <service> <wellknown mode="Singleton" type="TheRemotableObject, RemotableType" objectUri="TheRemotableObject.rem" />
</service> <channels> <channel ref="http" port="8989"/> </channels> </application> </system.runtime.remoting> </configuration> To compile the above "Listener.vb" module we will use the command line tools like in compiling the remotable object class above. Before compilation you have to save a copy of the "The remotableObject.dll" created in the previous example in the same directory with the "Listener.vb". Then save the above configuration file under the name specified in the listener module code file (which is "Listener.exe.config") in the same directory as the "Listener.vb" file. Position your command line prompt at the directory that contains the three files mentioned above then run the following command line. > vbc /r:TheRemotableObject.dll Listener.vb As a result you will get "Listener.exe" file in the same directory with the "Listener.vb". To download the listener application click here. Building a Client Application To build a client application that utilizes the remotable type "TheRemotableObject" and hosted by the "Listener" application created above, you have to register this client application as a client for the specified remotable type. When you do this, the client application will call the remotable type as if it does exist in the same application domain with the client. The following code example shows you how to build a client application. Close all open projects and solution in your Visual Studio .NET 2005 then create a new console application giving it a name and a directory to be created in (in our example the project name will be "Example3"). Rename the default created module "Module1" to "Client" then double click its icon to open the code file. Rename the module to "Client". Add the imports statement and the lines of code inside the "Main" sub as shown in the following code snippet.
Imports System.Runtime.Remoting
Module Client
Sub Main()
RemotingConfiguration.Configure("Client.exe.config")
Dim RM As New TheRemotableObject() System.Console.WriteLine("Result = " + RM.ViewItem(1))
End Sub End Module As shown in the code above you have to configure the remoting infrastructure with the "Client.exe.config" XML configuration file. Then you define and create a new instance of the remotable type "TheRemotableObject". Call the remotable method "ViewItem" then write the result to the console. Although the "TheRemotableObject" type is not in the same application domain with the "Client" but you will be able to call its services "ViewItem" remotly and will be able to receive the results. Of course the last two lines of code in the "Main" subroutine will be marked as error but this is not a matter, just ignore it. Write the following configuration file and save it under the name "Client.exe.config" at the same directory of the "Client.vb" code file.
<configuration> <system.runtime.remoting> <application> <client> <wellknown type="TheRemotableObject, RemotableType" Url="http://localhost:8989/TheRemotableObject.rem" />
</client> </application> </system.runtime.remoting> </configuration> The configuration file tells the remoting system that the type information of the remotable type can be found in the "TheRemotableType" assembly. This remotable object located at "http://localhost:8989/TheRemotableObject.rem". If you want to run this application over a network, you have to write the remote computer name instead of "localhost" in the url above. You must pay attention when you write a configuration file. Although it is simple but most errors comes from incorrect settings or mismatching between settings in the two configuration files used by client and host applications. Now put a copy of the "TheRemotableObject.dll" created in example1 and compile the above "Client.vb" using command line tools as follows.
> vbc /r:TheRemotableObject.dll Client.vb As a result you will get "Client.exe" file at the same directory with the "Client.vb". To download the client application click here. Running The Complete .NET Remoting applicationNow The situation is : We have one directory called "Example2" (which is the listener directory) that contains "Listener.exe", "Listener.exe.config", and "TheRemotableObject.dll" files. We have another directory called "Example3" (which is the client directory) that contains "Client.exe", "Client.exe.config", and "TheRemotableObject.dll" files. Note: "Example2", and "Example3" are depicted as "L" and "cl" in the figure below.
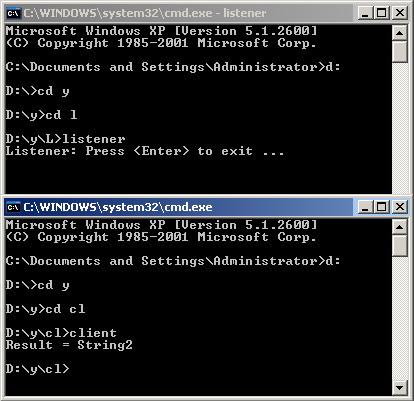 Figure 1 - The host listing to the client and fulfill its requests To run and test the remoting process between these two different applications where each one of them has its own application domain and process boundaries do the following: Run the command line prompt at the listener directory and type: Listener, then press <enter>. A message will be displayed as shown in figure1 in the above window. Now open a new command prompt in the client directory and type: Client, then press <enter>. When you do so the client application will call the remotable type, while the server at the other side of the channel listening for any requests. It receives the client request, process it then returns the results back to the client. The client gets the result and displays it to you at the client command prompt as shown in figure1 in the second window. That's it! For further informationRefer to the online copy of Microsoft Developers Network at http://msdn.microsoft.com or use your own local copy of MSDN. Tutorial toolbar: Tell A Friend | Add to favorites | Feedback | comments powered by Disqus |