Products
Database Search Solution (New Version) Search Control SEO Pager Highlighter Shortcut Controls Crypt Package Free ASP.NET Controls
Geotargeting Component ASP.NET Media Player Control Flash Video Player Control Services
ASP.NET Telecommute Jobs Free IP Location Lookup Test .Net Regular Expressions CSS/Table/DIV Page Layouts Custom Programming Article Sites Master List |
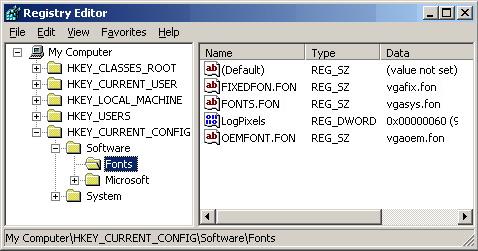
System Registry in .NETIntroductionSystem registry is always seen as both a location for experts to do magnificent operations and as a source of trouble as well. You can virtually tune every aspect of every possible software piece on your system from system registry even those aspects that are not exposed using any user interface at all. This is all in addition to the thousands (not hundreds!) of other operations that are even not tuning and are much ahead the already complex tuning. If you can access registry from your applications then you freely and automatically can give your application the capabilities to benefit from this magnificent world. This tutorial aims to show you how to access system registry from a .NET application along with a description about the system registry and its main properties. What Is System Registry?It is a database file contains valuable data and configurations about your computer. It contains information about installed hardware, installed programs and the type of documents each can create, ports being used, settings for folders and program icons, and profiles of system users. Windows continually references the above information and settings during operation. Applications and system components store and receive configuration data using the system registry as well. You can think of it as a repository for the current system configurations and settings. System Registry StructureThe system registry is organized in a tree structure just like the structure of folders and files. It made up of keys (like folders), sub keys (like sub folders), and values (like files). It is better to open your system registry file and browse it to understand its structure. To do so you have to use the system registry editor "RegEdit" shipped with your Microsoft Windows. To open it click "Start\Run" then type "RegEdit" and press enter. See the following figure.
As you see in figure1, the registry keys and sub keys viewed in the left while the values are in the right. Some Registry DefinitionsKey A key is a folder appears in the left pane of the registry editor window. It can contain sub keys and values. "HKEY_CURRENT_CONFIG" is an example of a key (see figure1). Sub Key A sub key is a key under another key just like a folder under another folder. It can contain sub keys and values. "Software" is an example. (see figure1). Value A value entry consists of a name, data type, and the value itself. The value entries always appear at the right pane of the registry editor window. In figure1 above the entries appear in the right pane are all values of the current selected sub key "Fonts". The second value entry named "FIXEDFON.FON" has a "REG_SZ" data type and a "vgafix.fon" as its value. Predefined Key A predefined key is one of the main five keys that make the system registry. They are located directly at the registry root. You can not rename or delete one of them. You can not add another new key at the same level with them. You only can add new keys under one of those defined keys. These predefined keys are:
Registry Data TypesAs we say above the value entry consists of a name, data type, and the value itself. The allowed data types in the registry file are as follows:
Although you can store whatever you want in the registry, a few practical guidelines exist to promote system efficiency. We can summarize these guidelines in the following list:
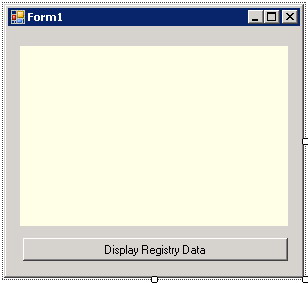
Registry Access In .NetAlthough you can access the system registry from the registry editor, add new keys, sub keys, and values, modify key name and values. You still need in some cases to access it from your application. Assume that your application has state settings like its fore color, back color, last browsed folder, and so on, and you want to preserve settings between the previous session of the application and the new restarted one. You can store these settings in a file and save this file path hard coded in your application. But what if the file path changed, deleted, or not exist on the current computer. The safer and professional solution in this case is to save your application state as a value under a new created key in the system registry. Another case in which you may need to access your system registry from your application is when you need to get system information like for example the Windows directory of the current system. You can not always assume that the Windows is installed on the "C:" drive or under the "Windows" or "Winnt" directory. So, hard coding this path will lead to invalid results. The solution is to retrieve this information from the system registry. The .Net framework provides built-in classes to facilitate accessing the registry from code. The main two classes in this regard are: "Registry", and "RegistryKey". These two classes contain all what you need to retrieve registry data, add new keys, sub keys, and values. Let's create an example to demonstrate the using of these two main classes. Open up Visual Studio 2005, create new Visual Basic application and name it "Example1". In "Form1" design view add "Label", and "Button" controls as shown in Figure2.
Double click the button to activate its click event handler. At the top of the "Form1" class add the following line of code to import the "Microsoft.Win32" namespace that includes the classes we need.
Imports Microsoft.Win32
The purpose of our program is to add a new key under the "Software" subkey under the current user predefined key. Our new key name is "ABC" it will have two values named "Value1" and "Value2", and two subkeys called "Sub1" and "Sub2". The following lines of code add our new key along with its values and subkeys.
Private Sub AddNewKey() Dim NKey As RegistryKey Dim Key As RegistryKey Key = Registry.CurrentUser.OpenSubKey("software", True) NKey = Key.CreateSubKey("ABCD")
NKey.SetValue("Value1", "Hello 1") NKey.SetValue("Value2", "Hello 2") NKey.CreateSubKey("Sub1")
NKey.CreateSubKey("Sub2")
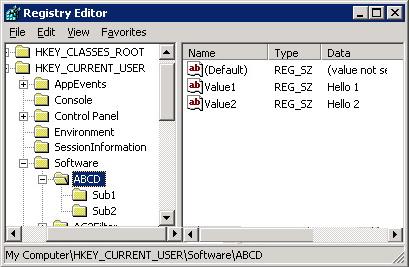
NKey.Close() Key.Close() End Sub As you see we define two variables with the "RegistryKey" type. The "Key" variable holds the "software" key under the current user predefined key. Then a new created key "NKey" is created under that path. The "Value1" has a value of "Hello 1", and the "Value2" has a value of "Hello 2" as shown above. Two new subkeys are created under the "NKey". After finishing we close all the opened keys to flush their buffers. Now if you execute this piece of code and run the registry editor you will find the following.
The "ABCD" key is created successfully along with its values and subkeys as shown in figure3. Now what if you want to retrieve values and subkeys under a specific key?. The following piece of code demonstrates this idea.
Private Sub ViewKey() Dim Key As RegistryKey Dim VNames As String() Dim VName As String Dim SKNames As String() Dim SKName As String Key = Registry.CurrentUser.OpenSubKey("Software\ABCD")
VNames = Key.GetValueNames() Label1.Text = "ABCD Values"
For Each VName In VNames Label1.Text = Label1.Text + Chr(13) + Chr(10) + _ VName + " = " + Key.GetValue(VName)
Next
SKNames = Key.GetSubKeyNames Label1.Text = Label1.Text + Chr(13) + Chr(10) Label1.Text = Label1.Text + Chr(13) + Chr(10) + _ "ABCD SubKeys"
For Each SKName In SKNames Label1.Text = Label1.Text + Chr(13) + Chr(10) + _ SKName Next
End Sub To make our example functional correctly add the following lines of code.
Private Sub View() AddNewKey() ViewKey() End Sub All the above three subroutines must be added to the "Form1" class. Add the following line of code to the "Button1" click handler.
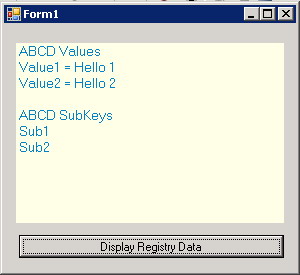
Private Sub Button1_Click(ByVal sender As System.Object, _ ByVal e As System.EventArgs) Handles Button1.Click View() End Sub Now run your application, click the "Display Registry Data" button and enjoy the result.
To download the created example just click here. For further informationRefer to the online copy of Microsoft Developers Network at http://msdn.microsoft.com or use your own local copy of MSDN. Tutorial toolbar: Tell A Friend | Add to favorites | Feedback | comments powered by Disqus |