

Products
Database Search Solution (New Version) Search Control SEO Pager Highlighter Shortcut Controls Crypt Package Free ASP.NET Controls
Geotargeting Component ASP.NET Media Player Control Flash Video Player Control Services
ASP.NET Telecommute Jobs Free IP Location Lookup Test .Net Regular Expressions CSS/Table/DIV Page Layouts Custom Programming Article Sites Master List |
How To Deploy .NET Windows ApplicationDeployment is the process of distributing the files that make up an application to install it on the target computers. Here we will be learning the deployment using the Visual Studio .NET Deployment tools. Before the practical demo I must tell you the various project editors that used in for the deployment. Deployment Project EditorsVisual Studio .NET allows you to specify files to be included in a deployment project and to create registry entries when the application is deployed. you can also customize the user interface that is displayed when a user executes the .msi file. To accomplish this there are six editors in deployment projects:
The File System EditorThis editor is displayed by default. Or you can even open this as View->Editor->File System. This editor allows you to add project outputs ( such as .exe and .dll files ) and additional files ( such as readme.txt ) to the deployment project. This editor displays the folder structure on the target computer. This is how the file system editor will look like: 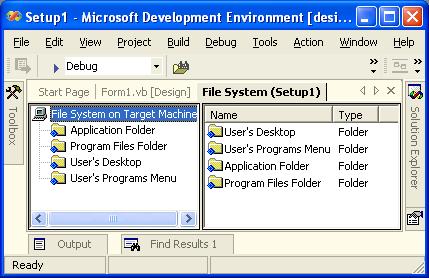 You can add subfolders, special folders, or custom folders to a deployment project by using this editor. Some special folders paths that can be added are displayed below along with there physical paths:
This editor allows you to perform the following functions: Add a special Folder--Select the "File system on Target machine" node, and then select appropriate folder form Action->add special folder menu. Add a subfolder--Select the folder in the editor, and then select Action->add->folder Delete a folder-Select the folder and press del key. Or select Edit->Delete. Add and Remove project outputs--Project outputs include .exe and .dll, the source files and the .pdb file. A .pdb file contains debug info. To perform this task, Select File->Add project->Existing project. Click your project which you are wanting to deploy and click ok. In the file system editor, select the target folder to which the output needs to be added. And select Action->add->project output. The following dialog box appears:  Select your project from the dropdown list. You can select one or multiple output types from the box, the description of the selected output is displayed in the description text box. If you wish to delete the output types you can do that by selecting the project output, and select edit-> delete. Adding/Removing files-- Like readme.txt. For this select the target folder, select action->add->file Adding/Removing shortcuts--Select the file/folder to which a shortcut is to be created. Select Action->create shortcut to <name>. assign a name. You can change the shortcut location by moving it to appropriate folder in the File System editor. You can perform a cut-and-paste operation to move the shortcut to the appropriate folder by using the edit menu. The Registry EditorWhen an application is installed, you can add registry keys and values to the registry of the target computer. For example, you can set values for environment variables or specify Control Panel settings for the target computer. To perform such tasks, you can use the registry editor in a deployment project. To view this window View->Editor->Registry. It is shown below: 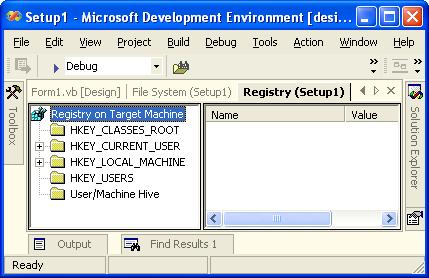 You can perform following functions using registry: Add/Remove registry keys--Select one of the top-level key nodes. Select Action->New key. And specify its name. If you want to add a subkey within an existing, perform the following steps--Select a key. Select Action->New->key. Adding/Removing Registry key values--Select the key in the registry editor. You can assign four types of values to registry keys: binary, string, environment string, and DWORD. Depending on the type, select the appropriate option from the New option on the Action menu. The newly created value appears in the Name column of the detail pane of the Registry editor. Type a name for the new value. In the properties window, select the value property and type a value. Importing an existing registry file in the registry editor--Select the registry on Target machine node. Select Action->Import. Locate your .reg file and click open. The File Types EditorIt allows you to specify file types and file associations on a target computer. E.g. of a file type is Microsoft Excel Worksheet. It has extension .xls. Therefore when you double click a file with the .xls extension, Windows launches EXCEL.EXE. Similarly, you can associate a file extension with an application by using the File Types Editor. The window looks like: 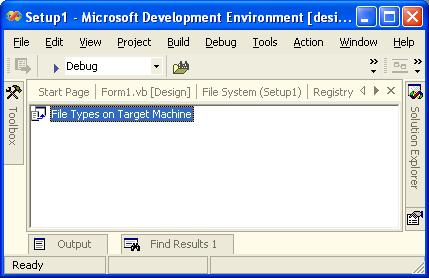 You can perform following functions using files types editor. Add/Remove file types-- Select "file types on target machine" node. Select action->add file type. To associate extensions with the file type, select the newly created file type. Press F4 to open properties window, select extensions property and specify the extension. You must use dot (.) when specifying. To associate the file type with an executable file, select the command property in the properties windows. This opens the Select Item in project dialog box. Select the executable file to be associated with the file type. You can also associate an icon with a file type. For this select the icon property and specify the file to be associated with the file type. The User Interface EditorWhen you create a deployment project, some dialog boxes are automatically displayed during the installation of the application. In addition, you can add your own customized dialog boxes. For this select View->Editor->User Interface 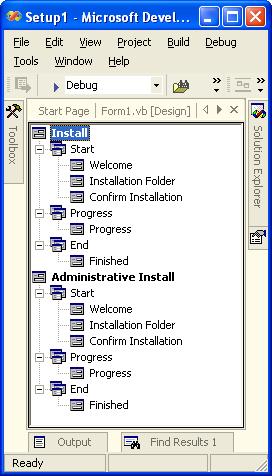 You can see that dialog boxes are categorized as
You can perform following functions using User interface editor Add/Remove dialog boxes--Select start, progress or end. Select Action->Add dialog. This window appears: 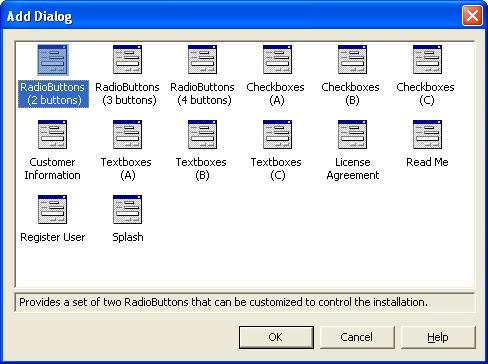 Now select any dialog box according to your requirement. And click ok. You can change the sequence of dialog box to appear by clicking move-up, or move down from the Action menu. The Custom Actions EditorYou can use the installer to perform some additional custom tasks like to create a database during installation. 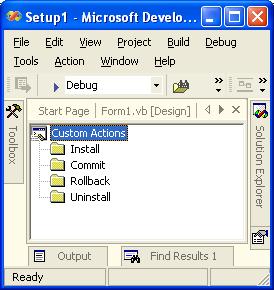 To perform the function of adding a custom action--Select the section in which the custom action is to be added. Select Action->Add custom action. This invokes the select item in project dialog box. Select the .dll or .exe file. The Launch Conditions EditorYour application may be dependent on several factors for execution, such as availability of files, version of the operating system on the target computer and registry keys. You can use Launch Conditions editor to add a number of launch conditions. These conditions are as folloes:
Practical Demonstration of Windows Setup DeploymentPerform the following steps: 1. Select File->New->Project. 2. In the project panes, select Setup and deployment projects. In the templates pane, select setup project. 3. Change the name to "samplesetup", as my demo is creating a setup for a sample project. Click ok. 4.Select File->Add project->Existing Project. And add your project, in my case it is "sample". 5. Select the "File System on Target Machine" in the File system editor. 6. Select Action->Add Special Folder->Program Files folder. 7. Select the program files folder node. Select Action->Add->folder. Type the name of the folder as "samplesetup". 8. To add the output, select Action->add->project output. Select "sample" from the drop down-list. Select primary output from the output list. 9. Click the ok button. 10. To create a shortcut on the desktop, in the details pane select primary output from sample. select action->create shortcut to primary output. Change the shortcut name. Drag the shortcut to the user's Desktop node in the left pane. 11. To add a Dialog box--open your word pad, type your license agreement and save it as License.rtf i.e in Rich Text Format (RTF). 12. In the visual Studio .net, select View->Editor->User interface. In the install section, select start. select action->add dialog. In the add dialog box select License Agreement. And move it up, just after welcome dialog box. Select the license agreement node and press F4 for properties. SElect the LicenseFile property, click the drop down arrow and click browse. The following dialog box opens: 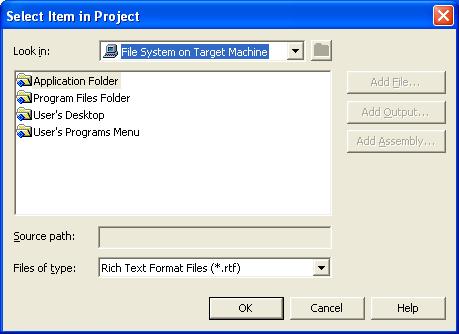 Select your "samplesetup". Click the add file and select license.rtf. and then click ok in the select item in project dialog box 13. Build your application. 14. To execute the windows installer package which we had just created, open windows explorer. Locate the setup.exe and double click it. Verify that your License agreement appears. And you get a shortcut on the desktop. Now you are ready to run your application form the deskstop icon. My desktop icon that appeared after installation. Protecting of your .Net applicationYou need to know that every .Net application or .Net custom control can be easily decompiled by using one of the many free .Net decompilers. Practically, if your user have an access to your exe or dll files, he or she also have an access to your source code. That is a problem if you sell the software and your license don't include source code. To protect all our applications and controls, Bean Software uses Spices.Net. Even if you can't afford complete suite, you should get at least their Obfuscator. This tutorial is written by pinkdamselblack. Tutorial toolbar: Tell A Friend | Add to favorites | Feedback | |