

Products
Database Search Solution (New Version) Search Control SEO Pager Highlighter Shortcut Controls Crypt Package Free ASP.NET Controls
Geotargeting Component ASP.NET Media Player Control Flash Video Player Control Services
ASP.NET Telecommute Jobs Free IP Location Lookup Test .Net Regular Expressions CSS/Table/DIV Page Layouts Custom Programming Article Sites Master List |
GridView extras - DetailsViewIntroductionThis tutorial will give you some extras like how to add a record to the data source by using the GridView, how to sort and divide your data over several pages. For the basics of the GridView class and how to use an ObjectDataSource object, please check this tutorial. The second part of this tutorial explains the use of a DetailsView. This class shows one single record in table form. It's used to give a view on all the details of any object selected by a GridView or another control (like DropDownList). Add a new recordHow to add a record by using the GridView itself ? The only 'free' space available is in the footer of the GridView. Convert all columns where you have to add text to the TemplateField and insert a fitting control to insert your data (TextBox, DropDownList, ...) and if needed Validation controls. Now add a column to place an Add button in it. Don't forget to place the CommandName property so when the button is clicked you can check on the CommandName in the RowCommand event of the GridView. If you found out the click came from your Add button, you pull the footer into a GridViewRow object. Now you can use the FindControl method which takes the ID of the control as argument, to retrieve the values you entered and create a new object. Deliver the object to the Facade class to be sure it gets inserted into the data source and reassign your DataSourceID (or rebind the ObjectDataSource to the GridView) to update your GridView. Sorting dataYou can sort the data that is returned by the ObjectDataSource when you have used the SelectMethod. When using a DataSet/DataView or DataTable you don't have to write extra code that implements the sorting. ObjectDataSource will use the Sort property of DataView and can sort ascending and descending. In case you use a generic List (or another object that implements IEnumerable) then you'll have to write the code to sort yourself. You also have to set the SortParameterName property of the ObjectDataSource. Create a new select method or alter the old one to add the SortExpression parameter to the method call. Now you can choose between two ways to implement this sorting. Either you can add an order by clause to the sql query or you can implement the IComparer which has a Compare method to compare 2 objects. public
class GebruikerComparer : IComparer<Gebruiker> To enable sorting you have to set the AllowSorting property of the GridView. Next thing to do is set the SortExpression property for each column you want to be able to sort on. This works analogue like the order by expression in sql. Without this property you're unable to sort on the column. The headertext will be changed to a link for each column on which you can sort. The following things happen when you click on the linked headertext. The GridView's sorting event is triggered and the SortExpression and SortDirection are calculated automatically. The ObjectDataSource asks all the data from the business layer and gets it sorted. The GridView's PageIndex is resetted to 0 and as last the Sorted event is triggered to confirm the sorting is completed. Paging a GridViewIf your list of data is too big to show in one single table you can choose to use paging. A fixed number of records is shown each page, together with buttons to previous and next page. Place the AllowPaging property on true and define the number of records you want to show in the PageSize property (default 10). Other useful properties are CurrentIndexPage (0-based index), PagerStyle and PagerSettings. The PagerSettings property is used for configuring the navigation buttons. You can place the Mode on Next-Previous or on Numeric, in the first mode you can change the text on the buttons and in the second mode you can define how many numbers you want to see in the PageButtonCount property. When you click on a navigation button the PageIndexChanging is triggered. The ObjectDataSource asks all data to the business layer once again (try to use caching). Thanks to the PageIndex and the PageSize properties of the record, the ObjectDataSource decides which records should be shown. There are two ways to page: automatic and custom. Every data source that implements the ICollection interface can use automatic paging. The downside is that all data is asked every time you switch page. This can be made more efficient with caching, but it isn't a good solution for very large tables. Custom paging is way faster and is implemented with a method that only returns the number of methods you need to show on that particular page. Place this method in the SelectCountMethod property of the ObjectDataSource. To complete the performance improvement, implement a stored procedure in your database to retrieve these records. Combining everything you've learned before you can generate some source like the fragment below. Some things to pay attention on: DataKeyNames (key to track which row is selected), PageSize, AllowPaging and AllowSorting in the GridView tag. Then you have a SortExpression for the first TemplateField which is used by the ObjectDataSource to sort. And the first TemplateField also has a FooterTemplate to add new records to the GridView. A skin is used to give some layout to the GridView. A last thing is the Eval() at the bottom which changes a flat email string to a mailto link. <asp:GridView
ID="grvGebruikers"
runat="server"
AutoGenerateColumns="false"
DataKeyNames="gebruikerId" GridView is very powerful control. However, in real developer life it is often better to avoid to reinvent the wheel and choose some more professional solution, like APNSoft Datagrid, to reduce your development time and get more stable code. DetailsViewA DetailsView shows one single record in a table and uses a row for every field. This makes it possible to run through all records one by one by using paging or to create Master/Detail pages where it shows the details from a record that is selected by another object (mostly GridView or DropDownList). Just like a GridView, it's possible to add, edit or remove records with the DetailsView. Setting up style for the DetailsView is analogue with the GridView. To add insert, update and delete buttons you can place the property AutoGenerateDelete/ Edit/ InsertButton on true or you can implement them in the CommandFields if you want to use your own text or image. The default mode of a DetailsView is ReadOnly. To change this you'll have to use the method ChangeMode which triggers the ModeChanging event. The ItemUpdated, ItemInserted or ItemDeleted event is triggered when an item is changed in the DetailsView. Make use of these events to implement exception handling and to refresh the GridView in case your DetailsView is linked with the GridView. The DetailsView will automatically return to the default mode being ReadOnly. In the picture below you have a possible combination of a GridView on top and a DetailsView below which shows all the details of the selected entry in the GridView. 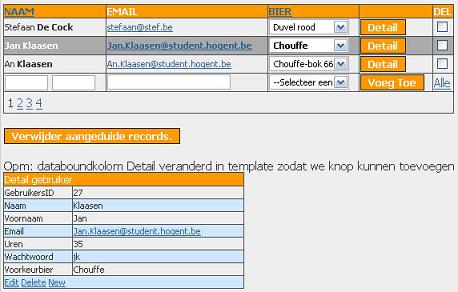 This tutorial is written by Assesino. Tutorial toolbar: Tell A Friend | Add to favorites | Feedback | Google |