

Products
Database Search Solution (New Version) Search Control SEO Pager Highlighter Shortcut Controls Crypt Package Free ASP.NET Controls
Geotargeting Component ASP.NET Media Player Control Flash Video Player Control Services
ASP.NET Telecommute Jobs Free IP Location Lookup Test .Net Regular Expressions CSS/Table/DIV Page Layouts Custom Programming Article Sites Master List |
Implementing Code Behind in ASP.NETIntroduction on C#For this tutorial you should have basic knowledge in programming with C#. Meaning you should know which Data Types you can use, what kind of operators and basic functions you can use on them and how to set up control (if/else) and iteration structures (while/for). Understanding the fundamentals of object-oriented programming is also very useful. After you started a new Web site in Visual Studio (File > New > Web Site) you can add the ASP.NET subfolder App_Code to your project by right clicking on the directory map in the Solution Explorer. All the code you place into this folder will be compiled automatically by the .NET platform. You can download sample BankAccount project, used in this tutorial. What is Object Oriented DesignOOP (Object Oriented Programming) uses 'objects' to design applications. This object is a particular instance of a class. The class defines all the possible characteristics and behaviors for his objects. To create a new class right click on the App_Code folder > Add new Item. Visual Studio will create the source file with the standard namespaces and the declaration of your class and its default constructor. 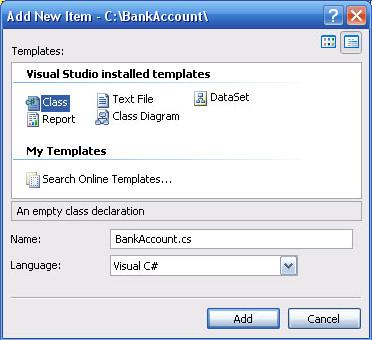 It's a nice habit to order the classes in a logical group called a namespace (also known as package in Java). It's possible to add multiple classes to a single namespace and also to use multiple namespaces in a single application. When you have to use one (or several) classes of a several namespace in another namespace you do this by adding 'using nameOfNamespace' on top of your source. A first important part of your class is the constructor. If you forget to code one yourself then C# uses the default
constructor which does nothing else than just create an empty object. If you want extra functionality you can write one or even
several constructors yourself since C# supports overloading (methods/constructors with the same name but with a different amount/type
of arguments). Classes normally have attributes (or fields) in which you can store your variables. These attributes should be kept hidden from the outer world and only be accessible by methods of the class itself (encapsulation). This can be done by declaring them private (or if really necessary protected). Where other classes use getters and setters to access these attributes from outside, C# supports Properties for this access. Nothing keeps you from writing your getters and setters yourself, but why wouldn't you use the standard functionality? Below you see the source code for a basic bank account with two constructors, private attributes and a property to change the balance of the bank account. using
System.Data; Note the #region and #endregion marks. These marks divide your code in several regions and when used properly, they'll make your code easier to read and understand. What's the use of an object if you can't do anything without it. It's time to add some methods. When you say 'bank account' then the first thing you think about is deposit and withdraw money. But it shouldn't be possible to withdraw more money then there is available on the bank account. You'll have to add a control structure to check on this constraint. public void
Deposit(decimal amount) An alternative method is to add a new Class Diagram to the App_Code folder, drag and drop a class object out of your Toolbox and enter all the details (fields, methods, properties and events) of the class in the diagram. This method might be easier for beginning programmers. But don't forget to look at the generated source, it's a nice way to learn how to code what you implemented by drag and drop. Be aware this only gives the declaration of the details, you will still have to implement the code for each method, property and event. 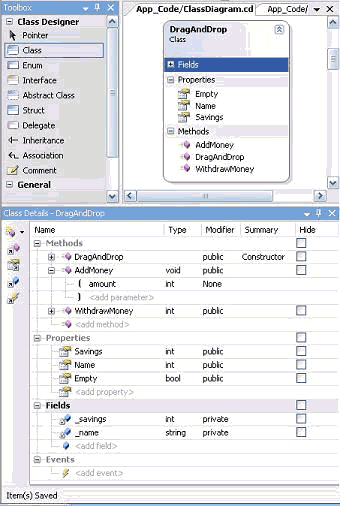 Creating a fitting user interfaceFor the basics of creating a user interface, please check How to get started. On this Web form you need some plain text, a TextBox for the accountnumber and one for the amount you want to deposit or withdraw,
a Label for the balance of the bank account and an empty Label for an error message in case you try to withdraw more money than available.
You can use a Button to create the bank account and two more buttons to deposit and withdraw. To make it look professional you can use a Panel where
you place all the bank account-specific controls in. This way you can hide these controls if the account doesn't exist yet. 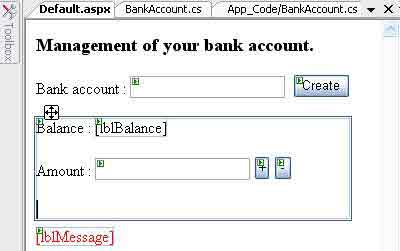 It's not visible in the design (except if you go to the property window), but in this example the ViewState of the label that gives a warning in case of wrong withdrawal is disabled. The Web Server has no possibility to 'remember' what text was assigned to the label and will generate an empty label. This will save you toggling between an empty label and the error message, since every time after you give a warning it will be emptied automatically. In the code of this Web form you can see the property EnableViewState placed on false. <asp:Label ID="lblMessage" runat="server" ForeColor="Red" EnableViewState="False"></asp:Label> Linking the interface and the code behindThe first thing you want is create a bank account with a certain accountnumber when you hit the Create-button. Double click the button to get into the source behind. Since you need access to the class BankAccount which is placed in his own namespace, you'll have to add 'using INGBank' (or your own namespace-name). Declare a private attribute of the type BankAccount in your Web form class and create a new object in the button-click event. Now you got a working bank account. You can hide the Create-button to prevent creation of another bank account and you can make all the specific controls visible at once by making the panel visible. Next thing to do is add functionality to both deposit and withdraw-buttons. To prevent duplication of code to show the current balance in the label and empty the textbox for the amount of money, you can put this code in a separate method and call this method in both deposit and withdraw events. This should be working, shouldn't it? When you run the application, you can create a new bank account and the specific controls become visible. But when you try to deposit a certain amount of money, you get an error: 'Object reference not set to an instance of an object'. This means the BankAccount-object doesn't seem to exist. How is this possible? ASP.NET 'remembers' the content of each control thanks to the ViewState, but it's unable to track objects you made this way. You'll have to transfer this knowledge yourself and one of the possible ways to do is with a Session. All the data that you link to a session is stored on the Web server and thanks to a unique UserID stored in a cookie on the client's pc the Web server is able to transfer the data from one page request to the other. This session object is destroyed with Session.Abandon (use with logout function) or after a certain time out after the last page request (default 20 mins, can be changed in Web.config). Analysis of the problem gives two results: on the first request you'll have to create the BankAccount-object and link it with the Session. On all subsequent requests (postbacks) you'll have to read the BankAccount-object from the Session and assign it before you do anything else with it. The best place to do this is in the Page_Load event since loading the page is the very first thing the Web server does. Tutorial toolbar: Tell A Friend | Add to favorites | Feedback | |