|
Products
Database Search Solution (New Version) Search Control SEO Pager Highlighter Shortcut Controls Crypt Package Free ASP.NET Controls
Geotargeting Component ASP.NET Media Player Control Flash Video Player Control Services
ASP.NET Telecommute Jobs Free IP Location Lookup Test .Net Regular Expressions CSS/Table/DIV Page Layouts Custom Programming Article Sites Master List |
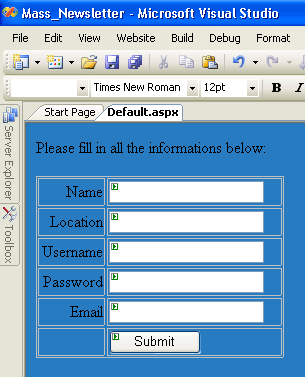
Newsletter in ASP.NET - How To Create ItThis tutorial intend to teach you how to create newsletter and send mass e-mails in ASP.Net. Because we will not send a spam e-mails to everyone, we need a registration form, so web site visitors can register to receive newsletter. First, we're going to see how to send a confirmation email, when somebody registers in a website. This is very common, suppose you want to register a new account on some online service. If you go to the registration form and fill in all the necessary data, once you submit the form, you will most probably receive an email from the company with a message saying welcome to the site, or having your personal informations such as your username, password, name, etc... This tutorial will show only basics about how to send an e-mail. Detail instructions, about how to send attachments, make HTML e-mails, possible errors etc. you can see on E-mail in ASP.NET tutorial. So to do start this Newsletter project, open up visual studio 2005, and create a new project there. Note, you can download complete Newsletter Visual Studio project, used in this tutorial. So, call your project "Mass_Newsletter". The language we're going to cover is Visual Basic, so make sure this is chosen from the Language List.Design a registration form. Usually this form will be connected to a database and the values you enter will be recorded with the database, but since we're talking about the mass email in this tutorial, we are not going to cover how to save the data in the database. Make your form similar the form in the image below:  Clearly, the sites often request more details, but this is enough informations for testing our mass-email system. ' Code starts here Make sure you add it to the very top of your page, just above the declaration of the class. ' Code
starts here This is pretty simple, at the beginning we defined a string called "theMessage" that holds the content of the email. Note that we can use html here,
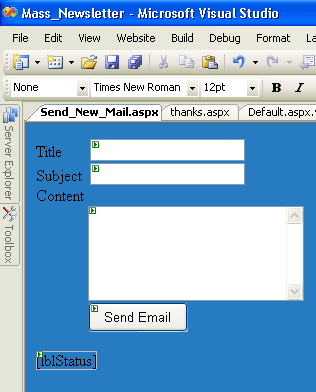
and it will be displayed correctly in the email, because we specified the "BodyFormat" to be MailFormat.Html The SmtpServer, is simply the server that we gonna use to send the email, this is usually on the form of: mail.yourwebsite.com At this moment, you should take into consideration that, the new subscriber should be saved in the database. Because later on we are going to send a newsletter email to all the users. To do that, you should add code just before sending the email method, to save the username information in a specific table, let's call it "tbl_subscribers". This project cannot be tested offline, because it needs an SMTP server, and therefore you will have to upload the project to your own server to test it out.  Now we are going to create a new page, for the administrator to send newsletter emails to all the users. The technique is quite the same, but we should consider every single user in our database. For this reason, create a new page and call it "Send_New_Mail.aspx". Design your page to be similar to the following image:  I have attached a small access database with the exercice files, that contains few records for emails of people. We will use these records to send out the newsletters
email. Then create a new function like the function below: Private
Sub SendEmails() We will call this function in a new thread, instead of simple call on button click. This is important because, when we try to send Newsletter emails, often could be a lot of subscribers, and the application might return a runtime timeout error, besides that, shared hosting timeout is usually 30 seconds, so it is better to go with scalable solution with threading, that can hold both small and large mail lists. Now double click the "Send Email" button to handle the onClick event. Add the following Code: ' Code
starts here Again, this is not gonna work offline. You should test it out on your own server. Nothing really complicated, the trick here was, to use the same method we provided above, but instead of sending the email to a specific person, we're having a
For Loop, to pass through every single email and send out that email to, besides creating the new thread at runtime. You can make this application even better. With every new facility it will look more professional. If you have strong demands but don't have time to reinvent the wheel, you can get fast results with some advanced solution, like Absolute Newsletter. I hope you enjoyed learning from this tutorial. Happy programming! This tutorial is written by Tea Maker. Tutorial toolbar: Tell A Friend | Add to favorites | Feedback | Google |

