Products
Database Search Solution (New Version) Search Control SEO Pager Highlighter Shortcut Controls Crypt Package Free ASP.NET Controls
Geotargeting Component ASP.NET Media Player Control Flash Video Player Control Services
ASP.NET Telecommute Jobs Free IP Location Lookup Test .Net Regular Expressions CSS/Table/DIV Page Layouts Custom Programming Article Sites Master List |
Build Notepad ASP.NET Web Application - part 2 of 2NoticeThis is a supplementary tutorial to 'Build Notepad Web Application - Part 1'. Please read Part 1 first. The application source code itself can be downloaded from here. The sign in processThe security related issues are waived for the purpose of maintaining a clear and smooth understanding of the problems we are originally addressing. This is the case, we will quickly skim the sign in related parts of our web application. The user is first presented with a form inside which he can enter his user name and password. The form itself is trivial but we are interested in showing you two important activities that this form performs: The dynamic creation of the database connection and the link scheme used to move to the next form. Let's start first with the link scheme by which we move from the sign in form to the main web application form (of course after a valid user name and password are entered). We simply use the Redirect method of the Response object as follows:
We will later contrast this redirection method with another one below in the friends form. Now to the more sophisticated action of creating our database connection, and the data sources dynamically. To achieve this we will need 3 objects to be defined: SqlConnection for the connection itself, SqlCommand to issue our SQL Select statement, and finally SqlDataReader to be able to receive the actual data. You can review the definition of those 3 objects in lines 7, 8, and 9 of the code snippet below. The connection string is first set in line 16 and the connection is actually open in line 22. The SQL statement we are going to execute is set in line 19 and is actually executed in line 23. An easier and more typical method of connecting to our database will be presented to you elsewhere, we just wanted to show you how to perform this dynamic connection scheme. The SQL statement in line 19 is typically written to select only the user currently signing in, but we wrote it as a general statement to show you that you can write virtually any SQL syntax compliant statement you want.
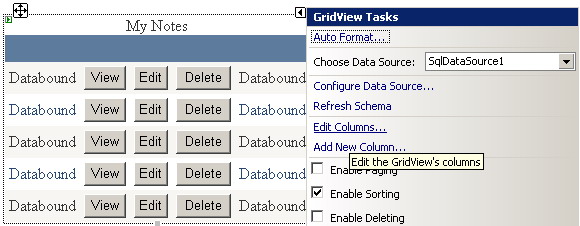
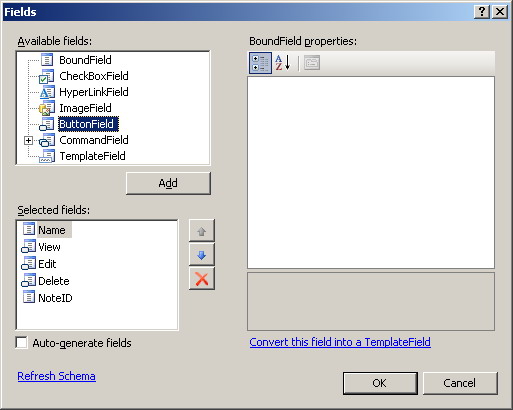
The main application boardThis is the form shown in figure 3 of Part 1. It's main purpose is to allow our end user to view and manage his notes. Let's start by the controls placed over this form. The central control of the form is a GridView control that lists the notes owned by the user currently active. We are specifically interested in it's Button Field feature. This is a new feature in ASP.NET 2.0. By using the smart tasks arrow of the GridView, you can select the Edit Columns task by which you can define your button fields. Please see figures 12 and 13. That is all you need to know to understand how we established the repetitive View, Edit, and Delete that can be seen in the front of every note on our GridView.
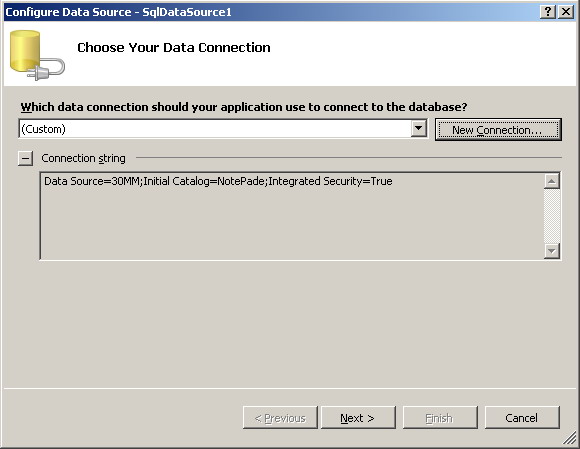
Another important aspect of the form we are currently investigating is that it implements the database connection method we promised to discuss as a typical alternative to the dynamic connection scheme presented above. This method can be easily accomplished by simply placing an SqlDataSource component from the tool box into your form. After placing this component you can use it's smart tasks arrow to configure the connection. It's this component that we use as the source of our data in this form (for example for the GridView control's data source). Please see figures 14 and 15.
Another important concept is the use of the ViewState object to save page information between multiple submissions of the same page. As you may know, some specific information about the page currently displayed is lost when the page is submitted and then re-displayed back. Particularly we mean here when a command button is clicked. In this case, you can save this valuable information in the ready to use ViewState object. For example:
And when you need to retrieve this piece of information after a page submission, you use something like this:
The friends formNow we are going to discuss a somewhat sophisticated form, which is the friends management form. As we mentioned earlier, the main purpose of this form is to give our users the ability to define their friends and to view the names of other users who have opted to include them as their friends too. More precisely, I'm as a user typically need to grant access to my files to other users (i.e., friends). In the same instance I need to know who granted me access to his files. This is exactly what we are going to implement in this form. As you can see in figure 7, our form is partitioned manly into two parts. The upper part is meant to allow our user to specify his friends, i.e., to grant / deny access to his files. A list of his friends who have access to his files is displayed where he can add to / delete from them. The list of friends is displayed inside a GridView which is implemented exactly as we described in the main application board form. Although this particular GridView contains only one Delete button per row, we are still interested to show you how to differentiate and respond properly in the case when there is more than one button. This can be achieved via the RowCommand event of the GridView. It's inside this even where you will have the CommandName member of your even argument set to the command name of the button being clicked. To test which command being clicked use something similar to line 20 in the following code:
The lower part of the form is where you can see a list of other users who granted you permission to view their notes. As usual this is a GridView list with a View button. The most interesting aspect about this GridView is how it obtains the data it displays. As many other controls this is simply achieved via an SqlDataSource component. What is interesting here is: how this component is configured? Recall that we need to display all friends who granted our user a permission to view their files. We can get this piece of information from the Friends table (Described earlier in Part 1). Two problems will face you here: The first is that the names of these friends are not in the same table (i.e., the Friends table) and this can be solved via an inner join statement (see figure 16). The second problem is that since the GridView is bound to a SqlDataSource component then we have no easy control on how to specify the exact desired user ID to which friends names are to be retrieved. This can be achieved by specifying the user ID as a parameter obtainable from the Session object (see this implemented in figure 16 as @UID in the 'Select command' and a Session("UID") in the 'Parameters' list. 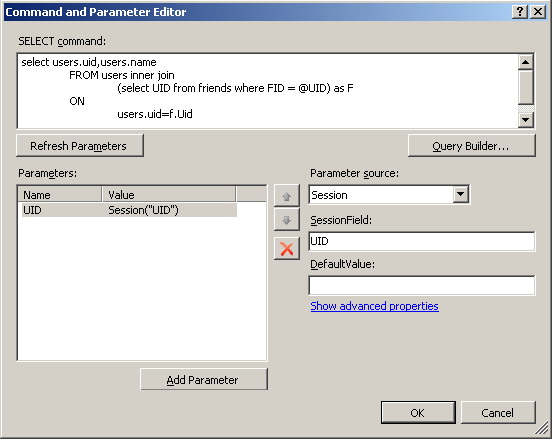 Figure 16 One last aspect is worth noting in this form. When the user clicks the View Notes button he is directed to another form inside which he can see the list of notes associated with this particular friend. The technique we used here is different from the one we used before for redirecting from a form to another. Recall that we need to display the list of notes associated with a given friend in that form. We then use a traditional Response.Redirect method but in addition to this we pass the ID of that friend as a parameter so that form can identify which friend to display notes for. Specifically see the "?FID=" in line 104 of the following code:
The Friends notes formAs we mentioned before, this form is responsible for displaying the notes of a given friend and that this friend is identified by his ID (FID) which is passed as a parameter in the URL to this form. Nothing new to be mentioned here in this form except for the use of the new ASP.NET 2.0 HiddenField component. We simply use this HiddenField component to store the ID of the friend being investigated. This is an alternative to storing it in the traditional ViewState object. For further informationSQL Inner Join was used many times in the Select commands of this tutorial. Some readers may have problems with this type of queries. A nice source from which you can get information to resolve this confusion is W3 Schools at http://www.w3schools.com/sql/sql_join.asp Tutorial toolbar: Tell A Friend | Add to favorites | Feedback | |