Home
    Shop
    Advertise
    Write For Us
    Affiliate
    Newsletter
    Contact

Working with the Wizard Control in ASP.Net 2.0

Introduction

The ASP.NET 2.0 Wizard control simplifies many of the tasks associated with building a web application. In this tutorial we will look at the basics of the Wizard Control by creating a simple data collection form and then advance to simulate an online test wizard that will be generated dynamically.


You can download the sample Wizard project related to this tutorial. 

Prerequisites

This tutorial assumes that you own a copy of Visual Studio 2005 or Visual Web Developer Express. It also assumes that you are familiar with ASP.Net 2.0 basics.

Creating the Website using Visual Studio 2005

[Top]

If you have an existing web site, you can skip this section. Otherwise, you can create a new web site and page by following these steps. To create a file system Web site:

  • Open Visual Studio 2005.
  • On the File menu, open New and click on Web Site.
    The New Web Site dialog box appears.
  • Under Visual Studio installed templates, click ASP.NET Web Site.
  • In the Location box, enter the name of the folder where you want to keep the pages of your Web site.
    For example, type the folder name C:\WebSites\mySite.
  • In the Language list, click Visual Basic (or the language you prefer to work with).
  • Click OK.
    Visual Web Developer creates the folder and a new page named Default.aspx.

Add the Wizard Control

[Top] Create a new page simpleWizard.aspx and switch to design mode. From the Standard group of the Toolbox, drag a Wizard control onto the page. This will create a wizard control with two default steps already in place. Clicking either step allows editing of text and controls displayed in that step.

Working with the Wizard Control - Basic


Now let’s edit both the predefined steps and add a completion step that shows the data submitted by the user in the first two steps. The default format of the wizard makes it hard to identify from where the content area begins. Click on the small box that appears at the upper right corner of the control to open the wizard setting menu.

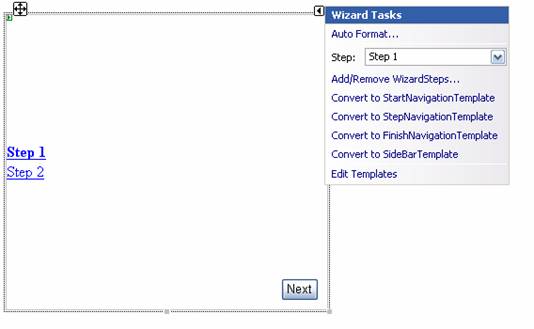
Click on Auto Format to open the Auto Format dialog box:

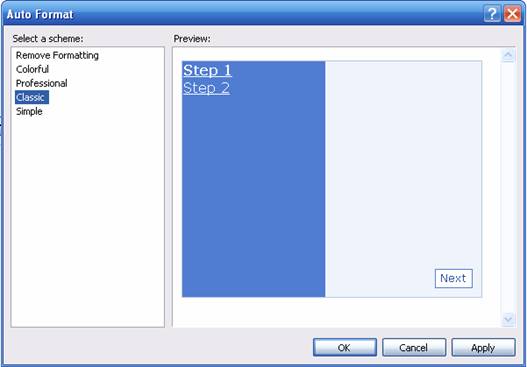
Choose a format that is likeable to you and click OK to apply the format and exit the dialog.

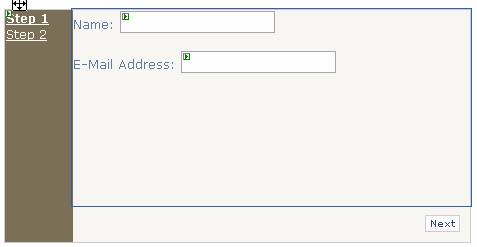
After setting the format, click the underlined Step 1 in the Wizard Control to activate the first step. Click the edit area (the area above the button) to focus on it. You can now edit the display of Step 1.

Suppose we want to get the user's name and e-mail address in this step. After clicking in the edit area, type â€~Name:'. Then drag a TextBox control onto the active area of the wizard, next to the text you just typed. Press enter, type â€~E-Mail Address:' and drag another TextBox onto the active area of the wizard next to the new text.

The end result should be something like this:

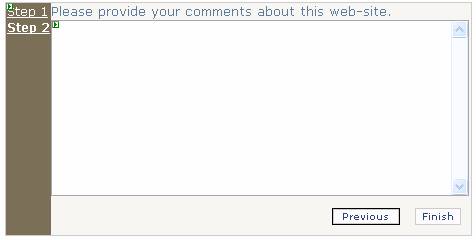
Now, let's move to the second step by clicking on Step 2 in the Wizard Control. Suppose we want the user's opinion or comments in this step. Create a step similar to the following:

Save the file.

Now we will add a completion step which will display the information the user submitted in the previous two steps.

Right-click the wizard control and click Add/Remove Wizard Steps. The WizardStep Collection Editor appears. From the Add drop-down list on the Add button, select Wizard Step. The Properties area now shows the new step. Set the title of the new step to Completed, and its StepType to Complete. Click on OK button to save and exit.

Now open the Smart Tag – by clicking on the small pictorial box located at the upper right corner of the control. In the Wizard Tasks dialog box, use the Step drop-down list to choose the Finished step. (The name in the drop-down list will be the name you gave the step when you created it, Completed in this example.)

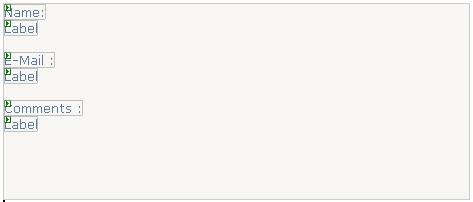
Note that the Sidebar in the Completed Step is not visible. This is to prevent navigation to other steps upon arrival to this step. Drag three labels onto the wizard control. Name the labels lblName, lblMail, and lblComments. Save the file.

This step will display the data entered by the user in the previous two steps. Using the page's Load event, we can assign the values from the first two steps to the labels in the completion step.

Protected Sub Page_Load(ByVal sender As Object, ByVal e As System.EventArgs) Handles Me.Load
        lblName.Text = txtName.Text
        lblMail.Text = txtMail.Text
        lblComments.Text = txtComments.Text
End Sub

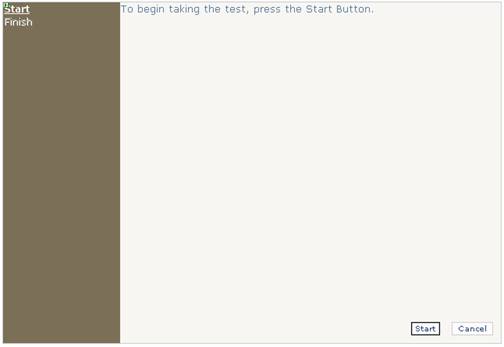
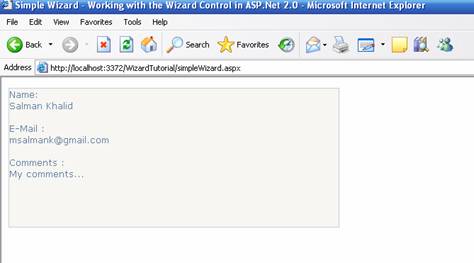
Finally, let's test our control. Press CTRL+F5 to compile and execute the application. Type in the textboxes and proceed to the completion step. (Be sure to set the active step to Step 1 before compilation, or it will set the active step for the wizard control to the final step.)

This is the expected result, (with your information of course)

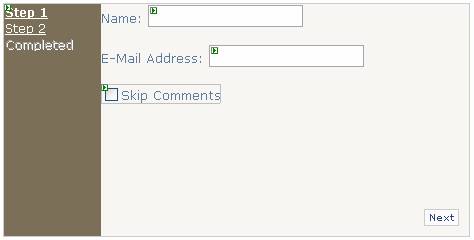
Now let us look at a little advanced scenario. Suppose we want to provide the user with the option to skip entry of comments. To do this, I am going to modify my first step and add a checkbox to the display area, as shown in the figure below:

Switch to the code, and create a method to handle the NextButtonClick event of the wizard.

Protected Sub myWizard_NextButtonClick( ByVal sender As Object , ByVal e As System.Web.UI.WebControls.WizardNavigationEventArgs) Handles myWizard.NextButtonClick

Protected Sub myWizard_NextButtonClick(ByVal sender As Object, ByVal e As System.Web.UI.WebControls.WizardNavigationEventArgs) Handles myWizard.NextButtonClick
        If myWizard.ActiveStepIndex = 0 Then
            If chkSkip.Checked Then
                'Skip the Comments Part
                myWizard.ActiveStepIndex = 2
                lblComments.Visible = False
            Else
                myWizard.ActiveStepIndex = 1
            End If
        End If
End Sub


Creating a Dynamic Test using the Wizard Control - Advanced

[Top]

In this section we will create a dynamic online test using the wizard control. The data for the test is being pulled off from an XML file.

First, let's create the XML file. Add an XML file to the project, name it testDefinition.xml. Open this file and add the following:

<?xml version="1.0" encoding="utf-8" ?>
<Definition>
  <testQuestion>
    <question>What is this tutorial about?</question>
    <a>Wizard Control</a>
    <b>GridView Control</b>
    <c>Master Content Pages</c>
    <d>ASP.Net 2.0 Skin</d>
    <ans>a</ans>
  </testQuestion>
  <testQuestion>
    <question>Which is a keyword in VB.Net?</question>
    <a>This</a>
    <b>Me</b>
    <c>Which</c>
    <d>That</d>
    <ans>b</ans>
  </testQuestion>
  <testQuestion>
    <question>.Net was introduced by?</question>
    <a>Sun Microsystems</a>
    <b>IBM</b>
    <c>Nokia</c>
    <d>Microsoft</d>
    <ans>d</ans>
  </testQuestion>
  <testQuestion>
    <question>The new upcoming version of windows is:</question>
    <a>Vista</a>
    <b>Xterior</b>
    <c>OSX</c>
    <d>Windows X</d>
    <ans>a</ans>
  </testQuestion>
</Definition>

Create a new page, dynamicWizard.aspx and add a Wizard Control to it, myTest. I removed the predefined two steps and added two steps of my own. The first step's StepType property is set to Start and the second step's StepType property is set to Complete.

For the completion step, I have added a label, lblResult, to it that will display the result at the end of the test.

Now switch to code-behind and add the following piece of code:


Protected Sub myTest_SidebarNavigation(ByVal sender As Object, ByVal e As System.Web.UI.WebControls.WizardNavigationEventArgs) Handles myTest.SideBarButtonClick
        e.Cancel = True
End Sub

This will ensure that the user can not navigate using the Side Bar. This will be useful in displaying to the user the no. of questions in the test…

Now, we create a method to handle the Wizard Init method.

Private Sub test(ByVal sender As Object, ByVal e As System.EventArgs) Handles myTest.Init
        Dim myXml As New XmlDocument
        myXml.Load(Server.MapPath("~") + "\testDefinition.xml")
        'We've got the XML file loaded successfuly...
        Dim myNode As XmlNode = myXml.DocumentElement
        Dim myCounter As Integer = 1
        For Each tempNode As XmlNode In myNode.ChildNodes
            If tempNode.Name.ToLower = "testquestion" Then
                Dim question As String = ""
                Dim a As String = ""
                Dim b As String = ""
                Dim c As String = ""
                Dim d As String = ""
                Dim ans As String = ""
                For Each innerNode As XmlNode In tempNode.ChildNodes
                    If innerNode.Name.ToLower = "question" Then
                        question = innerNode.InnerText.Trim()
                    ElseIf innerNode.Name.ToLower = "a" Then
                        a = innerNode.InnerText.Trim()
                    ElseIf innerNode.Name.ToLower = "b" Then
                        b = innerNode.InnerText.Trim()
                    ElseIf innerNode.Name.ToLower = "c" Then
                        c = innerNode.InnerText.Trim()
                    ElseIf innerNode.Name.ToLower = "d" Then
                        d = innerNode.InnerText.Trim()
                    ElseIf innerNode.Name.ToLower = "ans" Then
                        ans = innerNode.InnerText.Trim()
                    End If
                Next
                'Create a new Wizard Step...
                Dim tempObject As New System.Web.UI.WebControls.WizardStep
                'Do not allow return to previous step.
                tempObject.AllowReturn = False
                Dim lblQuestion As Label = New Label
                lblQuestion.Text = question
                Dim lblInstructions As New Label
                lblInstructions.Font.Underline = True
                lblInstructions.Font.Bold = True
                lblInstructions.Text = "Select the correct answer."
                Dim selectionControl As New RadioButtonList
                selectionControl.Items.Add(a)
                If ans.CompareTo("a") = 0 Then
                    selectionControl.Items(0).Value = "1"
                Else
                    selectionControl.Items(0).Value = "0"
                End If
                selectionControl.Items.Add(b)
                If ans.CompareTo("b") = 0 Then
                    selectionControl.Items(1).Value = "1"
                Else
                    selectionControl.Items(1).Value = "0"
                End If
                selectionControl.Items.Add(c)
                If ans.CompareTo("c") = 0 Then
                    selectionControl.Items(2).Value = "1"
                Else
                    selectionControl.Items(2).Value = "0"
                End If
                selectionControl.Items.Add(d)
                If ans.CompareTo("d") = 0 Then
                    selectionControl.Items(3).Value = "1"
                Else
                    selectionControl.Items(3).Value = "0"
                End If
                'Create a line break literal.
                'This is required to add a new line or line break.
                Dim lineBreak As New Literal
                lineBreak.Text = "<br />"
                'Now start adding the controls to the wizard step, one by one.
                tempObject.Controls.AddAt(0, lblInstructions)
                tempObject.Controls.AddAt(1, lineBreak)
                lineBreak = New Literal
                lineBreak.Text = "<br />"
                tempObject.Controls.AddAt(2, lineBreak)
                tempObject.Controls.AddAt(3, lblQuestion)
                lineBreak = New Literal
                lineBreak.Text = "<br />"
                tempObject.Controls.AddAt(4, lineBreak)
                lineBreak = New Literal
                lineBreak.Text = "<br />"
                tempObject.Controls.Add(lineBreak)
                tempObject.Controls.AddAt(5, selectionControl)
                tempObject.Title = "Question # " + myCounter.ToString
                tempObject.StepType = WizardStepType.Step
                tempObject.AllowReturn = False
                'Add the step to the Wizard Control.
                'Note that we are starting insertion from index 1 instead of 0,
                'this is because we want to insert our steps after the Start Step.
                myTest.WizardSteps.AddAt(myCounter, tempObject)
                myCounter = myCounter + 1
            End If
        Next
End Sub


After creating and adding the steps to the wizard control, we need to create another method to handle the NextButtonClick event.


Protected Sub myTest_StepChanging(ByVal sender As Object, ByVal e As System.Web.UI.WebControls.WizardNavigationEventArgs) Handles myTest.NextButtonClick
        Try
            Dim answer As String = CType(myTest.ActiveStep.Controls(5), RadioButtonList).SelectedValue
            answer = answer.Trim
            If answer.Length = 0 Then
                answer = "0"
            End If
            If Session("userAnswers") = Nothing Then
                Session("userAnswers") = ""
            End If
            answer = Session("userAnswers").ToString + "," + answer
            answer = answer.Trim(" ", ",")
            Session("userAnswers") = answer
            Dim tempArr As String() = answer.Split(",")
            Dim wrongAnswers As Integer = 0
            Dim correctAnswers As Integer = 0
            For Each temp As String In tempArr
                If temp.CompareTo("0") = 0 Then
                    wrongAnswers = wrongAnswers + 1
                Else
                    correctAnswers = correctAnswers + 1
                End If
            Next
            lblResult.Text = "You took " + (wrongAnswers + correctAnswers).ToString()
            lblResult.Text = lblResult.Text + " questions and answered " + correctAnswers.ToString() + " correctly."
        Catch ex As Exception
        End Try
    End Sub

As can be seen in the code, a session has been declared to store scoring. A label or some other control can also be used for this purpose too. On each answer, the result is updated automatically, displaying to the user the result to his test on completion.

Hit CTRL+F5 on your keyboard and run the application.

Note : This implementation does not take care of the Browser Back Button. So if the user presses the back button, it will go to the previous page, i.e. going to the previous wizard control. To avoid this you can declare a session variable to record the previous page. If the current page is equal to the previous page index of less than that, it simply means that the Back button was in use, so throw an error.


And all things must come to the end

[Top]

The main emphasis in this article was on ASP.Net 2.0 Wizard Control. There are many options left unturned. Take your time to go through the article code and modify it to experience the Wizard control to its extent. I hope you found this article interesting and informative. I am open for suggestions and remarks, both negative and positive. Feel free to contact me at salman@premierpos.com .


Tutorial toolbar:  Tell A Friend  |  Add to favorites  |  Feedback  |